주요 콘텐츠로 건너뛰기

Sony Vaio Pro 13 Trackpad Replacement

필요한 것

  1. Sony Vaio Pro 13 Trackpad Replacement, Bottom Cover: 1 단계, 이미지 1/2 Sony Vaio Pro 13 Trackpad Replacement, Bottom Cover: 1 단계, 이미지 2/2
    • Remove cover for the extended battery connector. Use your finger nail or a plastic opening tool to remove it.

    • Remove the two rubber feet at the back of the computer, these can be removed in the same way.

  2. Sony Vaio Pro 13 Trackpad Replacement: 2 단계, 이미지 1/2 Sony Vaio Pro 13 Trackpad Replacement: 2 단계, 이미지 2/2
    • Remove the four 5.6mm Philips #00 screws located at the top of the computer.

    • Remove the eight 3.6mm Philips #00 screws on the base of the computer.

  3. Sony Vaio Pro 13 Trackpad Replacement: 3 단계, 이미지 1/2 Sony Vaio Pro 13 Trackpad Replacement: 3 단계, 이미지 2/2
    • Using a plastic opening tool, pry the plastic casing away from the base of the computer, the remaining clips around the edges can be released using your hands.

    • Leave the side with the USB and audio port until last, then slide the case out and off, so the audio port doesn't get caught.

  4. Sony Vaio Pro 13 Trackpad Replacement, Internal Battery: 4 단계, 이미지 1/1
    • Once the bottom cover is removed, peel away the piece of tape located near the fan and heat sink assembly.

  5. Sony Vaio Pro 13 Trackpad Replacement: 5 단계, 이미지 1/2 Sony Vaio Pro 13 Trackpad Replacement: 5 단계, 이미지 2/2
    • Remove the three 4.2mm Philips #0 screws located at the top of the battery.

    • Simply lift the battery away from the computer.

  6. Sony Vaio Pro 13 Trackpad Replacement, Trackpad: 6 단계, 이미지 1/2 Sony Vaio Pro 13 Trackpad Replacement, Trackpad: 6 단계, 이미지 2/2
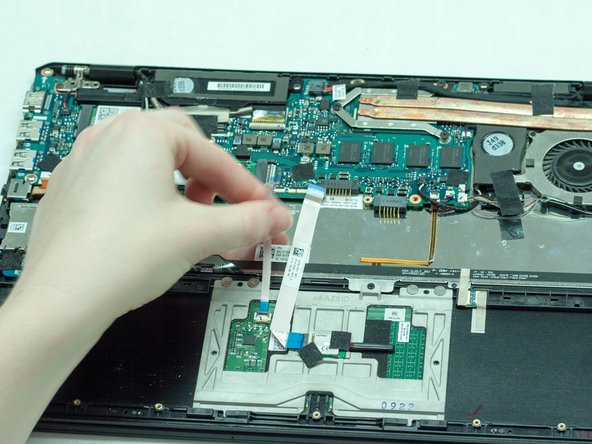
    • Use the nylon spudger to lift up on both of the white wire strips.

    • Then use your fingers to lift them up.

  7. Sony Vaio Pro 13 Trackpad Replacement: 7 단계, 이미지 1/2 Sony Vaio Pro 13 Trackpad Replacement: 7 단계, 이미지 2/2
    • Using the Phillips head screwdriver, remove the four screws holding the track pad in.

    • Use the Phillips head again and remove the final black screw.

  8. Sony Vaio Pro 13 Trackpad Replacement: 8 단계, 이미지 1/2 Sony Vaio Pro 13 Trackpad Replacement: 8 단계, 이미지 2/2
    • Finally, remove the track pad from the computer.

결론

To reassemble your device, follow these instructions in reverse order.

다른 한 분이 해당 안내서를 완성하였습니다.

Alex R

회원 가입일: 01/29/16

1,005 평판

안내서 5개 작성하였습니다

댓글 한 개

I still have my old Sony Vaio pro, the track pad has been sticky recently and I've used this guide to take it apart and clean it. Very very helpful!! Happy to put off buying a new laptop for a bit longer, thank you :)

Emily Sabin - 답글

댓글 쓰기

조회 통계:

24 시간 전: 0

7일 전: 4

30일 전: 9

전체 시간: 3,824