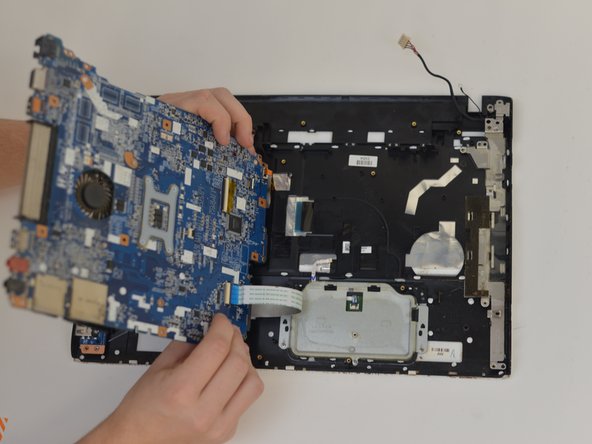
주요 콘텐츠로 건너뛰기

Sony Vaio SVE151G11L Motherboard Replacement

필요한 것

  1. Sony Vaio SVE151G11L Motherboard Replacement, Battery: 1 단계, 이미지 1/1
    • Turn the laptop over so its underside is facing upwards and visible.

  2. Sony Vaio SVE151G11L Motherboard Replacement: 2 단계, 이미지 1/1
    • Standing so that the barcode and warning labels are upright and legible, push the left tab up and away from yourself.

  3. Sony Vaio SVE151G11L Motherboard Replacement: 3 단계, 이미지 1/1
    • Standing so that the barcode and warning labels are upright and legible, push the right tab up and away from yourself.

  4. Sony Vaio SVE151G11L Motherboard Replacement: 4 단계, 이미지 1/1
    • Locate the small gap where the battery and the laptop shell meet. Lift from the gap and rotate the battery up and away from yourself.

  5. Sony Vaio SVE151G11L Motherboard Replacement: 5 단계, 이미지 1/1
    • Pull battery away from laptop.

  6. Sony Vaio SVE151G11L Motherboard Replacement, Hard Disk Drive: 6 단계, 이미지 1/1
    • Flip laptop over so the bottom is facing upwards.

  7. Sony Vaio SVE151G11L Motherboard Replacement: 7 단계, 이미지 1/1
    • Remove 2 bottom screws in the top right on the HDD cover, with a size P000 screwdriver.

  8. Sony Vaio SVE151G11L Motherboard Replacement: 8 단계, 이미지 1/2 Sony Vaio SVE151G11L Motherboard Replacement: 8 단계, 이미지 2/2
    • Pop open the cover to the HDD.

  9. Sony Vaio SVE151G11L Motherboard Replacement: 9 단계, 이미지 1/1
    • Remove the screws on the HDD with a Phillips #000 screwdriver.

  10. Sony Vaio SVE151G11L Motherboard Replacement: 10 단계, 이미지 1/2 Sony Vaio SVE151G11L Motherboard Replacement: 10 단계, 이미지 2/2
    • Pull plastic tab away from the laptop.

    • Lift HDD away from laptop.

  11. Sony Vaio SVE151G11L Motherboard Replacement, Motherboard: 11 단계, 이미지 1/1
    • Flip the laptop over on its backside.

  12. Sony Vaio SVE151G11L Motherboard Replacement: 12 단계, 이미지 1/1
    • Remove the screws holding the motherboard in place.

  13. Sony Vaio SVE151G11L Motherboard Replacement: 13 단계, 이미지 1/2 Sony Vaio SVE151G11L Motherboard Replacement: 13 단계, 이미지 2/2
    • Pop the motherboard away from the frame.

  14. Sony Vaio SVE151G11L Motherboard Replacement: 14 단계, 이미지 1/1
    • Remove the ribbon cable from the motherboard.

  15. Sony Vaio SVE151G11L Motherboard Replacement: 15 단계, 이미지 1/2 Sony Vaio SVE151G11L Motherboard Replacement: 15 단계, 이미지 2/2
    • Remove motherboard from the laptop.

결론

To reassemble your device, follow these instructions in reverse order.

다른 2명이 해당 안내서를 완성하였습니다.

Alex Theg

회원 가입일: 10/15/18

758 평판

안내서 4개 작성하였습니다

UMass Dartmouth, Team S9-G9, Valliere Fall 2018 UMass Dartmouth, Team S9-G9, Valliere Fall 2018 회원

UMASSD-VALLIERE-F18S9G9

4 회원들

안내서 12개 작성하였습니다

댓글 0개

댓글 쓰기

조회 통계:

24 시간 전: 2

7일 전: 9

30일 전: 26

전체 시간: 1,696