주요 콘텐츠로 건너뛰기

Sony Vaio Tap 11 Internal Speakers Replacement

필요한 것

  1. Sony Vaio Tap 11 Internal Speakers Replacement, Screen Assembly: 1 단계, 이미지 1/1
    • Begin by opening the HDMI/USB port cover on the left edge.

    • Remove the three #000 headed, 3 mm long screws located underneath the port cover.

  2. Sony Vaio Tap 11 Internal Speakers Replacement: 2 단계, 이미지 1/1
    • Locate and open the Micro SD slot on the top side of the device.

    • Remove the two screws located beneath the cover.

  3. Sony Vaio Tap 11 Internal Speakers Replacement: 3 단계, 이미지 1/2 Sony Vaio Tap 11 Internal Speakers Replacement: 3 단계, 이미지 2/2
    • Attach the suction cup to the top right area of the screen.

    • Pull to separate the screen from the rest of the device.

    • Be aware of the front camera cable that is still connected to the rest of the device.

    • Detach the display ribbon cable.

  4. Sony Vaio Tap 11 Internal Speakers Replacement, Battery: 4 단계, 이미지 1/1
    • Disconnect the battery from the motherboard by pulling out the cable below the fan.

  5. Sony Vaio Tap 11 Internal Speakers Replacement: 5 단계, 이미지 1/1
    • Remove the seven 3 mm Phillips #000 screws that hold the battery in place.

    • Carefully remove the battery from the back assembly.

  6. Sony Vaio Tap 11 Internal Speakers Replacement, Motherboard: 6 단계, 이미지 1/1
    • Remove the nine 3 mm Phillips #000 screws holding in the motherboard.

  7. Sony Vaio Tap 11 Internal Speakers Replacement: 7 단계, 이미지 1/1
    • Remove the black plastic dust shield by gently pulling it up.

    • You'll want to keep the sticky side up so you can replace it when reassembling. This part also functions as a shield for the sensitive camera component!

  8. Sony Vaio Tap 11 Internal Speakers Replacement: 8 단계, 이미지 1/3 Sony Vaio Tap 11 Internal Speakers Replacement: 8 단계, 이미지 2/3 Sony Vaio Tap 11 Internal Speakers Replacement: 8 단계, 이미지 3/3
    • Before removing the motherboard, there are a few cables to disconnect.

    • Disconnect the cable connected to the top of the display.

    • Disconnect the power jack connector on the left side of the screen.

    • Disconnect the daughterboard connector located above and to the right of the WiFi chip slot.

  9. Sony Vaio Tap 11 Internal Speakers Replacement: 9 단계, 이미지 1/2 Sony Vaio Tap 11 Internal Speakers Replacement: 9 단계, 이미지 2/2
    • Gently pull the motherboard out by pulling from the right side of the board and flip it so that the motherboard now sits where the battery was and the underside is now visible.

    • There is still one cable to remove!

    • Remove the speaker connector located next to the SSD slot.

    • You may now remove the motherboard from the device.

  10. Sony Vaio Tap 11 Internal Speakers Replacement, Internal Speakers: 10 단계, 이미지 1/1
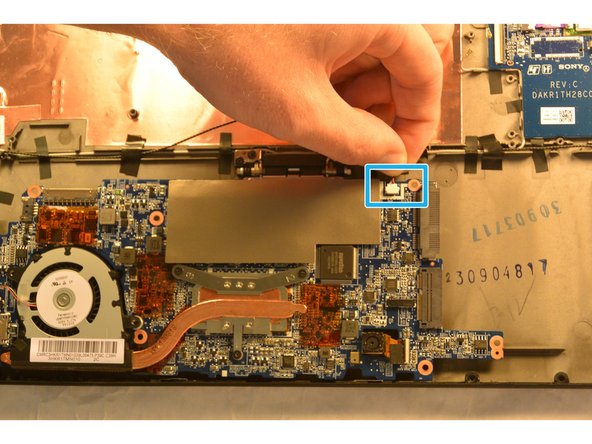
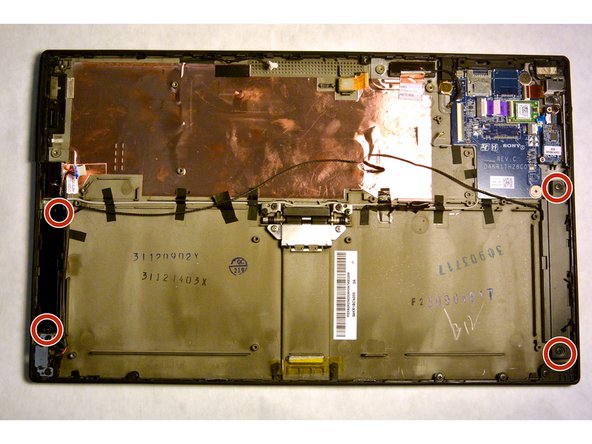
    • Remove the four 3 mm Phillips #000 screws from the upper and lower ends of each speaker module.

  11. Sony Vaio Tap 11 Internal Speakers Replacement: 11 단계, 이미지 1/2 Sony Vaio Tap 11 Internal Speakers Replacement: 11 단계, 이미지 2/2
    • Once the speakers are loose, follow the wires and remove any tape holding them to the assembly.

    • The speaker connector should have been disconnected in the motherboard prerequisite.

    • The speaker wiring and assembly should now be completely free to remove from the tablet assembly.

결론

To reassemble your device, follow these instructions in reverse order.

다른 한 분이 해당 안내서를 완성하였습니다.

Kevin

회원 가입일: 09/16/15

258 평판

안내서 2개 작성하였습니다

IUPUI, Team 1-2, Harley Fall 2015 IUPUI, Team 1-2, Harley Fall 2015 회원

IUPUI-HARLEY-F15S1G2

4 회원들

안내서 20개 작성하였습니다

댓글 한 개

If the speakers are burned and not working what is the type/model/part number of them which I must know to buy new ones?

harkarag - 답글

댓글 쓰기

조회 통계:

24 시간 전: 0

7일 전: 1

30일 전: 1

전체 시간: 1,311