주요 콘텐츠로 건너뛰기

Sony Vaio VGN-SZ120P Optical Drive Replacement

필요한 것

  1. Sony Vaio VGN-SZ120P Optical Drive Replacement, Battery: 1 단계, 이미지 1개 중 1개
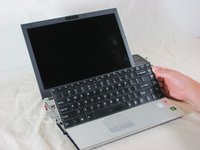
    • Set the computer display-side down.

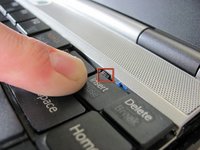
    • Unlock the battery by sliding the port-side latch to the 'unlock' position.

  2. Sony Vaio VGN-SZ120P Optical Drive Replacement: 2 단계, 이미지 1개 중 1개
    • On the opposite side of the battery, press the release latch and slide the battery away from the main body to remove.

  3. Sony Vaio VGN-SZ120P Optical Drive Replacement, Keyboard: 3 단계, 이미지 1개 중 1개
    • Ignore the removal of the heat sink and memory panels as depicted. They do not need to be removed for the completion of this guide.

    • Remove the Torx security screw near the center of the battery-side edge.

  4. Sony Vaio VGN-SZ120P Optical Drive Replacement: 4 단계, 이미지 2개 중 1개 Sony Vaio VGN-SZ120P Optical Drive Replacement: 4 단계, 이미지 2개 중 2개
    • Press the tabs on each side of the display-side of the keyboard with the flat edge of a spudger.

    • Pull the keyboard toward the mouse pad and gently lift up.

  5. Sony Vaio VGN-SZ120P Optical Drive Replacement: 5 단계, 이미지 2개 중 1개 Sony Vaio VGN-SZ120P Optical Drive Replacement: 5 단계, 이미지 2개 중 2개
    • The keyboard is still attached by ribbon cable, don't try to remove the keyboard entirely yet.

    • Disconnect the ribbon cable by pressing the tabs on either side of the connector. Pull the cable out parallel to the connector.

    • Remove the keyboard.

  6. Sony Vaio VGN-SZ120P Optical Drive Replacement, Mouse Assembly: 6 단계, 이미지 1개 중 1개
    • Turn the laptop upside down.

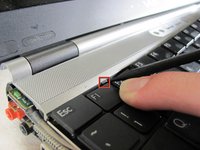
    • Remove the three screws from the front mouse panel located on the bottom of the laptop.

    • Carefully flip the laptop back over. Remove three more screws from the top securing the panel. A ribbon cable will still be attached to the panel when you remove it.

  7. Sony Vaio VGN-SZ120P Optical Drive Replacement: 7 단계, 이미지 2개 중 1개 Sony Vaio VGN-SZ120P Optical Drive Replacement: 7 단계, 이미지 2개 중 2개
    • Lift the mouse assembly just enough to access the connecting ribbon cable.

    • Lift the ribbon cable lock to remove the cable.

    • Carefully remove the mouse panel assembly and set aside.

  8. Sony Vaio VGN-SZ120P Optical Drive Replacement, Optical Drive: 8 단계, 이미지 1개 중 1개
    • Remove the securing screw on the bottom left of the optical drive.

  9. Sony Vaio VGN-SZ120P Optical Drive Replacement: 9 단계, 이미지 1개 중 1개
    • Carefully slide the optical drive out right.

    • The IDE connector on the left will pop out.

결론

To reassemble your device, follow these instructions in reverse order.

다른 5명이 해당 안내서를 완성하였습니다.

작성자

7다른 기여자 명과 함께

David Hoyt

회원 가입일: 04/09/10

4,053 평판

안내서 41개를 작성함

Cal Poly, Team 25-89, Amido Spring 2010 Cal Poly, Team 25-89, Amido Spring 2010 회원

CPSU-AMIDO-S10S25G89

4 회원들

안내서 61개를 작성함

0가이드 댓글

댓글 쓰기

조회 통계:

지난 24시간: 1

지난 7일: 3

지난 30일: 10

전체 시간: 5,524