주요 콘텐츠로 건너뛰기

Sony Vaio VPCW21FX RAM Replacement

필요한 것

  1. Sony Vaio VPCW21FX RAM Replacement, Battery: 1 단계, 이미지 1/3 Sony Vaio VPCW21FX RAM Replacement, Battery: 1 단계, 이미지 2/3 Sony Vaio VPCW21FX RAM Replacement, Battery: 1 단계, 이미지 3/3
    • Be sure to disconnect the device charger and power down the device before beginning.

    • Turn the device over onto its back, where the battery is at the top of the device. Slide the "lock" switch to the right.

  2. Sony Vaio VPCW21FX RAM Replacement: 2 단계, 이미지 1/3 Sony Vaio VPCW21FX RAM Replacement: 2 단계, 이미지 2/3 Sony Vaio VPCW21FX RAM Replacement: 2 단계, 이미지 3/3
    • Slide the "release" switch to the left and gently lift the battery up to remove it.

    • Completely remove the battery from the device.

  3. Sony Vaio VPCW21FX RAM Replacement, RAM: 3 단계, 이미지 1/3 Sony Vaio VPCW21FX RAM Replacement, RAM: 3 단계, 이미지 2/3 Sony Vaio VPCW21FX RAM Replacement, RAM: 3 단계, 이미지 3/3
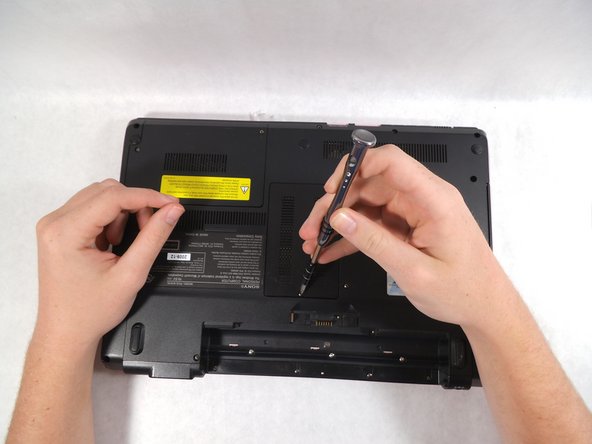
    • Loosen but do not remove the screw over RAM cover panel.

    • With the screw loosened but not removed, lift up and remove the panel.

  4. Sony Vaio VPCW21FX RAM Replacement: 4 단계, 이미지 1/3 Sony Vaio VPCW21FX RAM Replacement: 4 단계, 이미지 2/3 Sony Vaio VPCW21FX RAM Replacement: 4 단계, 이미지 3/3
    • Locate the mounting bracket holding the RAM Chips in the computer.

    • Pull silver tabs away from the chip.

    • The chip will pop up, this is normal.

    • Don't touch gold pins on RAM chip.

  5. Sony Vaio VPCW21FX RAM Replacement: 5 단계, 이미지 1/2 Sony Vaio VPCW21FX RAM Replacement: 5 단계, 이미지 2/2
    • Slide RAM chip out by holding the sides of the chip and pull away from the computer.

    • Repeat previous steps for second RAM chip.

결론

To reassemble your device, follow these instructions in reverse order.

Nicholas Corcoran

회원 가입일: 03/08/17

401 평판

안내서 4개 작성하였습니다

UMass Dartmouth, Team S2-G5, Isaacson Spring 2017 UMass Dartmouth, Team S2-G5, Isaacson Spring 2017 회원

UMASSD-ISAACSON-S17S2G5

2 회원들

안내서 4개 작성하였습니다

댓글 0개

댓글 쓰기

조회 통계:

24 시간 전: 0

7일 전: 12

30일 전: 25

전체 시간: 3,284