주요 콘텐츠로 건너뛰기

Sony Walkman WM-AF48 Headphone Jack Replacement

필요한 것

  1. Sony Walkman WM-AF48 Headphone Jack Replacement, Getting started: 1 단계, 이미지 1/1
    • Remove any batteries or cassettes from the Walkman.

  2. Sony Walkman WM-AF48 Headphone Jack Replacement, Remove the outer cover: 2 단계, 이미지 1/3 Sony Walkman WM-AF48 Headphone Jack Replacement, Remove the outer cover: 2 단계, 이미지 2/3 Sony Walkman WM-AF48 Headphone Jack Replacement, Remove the outer cover: 2 단계, 이미지 3/3
    • Using a spudger, separate the back cover from the front.

    • Remove the back cover evenly on all sides. The best method is to insert the spudger and gently twist it slightly to separate the two parts, slowly working your way around the entire outer shell.

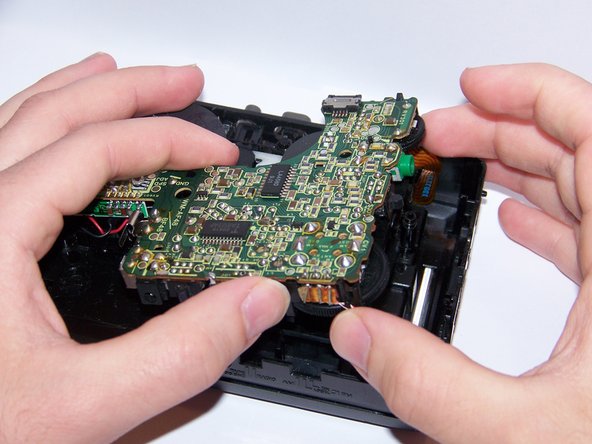
  3. Sony Walkman WM-AF48 Headphone Jack Replacement, Remove the motherboard: 3 단계, 이미지 1/2 Sony Walkman WM-AF48 Headphone Jack Replacement, Remove the motherboard: 3 단계, 이미지 2/2
    • Gently pull the ribbon from the jack just above the film revolver, near the edge.

    • Carefully lift the motherboard out of the outer shell.

    • Be careful to only handle the motherboard by the edges. Avoid touching the metal parts.

  4. Sony Walkman WM-AF48 Headphone Jack Replacement, Remove the headphone jack: 4 단계, 이미지 1/1
    • Locate the four metal points on the motherboard that hold the headphone jack in place.

    • Using a soldering iron, remove the headphone jack by de-soldering the four points that hold it in place.

결론

To reassemble your device, follow these instructions in reverse order.

다른 7명이 해당 안내서를 완성하였습니다.

Wilson Riforgiat

회원 가입일: 09/11/14

924 평판

안내서 4개 작성하였습니다

USF Sarasota-Manatee, Team 1-4, Stewart Fall 2014 USF Sarasota-Manatee, Team 1-4, Stewart Fall 2014 회원

USFSM-STEWART-F14S1G4

4 회원들

안내서 19개 작성하였습니다

댓글 0개

댓글 쓰기

조회 통계:

24 시간 전: 3

7일 전: 12

30일 전: 31

전체 시간: 5,528