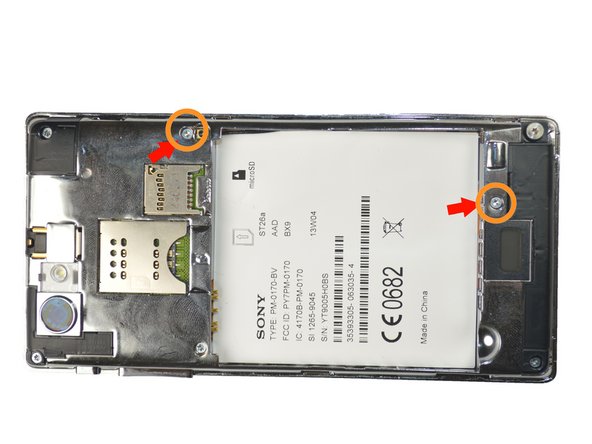
주요 콘텐츠로 건너뛰기

Sony Xperia J Volume/Lock Buttons Replacement

필요한 것

  1. Sony Xperia J Volume/Lock Buttons Replacement, External Features: 1 단계, 이미지 1/1
    • You will need a Torx T5 screwdriver, plastic opening tool, and a pincet for this operation.

  2. Sony Xperia J Volume/Lock Buttons Replacement: 2 단계, 이미지 1/1
    • Find the little bracket on the bottom left of the phone (when looking at it upside down) and use the opening tool to pry off the back cover.

  3. Sony Xperia J Volume/Lock Buttons Replacement: 3 단계, 이미지 1/1
    • Remove the silicone cover by squeezing it with the tweezers, there is not much pressure needed.

  4. Sony Xperia J Volume/Lock Buttons Replacement: 4 단계, 이미지 1/3 Sony Xperia J Volume/Lock Buttons Replacement: 4 단계, 이미지 2/3 Sony Xperia J Volume/Lock Buttons Replacement: 4 단계, 이미지 3/3
    • Using the Torx T5 screwdriver remove the four 4.74mm screws.

    • Then remove the two 3.13mm screws

    • Lastly remove 5.90mm screw.

  5. Sony Xperia J Volume/Lock Buttons Replacement: 5 단계, 이미지 1/3 Sony Xperia J Volume/Lock Buttons Replacement: 5 단계, 이미지 2/3 Sony Xperia J Volume/Lock Buttons Replacement: 5 단계, 이미지 3/3
    • Using the tweezers remove the black plate at the bottom of the phone. First insert the tweezers tip at the intersection between the black plate and phone, then just pull the plate up.

    • Repeat the same steps to remove the black plates located at the top left, and top right of the phone.

  6. Sony Xperia J Volume/Lock Buttons Replacement: 6 단계, 이미지 1/1
    • After removing the top left black plate, you will find another 3.13mm screw. Just remove it by using the screwdriver.

  7. Sony Xperia J Volume/Lock Buttons Replacement: 7 단계, 이미지 1/1
    • Place the plastic opening tool in-between the black external case of the phone and the silver case, then move it along the edges of the phone to detach the plates.

  8. Sony Xperia J Volume/Lock Buttons Replacement, Volume/Lock Buttons: 8 단계, 이미지 1/2 Sony Xperia J Volume/Lock Buttons Replacement, Volume/Lock Buttons: 8 단계, 이미지 2/2
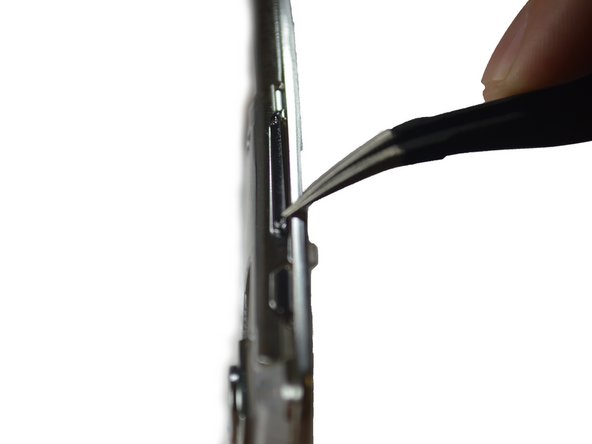
    • Grabbing the silver plate you just removed, locate the volume and lock switch on the upper right of it.

    • Using the tweezers, unclip the two silicone gel clips located at the ends of the keys.

    • Once the buttons are uncliped, push the keys from the outside to the inside.(As in the second picture)

결론

To reassemble your device, follow these instructions in reverse order.

다른 한 분이 해당 안내서를 완성하였습니다.

Arlind

회원 가입일: 01/21/15

899 평판

안내서 5개 작성하였습니다

USF Tampa, Team 4-3, Brown Winter 2015 USF Tampa, Team 4-3, Brown Winter 2015 회원

USFT-BROWN-W15S4G3

3 회원들

안내서 6개 작성하였습니다

댓글 0개

댓글 쓰기

조회 통계:

24 시간 전: 0

7일 전: 0

30일 전: 3

전체 시간: 717