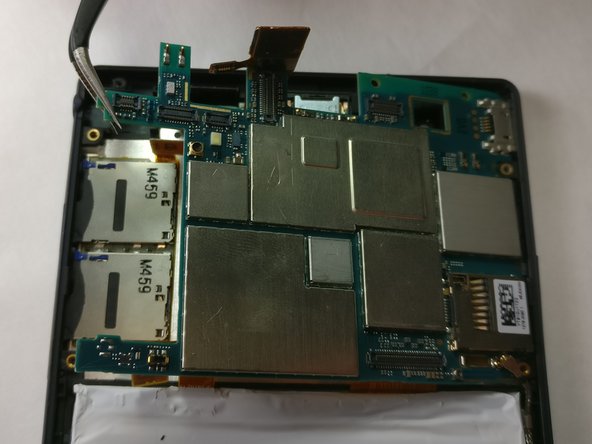
주요 콘텐츠로 건너뛰기

Sony Xperia T2 Ultra Dual Motherboard Replacement

필요한 것

  1. Sony Xperia T2 Ultra Dual Motherboard Replacement, Rear Case: 1 단계, 이미지 1/1
    • Using the spudger, pry open the back cover by starting alongside the edge of the back cover.

  2. Sony Xperia T2 Ultra Dual Motherboard Replacement: 2 단계, 이미지 1/1
    • Once the part of the back cover has been opened up. Slide the spudger to pry completely detach the cover from the phone.

  3. Sony Xperia T2 Ultra Dual Motherboard Replacement, Removing the internal cover: 3 단계, 이미지 1/1
    • Using the Phillips #00 Precision screwdriver, take out 8 silver screws (3.15mm) and 5 gold screws (3.9mm) for a total of all the screws attached to the flat plate. 3 of the gold screws are located at the top of the phone and the other 2 screws are located at the bottom of the phone.

  4. Sony Xperia T2 Ultra Dual Motherboard Replacement: 4 단계, 이미지 1/2 Sony Xperia T2 Ultra Dual Motherboard Replacement: 4 단계, 이미지 2/2
    • To remove the internal cover, use the plastic spudger tool and pry the cover from the phone as shown in the picture.

  5. Sony Xperia T2 Ultra Dual Motherboard Replacement, Removing Chip: 5 단계, 이미지 1/1
    • To take out the back facing camera, flip open the flap labelled ‘film’ to reveal the chip that connects to the motherboard.

  6. Sony Xperia T2 Ultra Dual Motherboard Replacement: 6 단계, 이미지 1/1
    • Use the tweezer, carefully pry open the chip for the back facing camera.

  7. Sony Xperia T2 Ultra Dual Motherboard Replacement, Remove back facing camera: 7 단계, 이미지 1/1
    • Then using the tweezer, carefully remove the back facing camera component.

  8. Sony Xperia T2 Ultra Dual Motherboard Replacement, Removing the Front Camera: 8 단계, 이미지 1/1
    • Using the tweezer, carefully pry open the chip for the front facing camera as shown. Then using the tweezer, carefully remove the front facing camera component.

  9. Sony Xperia T2 Ultra Dual Motherboard Replacement, Removing chip: 9 단계, 이미지 1/1
    • Using tweezer, locate the audio jack as shown and pull out the chip connected to the motherboard.

  10. Sony Xperia T2 Ultra Dual Motherboard Replacement, Remove audio jack: 10 단계, 이미지 1/1
    • Carefully remove the audio jack by using the tweezers and pull firmly straight out of the motherboard.

  11. Sony Xperia T2 Ultra Dual Motherboard Replacement, Motherboard: 11 단계, 이미지 1/2 Sony Xperia T2 Ultra Dual Motherboard Replacement, Motherboard: 11 단계, 이미지 2/2
    • Using tweezers, locate the battery connector and carefully pull up to disconnect it.

  12. Sony Xperia T2 Ultra Dual Motherboard Replacement: 12 단계, 이미지 1/2 Sony Xperia T2 Ultra Dual Motherboard Replacement: 12 단계, 이미지 2/2
    • Carefully remove the button circuit connector by using tweezers and gently pulling up.

  13. Sony Xperia T2 Ultra Dual Motherboard Replacement: 13 단계, 이미지 1/2 Sony Xperia T2 Ultra Dual Motherboard Replacement: 13 단계, 이미지 2/2
    • Carefully remove the silver plug by using the tweezers to lift straight up.

  14. Sony Xperia T2 Ultra Dual Motherboard Replacement: 14 단계, 이미지 1/2 Sony Xperia T2 Ultra Dual Motherboard Replacement: 14 단계, 이미지 2/2
    • Carefully remove the SIM card connector using tweezers by gently pulling it straight up.

  15. Sony Xperia T2 Ultra Dual Motherboard Replacement: 15 단계, 이미지 1/2 Sony Xperia T2 Ultra Dual Motherboard Replacement: 15 단계, 이미지 2/2
    • Using tweezers, carefully remove the motherboard by pulling it up and out of the backing.

결론

To reassemble your device, follow these instructions in reverse order.

다른 4명이 해당 안내서를 완성하였습니다.

Brayden Ratekin

회원 가입일: 03/01/17

197 평판

안내서 1개 작성함

IUPUI, Team S1-G3, Harley Spring 2017 IUPUI, Team S1-G3, Harley Spring 2017 회원

IUPUI-HARLEY-S17S1G3

4 회원들

안내서 3개 작성하였습니다

댓글 2개

Mayrka D5322 ke bad cahiy

Goving Ram Goving Ram - 답글

I have a sony xperia dual ultra T2

RAM 1GB ITS REALLY POOR FOR THE TAB

HOW CAN I CHANGE THE RAM.

ANS ME PLEASE

MP - 답글

댓글 쓰기

조회 통계:

24 시간 전: 0

7일 전: 1

30일 전: 5

전체 시간: 3,603