주요 콘텐츠로 건너뛰기

Sony Xperia XA1 Ultra Loudspeaker Replacement

필요한 것

  1. Sony Xperia XA1 Ultra Loudspeaker Replacement, Back Assembly: 1 단계, 이미지 1/2 Sony Xperia XA1 Ultra Loudspeaker Replacement, Back Assembly: 1 단계, 이미지 2/2
    • Wedge your finger under the bottom ridge of the SD card insert.

    • Pull outwards with your fingers to remove the SD card from the left side of device.

  2. Sony Xperia XA1 Ultra Loudspeaker Replacement: 2 단계, 이미지 1/1
    • Use a hair dryer to heat each corner of the phone.

    • Alternate heating each corner for a minute to loosen the adhesive binding the back cover to the phone.

    • Don't heat one area for too long; the phone may get damaged from overheating.

  3. Sony Xperia XA1 Ultra Loudspeaker Replacement: 3 단계, 이미지 1/1
    • Press a suction cup on a heated corner of the device.

    • Hold the phone down and gently lift the suction cup to create a small gap.

    • You may hear crunching or popping sounds when you lift up the back cover.

  4. Sony Xperia XA1 Ultra Loudspeaker Replacement: 4 단계, 이미지 1/1
    이 단계에 사용된 도구:
    Plastic Cards
    $2.99
    구매
    • Insert your iFixit Opening Tool in the small gap between your phone and the back cover.

    • Lift up on the iFixit Opening Tool and insert your plastic card in the small gap between your phone and the back cover.

  5. Sony Xperia XA1 Ultra Loudspeaker Replacement: 5 단계, 이미지 1/1
    • Slide your plastic card along the side of your phone to loosen the adhesive.

    • Move the card along the sides of the phone to lift all of the corners.

  6. Sony Xperia XA1 Ultra Loudspeaker Replacement: 6 단계, 이미지 1/1
    • Lift up the back cover by lifting up the sides of the phone with your hand.

    • Apply a new strip of adhesive for reassembly.

  7. Sony Xperia XA1 Ultra Loudspeaker Replacement, Loudspeaker: 7 단계, 이미지 1/1
    • Remove the five 4mm T5 screws connecting the speaker to your phone.

  8. Sony Xperia XA1 Ultra Loudspeaker Replacement: 8 단계, 이미지 1/2 Sony Xperia XA1 Ultra Loudspeaker Replacement: 8 단계, 이미지 2/2
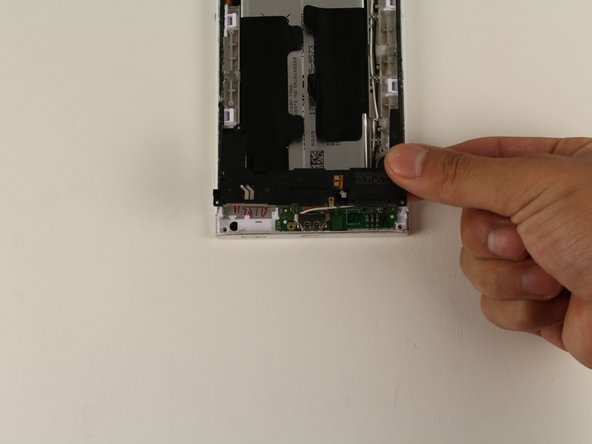
    • Insert your iFixit Opening Tool underneath the speaker and gently lift up.

    • Once the speaker is slightly lifted, use your hands to remove the piece from the device.

결론

To reassemble your device, follow these instructions in reverse order.

다른 한 분이 해당 안내서를 완성하였습니다.

Jacob Jung

회원 가입일: 04/18/18

1,429 평판

안내서 9개 작성하였습니다

Cal Poly, Team S16-G3, Livingston Spring 2018 Cal Poly, Team S16-G3, Livingston Spring 2018 회원

CPSU-LIVINGSTON-S18S16G3

4 회원들

안내서 9개 작성하였습니다

댓글 0개

댓글 쓰기

조회 통계:

24 시간 전: 0

7일 전: 0

30일 전: 5

전체 시간: 954