주요 콘텐츠로 건너뛰기

이 안내서에는 최근 변경 사항이 더 있습니다. 최신 비검증 버전으로 전환하십시오.

Sony Xperia Z3 Compact Rear Camera Replacement

필요한 것

  1. Sony Xperia Z3 Compact Rear Camera Replacement, Heat the cover glue: 1 단계, 이미지 1/1
    • Heat up along the edges of the cover to soften the glue.

    • Ideal temperature is around 120 - 150 °C for 60 seconds.

    Alternatively, use a heat pack to soften the internal glue/adhesive holding the screen.

    In any case, make sure the glue/adhesive comes off nicely, otherwise you will have to spend a lot of time cleaning off glue residues before putting the new adhesive on.

    axel - 답글

  2. Sony Xperia Z3 Compact Rear Camera Replacement: 2 단계, 이미지 1/1
    • Place a suction cup on the back cover and pull to open a gap.

    • Insert a guitar pick into the gap and slide it around the corner of the back cover to cut the adhesive sticker.

  3. Sony Xperia Z3 Compact Rear Camera Replacement: 3 단계, 이미지 1/1
    • Finally, remove the back cover.

    • Be careful, the back cover is fragile and can break.

    • It can be a good idea to wear protective glasses. If the glass shatters, it could enter your eye.

  4. Sony Xperia Z3 Compact Rear Camera Replacement, Rear Camera: 4 단계, 이미지 1/3 Sony Xperia Z3 Compact Rear Camera Replacement, Rear Camera: 4 단계, 이미지 2/3 Sony Xperia Z3 Compact Rear Camera Replacement, Rear Camera: 4 단계, 이미지 3/3
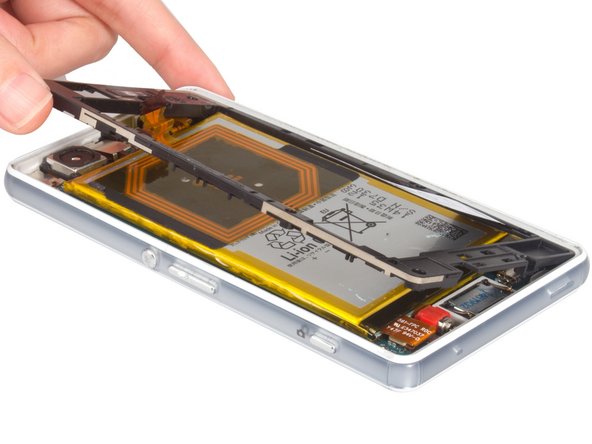
    • Disconnect the NFC antenna.

    • Unscrew the screws holding the black midframe in place.

    • Remove midframe.

  5. Sony Xperia Z3 Compact Rear Camera Replacement: 5 단계, 이미지 1/3 Sony Xperia Z3 Compact Rear Camera Replacement: 5 단계, 이미지 2/3 Sony Xperia Z3 Compact Rear Camera Replacement: 5 단계, 이미지 3/3
    • Disconnect the battery flex connector.

    • Remove rear camera bracket.

  6. Sony Xperia Z3 Compact Rear Camera Replacement: 6 단계, 이미지 1/3 Sony Xperia Z3 Compact Rear Camera Replacement: 6 단계, 이미지 2/3 Sony Xperia Z3 Compact Rear Camera Replacement: 6 단계, 이미지 3/3
    • components on the mainboard are fragile, be careful in the next step.

    • disconnect the flat top cable with a spudger

    • Remove rear camera

결론

To reassemble your device, follow these instructions in reverse order.

다른 17명이 해당 안내서를 완성하였습니다.

Sophia

회원 가입일: 03/25/14

43,810 평판

안내서 62개 작성하였습니다

댓글 4개

Hi i just replaced myxperia z3 compact camera using your Step by step guide. ( Great job on this by the way!) but unfortunately my rear camera is still showing a black screen. What else could be causing this, either hardware or software related?

Atiyeh - 답글

Same - however Sony seem to be aware of the issue and are not honoring warranty on the device despite being less than 2 years old which is why I am trying this.. Rather annoying. An otherwise usable phone is resigned to the parts box due to an issue with the rear facing camera.

gary mckie -

Do I need additional adhesive to reassemble the phone, or the old one will work just fine?

Giacomo Ciani - 답글

You'll need a new adhesive pad.

gary mckie -

댓글 쓰기

조회 통계:

24 시간 전: 0

7일 전: 0

30일 전: 4

전체 시간: 15,831