주요 콘텐츠로 건너뛰기

Spigot Vacuum Breaker Replacement

필요한 것

  1. Spigot Vacuum Breaker Replacement, Vacuum Breaker: 1 단계, 이미지 1/2 Spigot Vacuum Breaker Replacement, Vacuum Breaker: 1 단계, 이미지 2/2
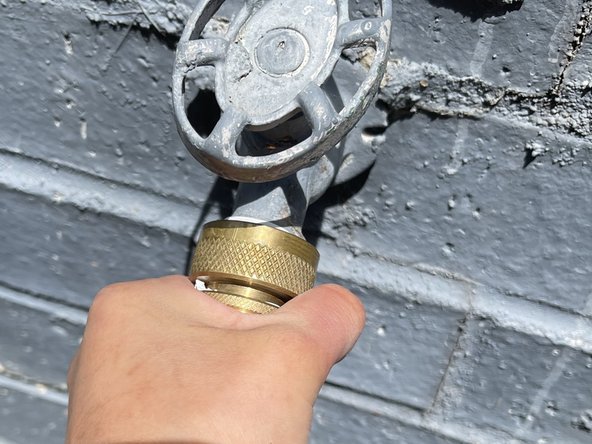
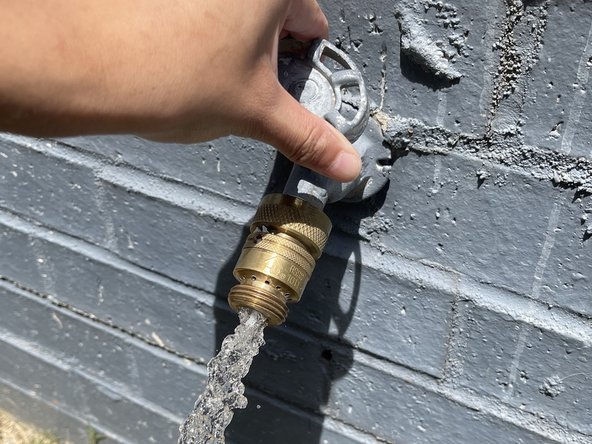
    • Confirm that the spigot is leaking from the vacuum breaker, and not a different component. Look specifically between the hose and vacuum breaker connection.

    • Disconnect the hose and ensure the spigot is turned off.

  2. Spigot Vacuum Breaker Replacement: 2 단계, 이미지 1/1
    • Use a pipe wrench to support the spigot and another to unscrew the vacuum breaker. If it unscrews, remove the breaker and skip to Step 7.

    • If the vacuum breaker is rusted on, or otherwise will not budge, use a compact handsaw with a metal-cutting blade to make a relief cut on the breaker.

    • While sawing, periodically stop to check your progress, making sure to not cut through and damage the main spigot threads.

  3. Spigot Vacuum Breaker Replacement: 3 단계, 이미지 1/1
    • When possible, use a metal prying tool, or a flathead screwdriver you don't mind damaging, to pry the edges of the cut apart. If necessary, use pliers.

  4. Spigot Vacuum Breaker Replacement: 4 단계, 이미지 1/3 Spigot Vacuum Breaker Replacement: 4 단계, 이미지 2/3 Spigot Vacuum Breaker Replacement: 4 단계, 이미지 3/3
    • If necessary, saw more relief cuts near the first. Continue to pry at the edges in order to expose the washer inside.

  5. Spigot Vacuum Breaker Replacement: 5 단계, 이미지 1/1
    • Remove the vacuum breaker, and ensure the washer and the cover are removed as well.

  6. Spigot Vacuum Breaker Replacement: 6 단계, 이미지 1/1
    • Use a ruler or caliper to measure the diameter of the spigot threads as accurate as possible; this measurement is crucial as it will determine the size of the part needed.

    • This specific spigot is 1 1/8 or 1.17 inches in diameter, so a SM01.125 adapter from Spigot Masters was ordered and used.

    • If the hose thread outlet is standard (¾ inch), omit the adapter, as it is already the desired diameter for a common hose in the US. A vacuum breaker can still be used as long as it is the appropriate size.

  7. Spigot Vacuum Breaker Replacement: 7 단계, 이미지 1/3 Spigot Vacuum Breaker Replacement: 7 단계, 이미지 2/3 Spigot Vacuum Breaker Replacement: 7 단계, 이미지 3/3
    • Wrap plumber's tape around the spigot threads.

    • The application of plumber's tape isn't necessary, but strongly recommended, as it will create a tighter seal between the threads and reduce the risk of leaking.

    • Screw on the adapter or vacuum breaker.

    • The adapter/breaker should screw on with relative ease; if it requires much force, it's probably cross-threaded.

  8. Spigot Vacuum Breaker Replacement: 8 단계, 이미지 1/3 Spigot Vacuum Breaker Replacement: 8 단계, 이미지 2/3 Spigot Vacuum Breaker Replacement: 8 단계, 이미지 3/3
    • Tightly screw the 3/4 inch vacuum breaker onto the adapter or spigot.

  9. Spigot Vacuum Breaker Replacement: 9 단계, 이미지 1/2 Spigot Vacuum Breaker Replacement: 9 단계, 이미지 2/2
    • Test the connection to make sure it isn’t leaking.

    • If any leakage appears, screw breaker/adapter on tighter, with care not to damage the threads. If there's no improvement, then remove the vacuum breaker and try applying another layer of plumber's tape to the threads.

결론

Enjoy your leak-free spigot!

다른 한 분이 해당 안내서를 완성하였습니다.

Jovita Gomez

회원 가입일: 02/28/22

169 평판

안내서 1개 작성함

University of Memphis, Team 51-6, Willis Spring 2022 University of Memphis, Team 51-6, Willis Spring 2022 회원

UM-WILLIS-S22S51G6

1 회원

안내서 1개 작성하였습니다

댓글 0개

댓글 쓰기

조회 통계:

24 시간 전: 20

7일 전: 78

30일 전: 448

전체 시간: 6,210