주요 콘텐츠로 건너뛰기

SteelSeries Stratus Duo Face Buttons Replacement

필요한 것

  1. SteelSeries Stratus Duo Face Buttons Replacement, Remove the sticker: 1 단계, 이미지 1/2 SteelSeries Stratus Duo Face Buttons Replacement, Remove the sticker: 1 단계, 이미지 2/2
    • Use your fingers to remove the sticker located on the back cover of the Stratus Duo.

    • If you have trouble removing the sticker, heat an iOpener and apply it to the rear case for two minutes to loosen the adhesive underneath. You can also use a hair dryer to soften the adhesive.

  2. SteelSeries Stratus Duo Face Buttons Replacement, Unscrew the back cover: 2 단계, 이미지 1/1
    • Use a Y0 Tri-point screwdriver to remove the five 9.3 mm-long screws securing the back cover.

  3. SteelSeries Stratus Duo Face Buttons Replacement, Reposition the back cover assembly: 3 단계, 이미지 1/3 SteelSeries Stratus Duo Face Buttons Replacement, Reposition the back cover assembly: 3 단계, 이미지 2/3 SteelSeries Stratus Duo Face Buttons Replacement, Reposition the back cover assembly: 3 단계, 이미지 3/3
    • Don't try to remove the back cover assembly all the way yet, as it's still connected to the mainboard.

    • Carefully lift the back cover assembly away from the frame and move it downward to uncover the battery cable and the interconnect cable at the top of the motherboard.

  4. SteelSeries Stratus Duo Face Buttons Replacement, Disconnect the interconnect cable: 4 단계, 이미지 1/3 SteelSeries Stratus Duo Face Buttons Replacement, Disconnect the interconnect cable: 4 단계, 이미지 2/3 SteelSeries Stratus Duo Face Buttons Replacement, Disconnect the interconnect cable: 4 단계, 이미지 3/3
    • Using the pointed end of a spudger, push the grey tabs on the interconnect socket away from the socket, parallel to the interconnect cable, to release the cable.

  5. SteelSeries Stratus Duo Face Buttons Replacement: 5 단계, 이미지 1/2 SteelSeries Stratus Duo Face Buttons Replacement: 5 단계, 이미지 2/2
    • Use a pair of blunt nosed tweezers or your fingers to pull the cable out of the socket.

  6. SteelSeries Stratus Duo Face Buttons Replacement, Disconnect the battery cable: 6 단계, 이미지 1/3 SteelSeries Stratus Duo Face Buttons Replacement, Disconnect the battery cable: 6 단계, 이미지 2/3 SteelSeries Stratus Duo Face Buttons Replacement, Disconnect the battery cable: 6 단계, 이미지 3/3
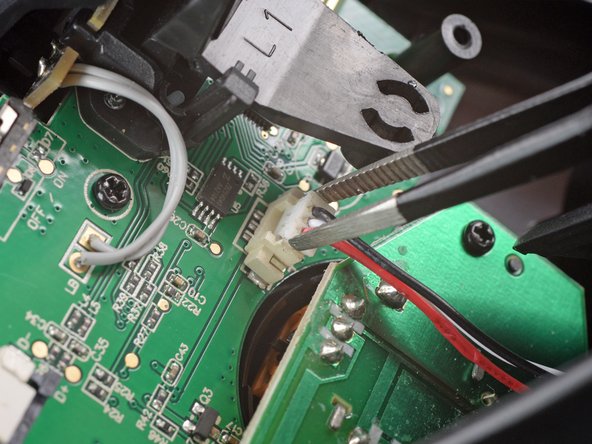
    • Use a pair of blunt nose tweezers to grab and lift the connector away from the motherboard.

  7. SteelSeries Stratus Duo Face Buttons Replacement, Remove the back cover assembly: 7 단계, 이미지 1/1
    • Remove the back cover assembly.

  8. SteelSeries Stratus Duo Face Buttons Replacement, Unscrew the thumbsticks board: 8 단계, 이미지 1/1
    • Use a Phillips screwdriver to remove the two 6.8 mm-long screws securing the thumbsticks board.

  9. SteelSeries Stratus Duo Face Buttons Replacement, Disconnect the thumbsticks board: 9 단계, 이미지 1/3 SteelSeries Stratus Duo Face Buttons Replacement, Disconnect the thumbsticks board: 9 단계, 이미지 2/3 SteelSeries Stratus Duo Face Buttons Replacement, Disconnect the thumbsticks board: 9 단계, 이미지 3/3
    • Grab the thumbsticks board with your hand and disconnect it by pulling it straight up and out of its socket on the mainboard.

    • Remove the thumbsticks board.

    • For reassembly make sure to correctly align the ten pins with their socket on the mainboard.

  10. SteelSeries Stratus Duo Face Buttons Replacement, Unscrew the mainboard assembly: 10 단계, 이미지 1/1
    • Use a Phillips screwdriver to remove the four 6.8 mm-long screws securing the mainboard assembly to the case.

  11. SteelSeries Stratus Duo Face Buttons Replacement, Remove the mainboard assembly: 11 단계, 이미지 1/3 SteelSeries Stratus Duo Face Buttons Replacement, Remove the mainboard assembly: 11 단계, 이미지 2/3 SteelSeries Stratus Duo Face Buttons Replacement, Remove the mainboard assembly: 11 단계, 이미지 3/3
    • Use your hand to remove the mainboard assembly by tilting it out of the plastic cover.

  12. SteelSeries Stratus Duo Face Buttons Replacement, Remove the face buttons: 12 단계, 이미지 1/2 SteelSeries Stratus Duo Face Buttons Replacement, Remove the face buttons: 12 단계, 이미지 2/2
    • Use a pair of tweezers to remove the face buttons from the plastic cover.

    • The alignment pegs on each button are designed to prevent incorrect installation. On reassembly make sure to correctly place and align the buttons.

결론

To reassemble your device, follow these instructions in reverse order. To reassemble your device, follow these instructions in reverse order.

Take your e-waste to an R2 or e-Stewards certified recycler.

Repair didn’t go as planned? Check out our Answers community for troubleshooting help.

Adriana Zwink

회원 가입일: 12/18/19

48,416 평판

안내서 167개 작성하였습니다

iFixit iFixit 회원

Staff

135 회원들

안내서 17,180개 작성하였습니다

댓글 0개

댓글 쓰기

조회 통계:

24 시간 전: 2

7일 전: 4

30일 전: 9

전체 시간: 175