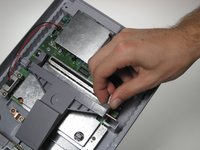
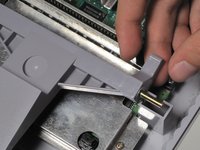
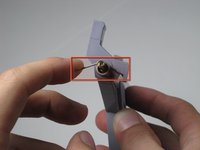
주요 콘텐츠로 건너뛰기

Super Nintendo Eject Button Replacement

필요한 것

  1. Super Nintendo Eject Button Replacement, Outer Case: 1 단계, 이미지 1/1
    • Remove the six screws located on the underside of the system using the Gamebit 4.5mm screwdriver.

  2. Super Nintendo Eject Button Replacement: 2 단계, 이미지 1/3 Super Nintendo Eject Button Replacement: 2 단계, 이미지 2/3 Super Nintendo Eject Button Replacement: 2 단계, 이미지 3/3
    • Carefully flip the unit back over.

    • Locate the seam. Lift and separate the upper half of the case from the lower half of the case.

  3. Super Nintendo Eject Button Replacement, Eject Button: 3 단계, 이미지 1/2 Super Nintendo Eject Button Replacement, Eject Button: 3 단계, 이미지 2/2
    • Lift the right side of the eject lever out of the housing.

  4. Super Nintendo Eject Button Replacement: 4 단계, 이미지 1/3 Super Nintendo Eject Button Replacement: 4 단계, 이미지 2/3 Super Nintendo Eject Button Replacement: 4 단계, 이미지 3/3
    • Pull the metal bar out through the right side of the eject lever.

    • Make sure to keep track of the spring located on the left side of the lever as it may shoot off when removing the metal bar.

    • When reassembling, the procedure becomes more difficult due to the spring (marked red). We recommend that one person hold the spring in place (picture 3) while another person slides the metal bar back into the left housing, and slide the eject lever onto the metal bar.

결론

To reassemble your device, follow the instructions in reverse order.

다른 10명이 해당 안내서를 완성하였습니다.

James Shirley

회원 가입일: 10/03/10

967 평판

안내서 2개 작성하였습니다

Cal Poly, Team 4-47, Amido Fall 2010 Cal Poly, Team 4-47, Amido Fall 2010 회원

CPSU-AMIDO-F10S4G47

4 회원들

안내서 25개 작성하였습니다

댓글 0개

댓글 쓰기

조회 통계:

24 시간 전: 4

7일 전: 26

30일 전: 97

전체 시간: 18,324