주요 콘텐츠로 건너뛰기

Swagtron T3 Gyroscope Replacement

필요한 것

  1. Swagtron T3 Gyroscope Replacement, Cover: 1 단계, 이미지 1/2 Swagtron T3 Gyroscope Replacement, Cover: 1 단계, 이미지 2/2
    • Make sure the hoverboard is completely powered off and unplugged from any outlets.

    • Flip the Swagtron so that the footpads are facing the ground.

    • Unscrew the sixteen 9.4 mm Phillips #1 machine screws on the side of the Swagtron that is now facing upwards.

  2. Swagtron T3 Gyroscope Replacement: 2 단계, 이미지 1/3 Swagtron T3 Gyroscope Replacement: 2 단계, 이미지 2/3 Swagtron T3 Gyroscope Replacement: 2 단계, 이미지 3/3
    • Be careful with the small blue capacitors indicated by the orange box. There are many of these capacitors in the device.

    • Slowly lift the backside cover.

    • Both sides lift up the same way, but the motherboard is under one side and the battery is under the other.

    • Detach the four cables connected to the cover by pinching the connector clips and pulling the cables out:

    • Three cables on the motherboard side.

    • Two red cables with white connectors and one white cable with a white connector.

    • One yellow cable with a black connector on the battery side.

    • After detachment, you should be able to completely remove the backside cover.

  3. Swagtron T3 Gyroscope Replacement, Gyroscope: 3 단계, 이미지 1/1
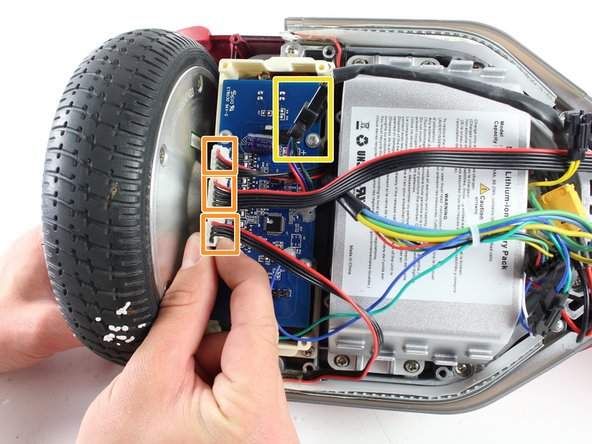
    • The gyroscope is a blue rectangular circuit board on top of a white base and is closest to the wheel.

    • Detach the four cables connecting the gyroscope to the hoverboard by pinching the connector clips and pulling the cables out:

    • Three red and black cables with white connectors.

    • One multicolored cable with a black connector.

  4. Swagtron T3 Gyroscope Replacement: 4 단계, 이미지 1/1
    • Uncrew the four 7.2 mm Phillips #1 self-drilling screws connecting the blue gyroscope to the white plastic holding piece.

  5. Swagtron T3 Gyroscope Replacement: 5 단계, 이미지 1/2 Swagtron T3 Gyroscope Replacement: 5 단계, 이미지 2/2
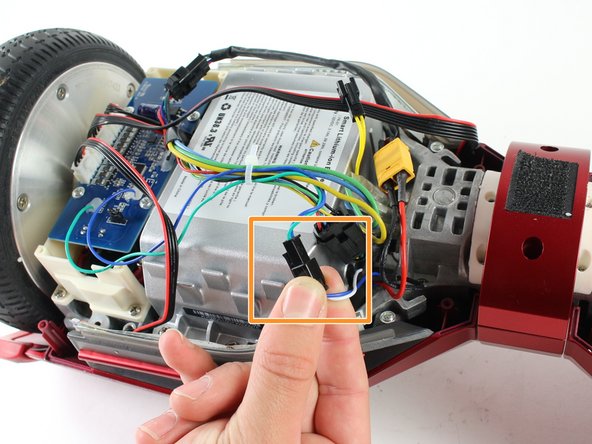
    • Cut the plastic cable tie holding the cables together with utility scissors.

    • Disconnect the blue/green cable from the blue/white cable by pinching the connector clips and pulling the cables apart.

  6. Swagtron T3 Gyroscope Replacement: 6 단계, 이미지 1/1
    • Gently lift the blue gyroscope off of the white plastic holder piece.

    • After reassembling the Swagtron with the new gyroscope, check to make sure your Swagtron is balancing properly.

    • If it is still unbalanced, repeat all steps in this guide with the gyroscope by the other wheel.

결론

To reassemble your device, follow these instructions in reverse order.

다른 3명이 해당 안내서를 완성하였습니다.

Emily Richter

회원 가입일: 04/10/17

351 평판

안내서 1개 작성함

Cal Poly, Team S13-G3, Forte Spring 2017 Cal Poly, Team S13-G3, Forte Spring 2017 회원

CPSU-FORTE-S17S13G3

4 회원들

안내서 4개 작성하였습니다

댓글 3개

Where can one buy the new gyroscope?

Mike - 답글

Where is the best place to buy the gyroscope for the T3?

I see Ebay sells complete kits with motherboards and all.

Are they compatible?

Mike - 답글

where can I buy new gyroscope

roccovalletta - 답글

댓글 쓰기

조회 통계:

24 시간 전: 2

7일 전: 3

30일 전: 20

전체 시간: 4,801