주요 콘텐츠로 건너뛰기

이 안내서에는 최근 변경 사항이 더 있습니다. 최신 비검증 버전으로 전환하십시오.

Switch Pro Controller Motherboard Replacement

필요한 것

  1. Switch Pro Controller Motherboard Replacement, Remove the screws: 1 단계, 이미지 1/1
    • Flip the controller over so the model stickers face the ceiling.

    • Use a JIS #00 screwdriver to remove the two black 8.4 mm screws that secure the handles, located at the ends of the handles.

  2. Switch Pro Controller Motherboard Replacement, Remove the handle covers: 2 단계, 이미지 1/3 Switch Pro Controller Motherboard Replacement, Remove the handle covers: 2 단계, 이미지 2/3 Switch Pro Controller Motherboard Replacement, Remove the handle covers: 2 단계, 이미지 3/3
    • Carefully remove the handle covers by pulling them away from the main body.

  3. Switch Pro Controller Motherboard Replacement, Remove the screws: 3 단계, 이미지 1/1
    • Use a JIS #00 screwdriver to remove the four silver 6.8 mm screws that secure the clear back plastic cover.

  4. Switch Pro Controller Motherboard Replacement, Unclip the plastic cover: 4 단계, 이미지 1/3 Switch Pro Controller Motherboard Replacement, Unclip the plastic cover: 4 단계, 이미지 2/3 Switch Pro Controller Motherboard Replacement, Unclip the plastic cover: 4 단계, 이미지 3/3
    • Carefully pry away the clear plastic cover using your fingernail.

  5. Switch Pro Controller Motherboard Replacement, Remove the clear plastic cover: 5 단계, 이미지 1/1
    • Remove the clear plastic cover.

  6. Switch Pro Controller Motherboard Replacement, Remove the battery: 6 단계, 이미지 1/3 Switch Pro Controller Motherboard Replacement, Remove the battery: 6 단계, 이미지 2/3 Switch Pro Controller Motherboard Replacement, Remove the battery: 6 단계, 이미지 3/3
    • Remove the lithium-ion battery by using a fingernail or plastic opening tool to pry it up on the left side.

    • Only a small amount of force is needed.

  7. Switch Pro Controller Motherboard Replacement, Motherboard: 7 단계, 이미지 1/2 Switch Pro Controller Motherboard Replacement, Motherboard: 7 단계, 이미지 2/2
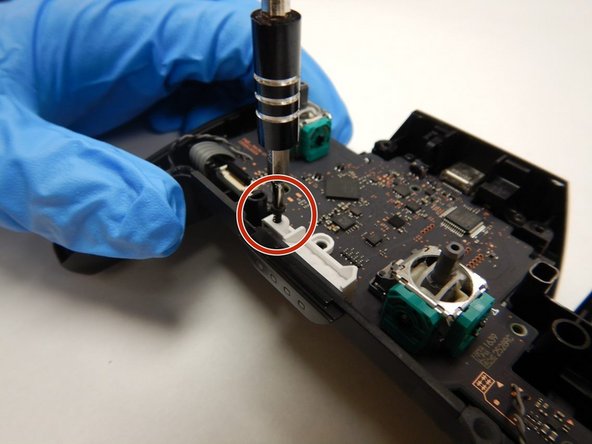
    • Using a Phillips #00 screwdriver, remove the five 5mm screws from the back case of the controller.

  8. Switch Pro Controller Motherboard Replacement: 8 단계, 이미지 1/3 Switch Pro Controller Motherboard Replacement: 8 단계, 이미지 2/3 Switch Pro Controller Motherboard Replacement: 8 단계, 이미지 3/3
    • Carefully separate the front panel from the main panel by gently levering the front panel off.

    • Do not completely remove the front panel, as there are still wires joining the two.

  9. Switch Pro Controller Motherboard Replacement: 9 단계, 이미지 1/3 Switch Pro Controller Motherboard Replacement: 9 단계, 이미지 2/3 Switch Pro Controller Motherboard Replacement: 9 단계, 이미지 3/3
    • Gently flip up the black lever on the ZIF connector and remove the cable from the port with your fingers or a pair of tweezers.

    • This cable is what connects the buttons on the face of the controller to the motherboard, so if you discover that the cable is damaged, that might be the source of your issue.

  10. Switch Pro Controller Motherboard Replacement: 10 단계, 이미지 1/3 Switch Pro Controller Motherboard Replacement: 10 단계, 이미지 2/3 Switch Pro Controller Motherboard Replacement: 10 단계, 이미지 3/3
    • Remove the joysticks by gently pulling up and away from the motherboard.

    • Using a Phillips #00 screwdriver, remove the three 5mm black screws.

  11. Switch Pro Controller Motherboard Replacement: 11 단계, 이미지 1/3 Switch Pro Controller Motherboard Replacement: 11 단계, 이미지 2/3 Switch Pro Controller Motherboard Replacement: 11 단계, 이미지 3/3
    • Using a Phillips #00 screwdriver, remove the 5mm black screw that holds the white LED housing at the base of the motherboard.

    • Gently pull the white housing away from the base of the motherboard, towards the top of the motherboard.

  12. Switch Pro Controller Motherboard Replacement: 12 단계, 이미지 1/3 Switch Pro Controller Motherboard Replacement: 12 단계, 이미지 2/3 Switch Pro Controller Motherboard Replacement: 12 단계, 이미지 3/3
    • Lift the top of the motherboard and flip the motherboard over to expose the backside.

  13. Switch Pro Controller Motherboard Replacement: 13 단계, 이미지 1/3 Switch Pro Controller Motherboard Replacement: 13 단계, 이미지 2/3 Switch Pro Controller Motherboard Replacement: 13 단계, 이미지 3/3
    • Identify the main power cable that connects the motherboard to the battery board.

    • Remove the main power cable from the highlighted pins by de-soldering them.

    • Refer to the following solder guide if necessary: How to Solder.

  14. Switch Pro Controller Motherboard Replacement: 14 단계, 이미지 1/3 Switch Pro Controller Motherboard Replacement: 14 단계, 이미지 2/3 Switch Pro Controller Motherboard Replacement: 14 단계, 이미지 3/3
    • Desolder and remove the rumble modules from the motherboard.

    • The rumble modules are connected to the motherboard by a pair of pins on either side of the motherboard.

    • Lift the old motherboard out of the device.

    • Resolder the rumble modules and main power cable onto your new motherboard.

결론

To reassemble your device, follow these instructions in reverse order.

다른 3명이 해당 안내서를 완성하였습니다.

댓글 0개

댓글 쓰기

조회 통계:

24 시간 전: 6

7일 전: 55

30일 전: 294

전체 시간: 13,671