주요 콘텐츠로 건너뛰기

이 버전에는 잘못된 편집 사항이 있을 수 있습니다. 최신 확인된 스냅샷으로 전환하십시오.

필요한 것

  1. 이 단계는 번역되지 않았습니다. 번역을 도와주십시오

    : 1 단계, 이미지 1/2 : 1 단계, 이미지 2/2
    • DS412+

    • Remove the front panel

  2. 이 단계는 번역되지 않았습니다. 번역을 도와주십시오

    : 2 단계, 이미지 1/1
    • Remove the hard disks

  3. 이 단계는 번역되지 않았습니다. 번역을 도와주십시오

    : 3 단계, 이미지 1/2 : 3 단계, 이미지 2/2
    • Remove the two screws in the back of the NAS, on the top and bottom.

  4. 이 단계는 번역되지 않았습니다. 번역을 도와주십시오

    : 4 단계, 이미지 1/2 : 4 단계, 이미지 2/2
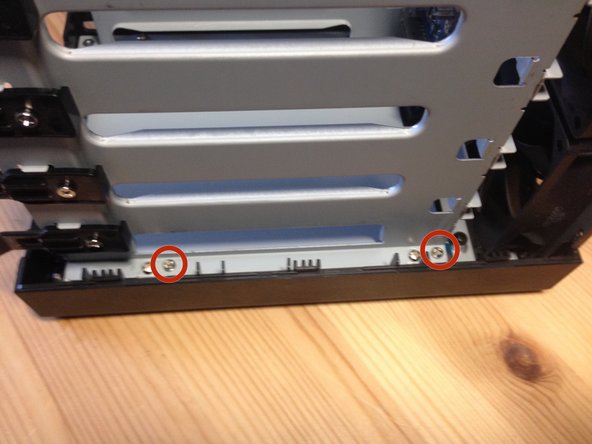
    • Locate those 2 tabs on the left side inside the device.

    • Lift them up off the metal brace

    • You may have to bend the metal support bar to remove the case. Bend it back if you do.

  5. 이 단계는 번역되지 않았습니다. 번역을 도와주십시오

    : 5 단계, 이미지 1/2 : 5 단계, 이미지 2/2
    • Push the case away towards the back about 1 cm

  6. 이 단계는 번역되지 않았습니다. 번역을 도와주십시오

    : 6 단계, 이미지 1/2 : 6 단계, 이미지 2/2
    • With the NAS on its right side, lift up the enclosure, mind the tabs on the top of the case.

  7. 이 단계는 번역되지 않았습니다. 번역을 도와주십시오

    : 7 단계, 이미지 1/2 : 7 단계, 이미지 2/2
    • Remove the screw securing the HDD bays enclosure.

  8. 이 단계는 번역되지 않았습니다. 번역을 도와주십시오

    : 8 단계, 이미지 1/1
    • Remove the screw securing the I/O board.

  9. 이 단계는 번역되지 않았습니다. 번역을 도와주십시오

    : 9 단계, 이미지 1/2 : 9 단계, 이미지 2/2
    • Remove the four screws securing the HDD bays

  10. 이 단계는 번역되지 않았습니다. 번역을 도와주십시오

    : 10 단계, 이미지 1/2 : 10 단계, 이미지 2/2
    • Pull the fan a little bit away

  11. 이 단계는 번역되지 않았습니다. 번역을 도와주십시오

    : 11 단계, 이미지 1/2 : 11 단계, 이미지 2/2
    • Watch out for this plug

    • Lift the metal bracket out

  12. 이 단계는 번역되지 않았습니다. 번역을 도와주십시오

    : 12 단계, 이미지 1/2 : 12 단계, 이미지 2/2
    • Remove the fan power headers

  13. 이 단계는 번역되지 않았습니다. 번역을 도와주십시오

    : 13 단계, 이미지 1/1
    • Remove the I/O board by lifting it up

  14. 이 단계는 번역되지 않았습니다. 번역을 도와주십시오

    : 14 단계, 이미지 1/2 : 14 단계, 이미지 2/2
    • Remove those 4 screws

  15. 이 단계는 번역되지 않았습니다. 번역을 도와주십시오

    : 15 단계, 이미지 1/1
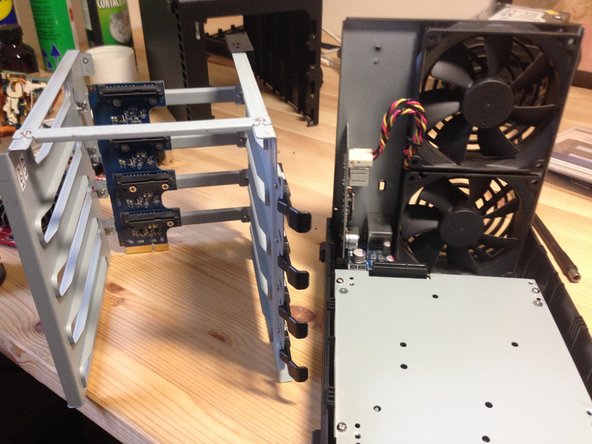
    • Starting from the front of the unit, remove the motherboard from the unit.

  16. 이 단계는 번역되지 않았습니다. 번역을 도와주십시오

    : 16 단계, 이미지 1/3 : 16 단계, 이미지 2/3 : 16 단계, 이미지 3/3
    • Pull these tabs and remove the ram

    • Old and new Ram

    • The old RAM's part number is: M3SN-1GSFCCM7-GA14

    • To reassemble your device, follow these instructions in reverse order.

결승점

다른 35명이 해당 안내서를 완성하였습니다.

gieljnssns

회원 가입일: 06/26/11

981 평판

안내서 1개 작성함

댓글 18개

Hi is it also possible with a Synology ds216play? Or is the RAM not modular in this Drives?

markusguenther30684 - 답글

Very nice guide. Thank you!

mbs - 답글

Thank you for the guide, just to ease it up a bit for everybody following, the best way to pull the two tabs from step 4 was to use small spoon (or anything metal) and use it as a crowbar from the inside (do not try to put force from the outer rim, but really from inside of the Synology itself (against the metal beam the tabs are holding to).

Ondrej Palat - 답글

Thank you very much.

Olivier Claude - 답글

did these steps and now my DS412+ won't boot anymore. just the blue power light for a few seconds, no hard drive or fan will turn on.

after putting the old RAM in the slot nothing changed. cannot find any error, how do I find out what's wrong here???

Andreas Hanny - 답글

댓글 쓰기

조회 통계:

24 시간 전: 3

7일 전: 41

30일 전: 165

전체 시간: 24,362