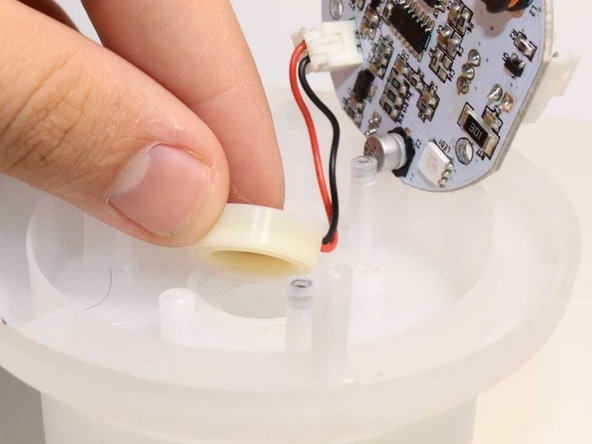
주요 콘텐츠로 건너뛰기

Syntus ST150 Ultrasonic Plate Replacement

필요한 것

  1. Syntus ST150 Ultrasonic Plate Replacement, Ultrasonic Plate: 1 단계, 이미지 1/1
    • First, make sure the water tank inside the diffuser is completely dry to avoid any water from contacting the internal components.

    • Make sure the diffuser is disconnected from the power source to avoid electrical hazards.

  2. Syntus ST150 Ultrasonic Plate Replacement: 2 단계, 이미지 1/2 Syntus ST150 Ultrasonic Plate Replacement: 2 단계, 이미지 2/2
    • With a Phillips #1 screwdriver, remove the three 10 mm screws on the bottom of the diffuser.

  3. Syntus ST150 Ultrasonic Plate Replacement: 3 단계, 이미지 1/3 Syntus ST150 Ultrasonic Plate Replacement: 3 단계, 이미지 2/3 Syntus ST150 Ultrasonic Plate Replacement: 3 단계, 이미지 3/3
    • Lift the water tank while holding the base of the diffuser.

    • Disconnect the three cables form the board.

    • Make sure when reassembling the diffuser to plug in each cable to its assigned port.

  4. Syntus ST150 Ultrasonic Plate Replacement: 4 단계, 이미지 1/3 Syntus ST150 Ultrasonic Plate Replacement: 4 단계, 이미지 2/3 Syntus ST150 Ultrasonic Plate Replacement: 4 단계, 이미지 3/3
    • To separate the board from the water tank, unscrew the three Phillips #1 10 mm screws securing the board.

  5. Syntus ST150 Ultrasonic Plate Replacement: 5 단계, 이미지 1/3 Syntus ST150 Ultrasonic Plate Replacement: 5 단계, 이미지 2/3 Syntus ST150 Ultrasonic Plate Replacement: 5 단계, 이미지 3/3
    • With a Phillips #0 screwdriver, remove the three 7 mm screws from the ultrasonic sensor cover.

    • Remove the cover to expose the ultrasonic sensor.

  6. Syntus ST150 Ultrasonic Plate Replacement: 6 단계, 이미지 1/3 Syntus ST150 Ultrasonic Plate Replacement: 6 단계, 이미지 2/3 Syntus ST150 Ultrasonic Plate Replacement: 6 단계, 이미지 3/3
    • Detach the ultrasonic sensor from the water tank.

    • Detach the ultrasonic sensor connector from the board.

  7. Syntus ST150 Ultrasonic Plate Replacement: 7 단계, 이미지 1/1
    • Remove the rubber cover from the ultrasonic plate.

  8. Syntus ST150 Ultrasonic Plate Replacement: 8 단계, 이미지 1/1
    • Now you can replace the ultrasonic plate of your diffuser.

결론

To reassemble your device, follow these instructions in reverse order.

Alejandro R. Calderin Anzueta

회원 가입일: 03/23/22

157 평판

안내서 1개 작성함

댓글 0개

댓글 쓰기

조회 통계:

24 시간 전: 2

7일 전: 10

30일 전: 28

전체 시간: 539