주요 콘텐츠로 건너뛰기

TOSHIBA Satellite E45W-C4200X Motherboard Replacement

필요한 것

  1. TOSHIBA Satellite E45W-C4200X Motherboard Replacement, Cooling Fan: 1 단계, 이미지 1/2 TOSHIBA Satellite E45W-C4200X Motherboard Replacement, Cooling Fan: 1 단계, 이미지 2/2
    • Using the phillips #1 screwdriver, remove the ten 1 mm screws from the back panel of the device.

  2. TOSHIBA Satellite E45W-C4200X Motherboard Replacement: 2 단계, 이미지 1/2 TOSHIBA Satellite E45W-C4200X Motherboard Replacement: 2 단계, 이미지 2/2
    • Use plastic opening tool to separate the back cover from the laptop.

    • Go slowly and be careful as the plastic can crack.

    • It is recommend that you start from a corner and run the tool along the edge.

  3. TOSHIBA Satellite E45W-C4200X Motherboard Replacement: 3 단계, 이미지 1/2 TOSHIBA Satellite E45W-C4200X Motherboard Replacement: 3 단계, 이미지 2/2
    • Remove the four .5 mm screws that secure the heat sink using a Phillips #1 screwdriver.

  4. TOSHIBA Satellite E45W-C4200X Motherboard Replacement: 4 단계, 이미지 1/2 TOSHIBA Satellite E45W-C4200X Motherboard Replacement: 4 단계, 이미지 2/2
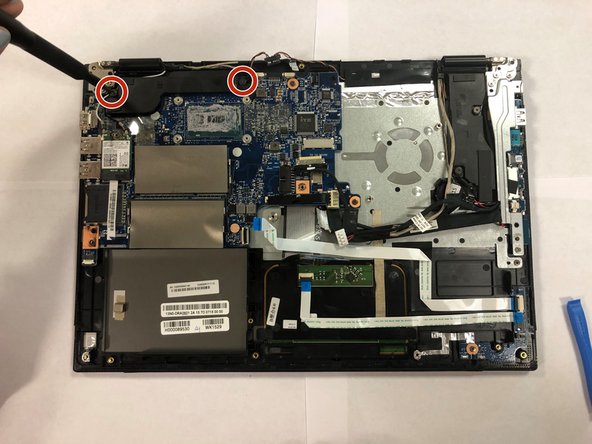
    • Remove the two 1 mm screws that secure the cooling fan using a Phillips #1 screwdriver.

  5. TOSHIBA Satellite E45W-C4200X Motherboard Replacement: 5 단계, 이미지 1/2 TOSHIBA Satellite E45W-C4200X Motherboard Replacement: 5 단계, 이미지 2/2
    • Disconnect the fan cord from the harness.

    • Remove the cooling fan and heat sink from the laptop.

  6. TOSHIBA Satellite E45W-C4200X Motherboard Replacement: 6 단계, 이미지 1/3 TOSHIBA Satellite E45W-C4200X Motherboard Replacement: 6 단계, 이미지 2/3 TOSHIBA Satellite E45W-C4200X Motherboard Replacement: 6 단계, 이미지 3/3
    • Carefully peel off the tape holding the heat sink onto the cooling fan.

    • Peel carefully as the tape goes around all four sides.

    • Remove the cooling fan from the heat sink.

  7. TOSHIBA Satellite E45W-C4200X Motherboard Replacement, Motherboard: 7 단계, 이미지 1/2 TOSHIBA Satellite E45W-C4200X Motherboard Replacement, Motherboard: 7 단계, 이미지 2/2
    이 단계에 사용된 도구:
    Anti-Static Wrist Strap
    $7.95
    구매
    • Unplug the connection to the battery.

    • Mark sure you are using the anti-static wrist strap for the duration of this replacement.

  8. TOSHIBA Satellite E45W-C4200X Motherboard Replacement: 8 단계, 이미지 1/3 TOSHIBA Satellite E45W-C4200X Motherboard Replacement: 8 단계, 이미지 2/3 TOSHIBA Satellite E45W-C4200X Motherboard Replacement: 8 단계, 이미지 3/3
    • Remove all remaining external wire harnesses from the circuit board.

    • It is recommended that you use labels or take pictures of the wires you remove to assist in the re-connection.

  9. TOSHIBA Satellite E45W-C4200X Motherboard Replacement: 9 단계, 이미지 1/1
    • Remove the three screws from the metal bracket on the left side of the circuit board using a Phillips #1 screwdriver.

    • Remove the bracket.

  10. TOSHIBA Satellite E45W-C4200X Motherboard Replacement: 10 단계, 이미지 1/3 TOSHIBA Satellite E45W-C4200X Motherboard Replacement: 10 단계, 이미지 2/3 TOSHIBA Satellite E45W-C4200X Motherboard Replacement: 10 단계, 이미지 3/3
    • Remove the two screws from the black plastic cover using a Phillips #1 screwdriver.

    • Remove the black plastic cover.

  11. TOSHIBA Satellite E45W-C4200X Motherboard Replacement: 11 단계, 이미지 1/2 TOSHIBA Satellite E45W-C4200X Motherboard Replacement: 11 단계, 이미지 2/2
    • Using a Phillips #1 screwdriver, remove the remaining two screws holding the circuit board in place.

    • Carefully remove the motherboard from the device.

결론

To reassemble your device, follow these instructions in reverse order.

Tim Guilbeault

회원 가입일: 09/23/19

210 평판

안내서 1개 작성함

댓글 한 개

Could you help me to know the values for this piece? My motherboard has burned it, and I could not find the schematic; I guess it is an inductor. But I'm just learning about this. I hope that you can help me.

Regards.

https://ibb.co/TKCGPpF

Developer Paridin - 답글

댓글 쓰기

조회 통계:

24 시간 전: 0

7일 전: 3

30일 전: 14

전체 시간: 917