주요 콘텐츠로 건너뛰기

Tagital T7X Camera Replacement

필요한 것

  1. Tagital T7X Camera  Replacement, Case: 1 단계, 이미지 1/3 Tagital T7X Camera  Replacement, Case: 1 단계, 이미지 2/3 Tagital T7X Camera  Replacement, Case: 1 단계, 이미지 3/3
    • Place the Tagital T7X on a sturdy surface.

    • Insert the plastic opening tool into the crack and pry open the tablet. Move the tool along the edge, while continuing to pry up the casing.

  2. Tagital T7X Camera  Replacement, Camera: 2 단계, 이미지 1/3 Tagital T7X Camera  Replacement, Camera: 2 단계, 이미지 2/3 Tagital T7X Camera  Replacement, Camera: 2 단계, 이미지 3/3
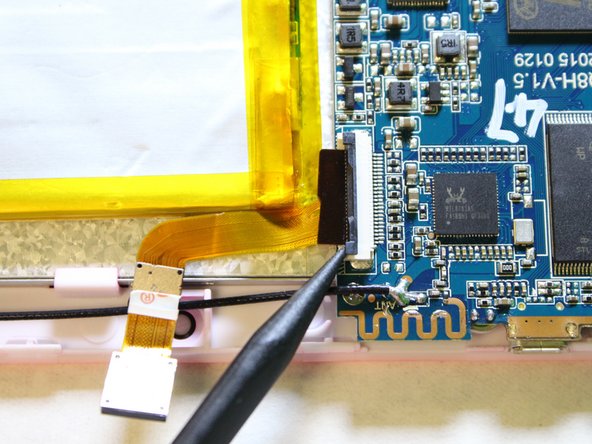
    • Use a spudger to hold the cameras in place.

    • Gently pull the black tape away using your finger.

  3. Tagital T7X Camera  Replacement: 3 단계, 이미지 1/3 Tagital T7X Camera  Replacement: 3 단계, 이미지 2/3 Tagital T7X Camera  Replacement: 3 단계, 이미지 3/3
    • Remove the ribbon cable from the motherboard.

    • Use a spudger to lift the two tabs, freeing the ribbon cable from the socket.

  4. Tagital T7X Camera  Replacement: 4 단계, 이미지 1/3 Tagital T7X Camera  Replacement: 4 단계, 이미지 2/3 Tagital T7X Camera  Replacement: 4 단계, 이미지 3/3
    • Gently pull the ribbon cable away from the motherboard.

    • Don't be afraid to use some force to pull the ribbon cable.

결론

To reassemble your device, follow these instructions in reverse order.

다른 한 분이 해당 안내서를 완성하였습니다.

Hanlong Chen

회원 가입일: 02/10/16

265 평판

안내서 2개 작성하였습니다

USF Tampa, Team 2-1, Sullivan Spring 2016 USF Tampa, Team 2-1, Sullivan Spring 2016 회원

USFT-SULLIVAN-S16S2G1

4 회원들

안내서 12개 작성하였습니다

댓글 0개

댓글 쓰기

조회 통계:

24 시간 전: 0

7일 전: 0

30일 전: 0

전체 시간: 170