주요 콘텐츠로 건너뛰기

Tapwave T2907US Zodiac 2 Directional Pad Replacement

필요한 것

  1. Tapwave T2907US Zodiac 2 Directional Pad Replacement, Back Cover: 1 단계, 이미지 1/1
    • Remove the four Torx T5 screws from the back panel.

  2. Tapwave T2907US Zodiac 2 Directional Pad Replacement: 2 단계, 이미지 1/1
    • Wedge a spudger in between the front and back panel.

    • Apply leverage downwards to the spudger in order to remove the back panel.

  3. Tapwave T2907US Zodiac 2 Directional Pad Replacement, Battery: 3 단계, 이미지 1/1
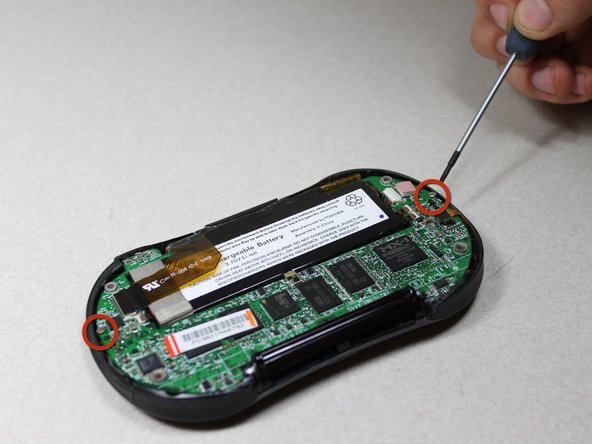
    • Slide the battery out from under the brown wire-tape.

    • Be careful of the wires still connected to the other end of the battery. Do not pull or damage may occur.

  4. Tapwave T2907US Zodiac 2 Directional Pad Replacement: 4 단계, 이미지 1/1
    • Slowly pull the white plug from its receptor. Grasp its sides firmly with a pair of tweezers and gently wiggle from side to side.

  5. Tapwave T2907US Zodiac 2 Directional Pad Replacement, Directional Pad: 5 단계, 이미지 1/1
    • Unscrew the 2 Philips #00 screws on each end of the motherboard.

  6. Tapwave T2907US Zodiac 2 Directional Pad Replacement: 6 단계, 이미지 1/1
    • Pull off the black memory card slot piece.

  7. Tapwave T2907US Zodiac 2 Directional Pad Replacement: 7 단계, 이미지 1/1
    • Unscrew the 2 Philips #00 screws on each side of the charging port.

  8. Tapwave T2907US Zodiac 2 Directional Pad Replacement: 8 단계, 이미지 1/2 Tapwave T2907US Zodiac 2 Directional Pad Replacement: 8 단계, 이미지 2/2
    • Disconnect 2 brown wire-tape ends from each end of the motherboard. Gently pull straight out with tweezers.

  9. Tapwave T2907US Zodiac 2 Directional Pad Replacement: 9 단계, 이미지 1/1
    • Grasp the upper left edge of the motherboard and slide diagonally up and left away from the auxiliary port entrance.

    • Glue connecting the port to the casing may make it difficult to remove. Gently apply force as needed.

  10. Tapwave T2907US Zodiac 2 Directional Pad Replacement: 10 단계, 이미지 1/1
    • Unscrew the 2 silver Philips #00 screws from both sides of the directional pad component on the front casing.

  11. Tapwave T2907US Zodiac 2 Directional Pad Replacement: 11 단계, 이미지 1/2 Tapwave T2907US Zodiac 2 Directional Pad Replacement: 11 단계, 이미지 2/2
    • Take out the 2 pieces of the directional pad with tweezers.

결론

To reassemble your device, follow these instructions in reverse order.

다른 한 분이 해당 안내서를 완성하였습니다.

Daniel Wiseman

회원 가입일: 01/20/12

133 평판

안내서 6개 작성하였습니다

Cal Poly, Team 10-33, Amido Winter 2012 Cal Poly, Team 10-33, Amido Winter 2012 회원

CPSU-AMIDO-W12S10G33

4 회원들

안내서 10개 작성하였습니다

댓글 0개

댓글 쓰기

조회 통계:

24 시간 전: 1

7일 전: 2

30일 전: 3

전체 시간: 633