소개
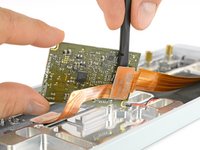
The Digital Signal Processing board is basically the brains of this little brat. Fortunately we can replace this kind of brain if it should malfunction at some point.
필요한 것
-
-
The four longer keys from the fingerboard are to be handled from the left side to get them off.
-
The eight smaller keys need to be levered from the bottom up.
-
-
-
The scissor mechanism of the eight small keys are obstructing the underlying screws.
-
By using again an opening tool or opening pick these can be snapped off easily.
-
-
-
Loosen those 12 screws with a Phillips #00 screwdriver.
-
Then just pull off the four rotary knobs and the volume knob.
-
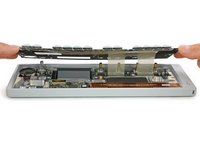
Now it is possible to slightly lift the keyboard and set it back.
-
-
-
-
Unlock the flex cables by pushing the two black nibs on both sides of each connector.
-
Now you can pull the flex cables out and remove the keyboard completely.
-
-
-
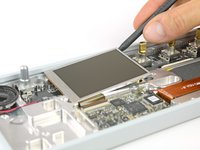
Open the display cable connector by using a plastic opening tool to flip the latch upwards.
-
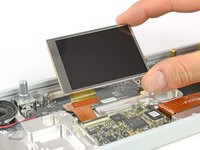
The display is held in place with a mild adhesive. A spudger helps you to get it free.
-
Now you can unplug the cable and take out the whole display.
-
-
-
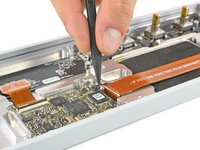
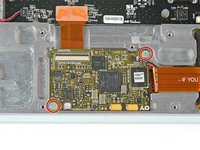
Disconnect the battery connector from the DSP board.
-
Unscrew the two Phillips #00 screws holding the board down.
-


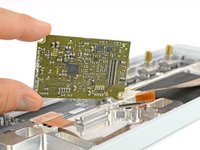
To reassemble your device, follow these instructions in reverse order.
다른 4명이 해당 안내서를 완성하였습니다.

팀

Tobias Isakeit - Repairability Engineer Tobias Isakeit - Repairability Engineer 회원
Business
1 회원
안내서 1,145개를 작성함
14가이드 댓글
Can you advise me where I can order DSP board?
Hi Ju-seok Jang, unfortunately we don’t sell this spare part. You might be able to reach Teenage Engineering directly and get an answer from them where to purchase that part.
I reached out to teenage engineering a month ago about ordering a replacement but they still haven’t responded. Pretty unacceptable seeing as they have a “do it yourself!” ethos for their $1,000 device…
Hi! Did you find a solution? I have the same issue. Thanks!
My OP-1 wouldn’t go into boot mode, and TE told me it was probably the DSP board, and they would look at it for a fee since it was out of warranty. Now I can’t find the DSP board anywhere to do this repair. I then found out this was a common problem, a manufacturing defect. I wonder if there are enough people with these problems the EU 2 year warranty rule can be invoked, or a class-action suit of some sort. TE has basically left those who have these problems without an option to repair the TE manufacturing defect.
Rob