주요 콘텐츠로 건너뛰기

Teenage Engineering OP-1 Flex Cable Replacement

필요한 것

  1. Teenage Engineering OP-1 Flex Cable Replacement, key removal: 1 단계, 이미지 1/3 Teenage Engineering OP-1 Flex Cable Replacement, key removal: 1 단계, 이미지 2/3 Teenage Engineering OP-1 Flex Cable Replacement, key removal: 1 단계, 이미지 3/3
    • To get to the screws beneath the keyboard you need to take some keys off. You can use either an opening tool or an opening pick. The first picture shows how it should look like with all the necessary keys off (12 in total).

    • The four longer keys from the fingerboard are to be handled from the left side to get them off.

    • The eight smaller keys need to be levered from the bottom up.

  2. Teenage Engineering OP-1 Flex Cable Replacement, removing scissors mechanisms: 2 단계, 이미지 1/2 Teenage Engineering OP-1 Flex Cable Replacement, removing scissors mechanisms: 2 단계, 이미지 2/2
    • The scissor mechanism of the eight small keys are obstructing the underlying screws.

    • By using again an opening tool or opening pick these can be snapped off easily.

    • When reassembling be sure to place them in with the correct side facing upwards.

  3. Teenage Engineering OP-1 Flex Cable Replacement, unscrew keyboard: 3 단계, 이미지 1/3 Teenage Engineering OP-1 Flex Cable Replacement, unscrew keyboard: 3 단계, 이미지 2/3 Teenage Engineering OP-1 Flex Cable Replacement, unscrew keyboard: 3 단계, 이미지 3/3
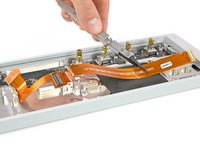
    • Loosen those 12 screws with a Phillips #00 screwdriver.

    • Then just pull off the four rotary knobs and the volume knob.

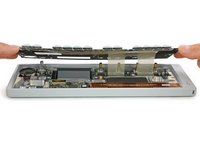
    • Now it is possible to slightly lift the keyboard and set it back.

  4. Teenage Engineering OP-1 Flex Cable Replacement, unplug and remove keyboard: 4 단계, 이미지 1/1
    • Unlock the flex cables by pushing the two black nibs on both sides of each connector.

    • Now you can pull the flex cables out and remove the keyboard completely.

  5. Teenage Engineering OP-1 Flex Cable Replacement, remove display: 5 단계, 이미지 1/3 Teenage Engineering OP-1 Flex Cable Replacement, remove display: 5 단계, 이미지 2/3 Teenage Engineering OP-1 Flex Cable Replacement, remove display: 5 단계, 이미지 3/3
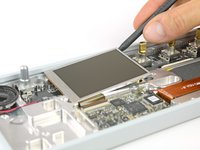
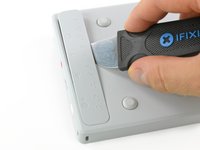
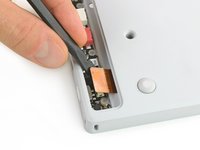
    • Open the display cable connector by using a plastic opening tool to flip the latch upwards.

    • The display is held in place with a mild adhesive. A spudger helps you to get it free.

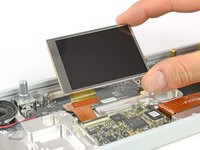
    • Now you can unplug the cable and take out the whole display.

  6. Teenage Engineering OP-1 Flex Cable Replacement, DSP Board: 6 단계, 이미지 1/2 Teenage Engineering OP-1 Flex Cable Replacement, DSP Board: 6 단계, 이미지 2/2
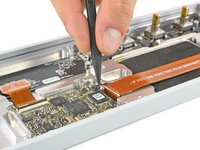
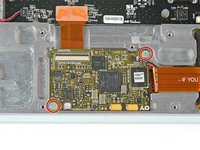
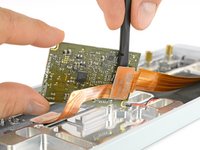
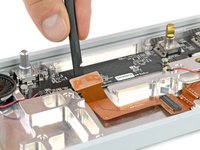
    • Disconnect the battery connector from the DSP board.

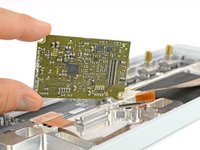
    • Unscrew the two Phillips #00 screws holding the board down.

  7. Teenage Engineering OP-1 Flex Cable Replacement: 7 단계, 이미지 1/2 Teenage Engineering OP-1 Flex Cable Replacement: 7 단계, 이미지 2/2
    • Now you can carefully lift the DSP board to access the flex cable connector underneath.

    • Disconnect the flex cable by using a spudger and remove the DSP board.

  8. Teenage Engineering OP-1 Flex Cable Replacement, Flex Cable: 8 단계, 이미지 1/2 Teenage Engineering OP-1 Flex Cable Replacement, Flex Cable: 8 단계, 이미지 2/2
    • Flip the OP-1 over to open the back panel giving you access to the connector board.

    • Disconnect the flex cable from the connector board.

  9. Teenage Engineering OP-1 Flex Cable Replacement: 9 단계, 이미지 1/2 Teenage Engineering OP-1 Flex Cable Replacement: 9 단계, 이미지 2/2
    • Returning to the front side you can unplug the flex cable from the UI board.

    • Now the flex cable is free and can be pulled out completely.

결론

To reassemble your device, follow these instructions in reverse order.

다른 3명이 해당 안내서를 완성하였습니다.

Tobias Isakeit

회원 가입일: 03/31/14

117,588 평판

안내서 188개 작성하였습니다

Master Techs Master Techs 회원

Community

322 회원들

안내서 2,528개 작성하였습니다

댓글 0개

댓글 쓰기

조회 통계:

24 시간 전: 5

7일 전: 11

30일 전: 40

전체 시간: 4,442