소개
No keyboard no sound. It's easy as that. But don't be afraid, replacing it is also very easy.
This guide shows you how to replace the keyboard of your OP-1.
필요한 것
-
-
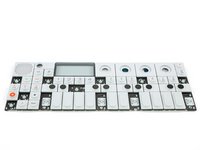
The four longer keys from the fingerboard are to be handled from the left side to get them off.
-
The eight smaller keys need to be levered from the bottom up.
-
-
-
The scissor mechanism of the eight small keys are obstructing the underlying screws.
-
By using again an opening tool or opening pick these can be snapped off easily.
-
-
-
-
Loosen those 12 screws with a Phillips #00 screwdriver.
-
Then just pull off the four rotary knobs and the volume knob.
-
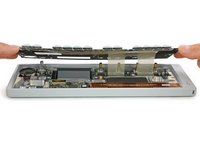
Now it is possible to slightly lift the keyboard and set it back.
-
-
-
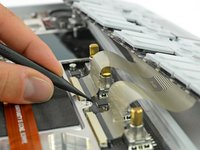
Unlock the flex cables by pushing the two black nibs on both sides of each connector.
-
Now you can pull the flex cables out and remove the keyboard completely.
-


To reassemble your device, follow these instructions in reverse order.
다른 19명이 해당 안내서를 완성하였습니다.

팀

Tobias Isakeit - Repairability Engineer Tobias Isakeit - Repairability Engineer 회원
Business
1 회원
안내서 1,145개를 작성함
19가이드 댓글
Nice guide Tobias!
Worked like a charm. My OP-1 feels brand new.
Thanks iFixit X TeenageEngineering for providing these replacement parts!
Keep it up <3
Awesome guide! Thank you!!!
After reassembling everything I have one key ( the upper A) which retriggers the sound randomly if I press the key.
I hope that the reason is not that I put the flex cable back too loose … and i have to open it again. Anyone had this before?
This happened to me constantly, only by taking the key off I noticed the tiniest amount of moisture, a mere misting, nesting in the board. it had been re-triggering randomly… Not ideal whilst constantly gigging. Seems to be triggering normally now after drying it in front of a heater. The only thing I think could of caused this is a dry ice machine I played beside a few weeks ago.
Perfect. Thanks :)