주요 콘텐츠로 건너뛰기

Teenage Engineering OP-Z Volume Potentiometer Replacement

필요한 것

  1. Teenage Engineering OP-Z Volume Potentiometer Replacement, Back Cover: 1 단계, 이미지 1/3 Teenage Engineering OP-Z Volume Potentiometer Replacement, Back Cover: 1 단계, 이미지 2/3 Teenage Engineering OP-Z Volume Potentiometer Replacement, Back Cover: 1 단계, 이미지 3/3
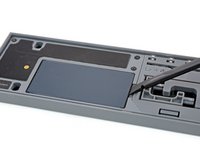
    • Unlock the four rubber feet by turning them 90° counterclockwise using your thumb or finger tip.

    • There is a tiny mark on every foot facing the bottom edge of the OP-Z. After turning them they should face towards the short edge where the on/off switch is.

  2. Teenage Engineering OP-Z Volume Potentiometer Replacement: 2 단계, 이미지 1/2 Teenage Engineering OP-Z Volume Potentiometer Replacement: 2 단계, 이미지 2/2
    • When turning the OP-Z over again the bottom plate should come off by itself (thanks gravity).

    • If the bottom plate won’t come off you might want to make sure every foot is rotated correctly and gently tug on one of them.

  3. Teenage Engineering OP-Z Volume Potentiometer Replacement: 3 단계, 이미지 1/1
    • Remove the bottom plate including the rubber feet.

  4. Teenage Engineering OP-Z Volume Potentiometer Replacement, Battery: 4 단계, 이미지 1/2 Teenage Engineering OP-Z Volume Potentiometer Replacement, Battery: 4 단계, 이미지 2/2
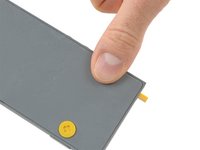
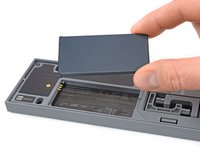
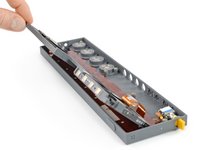
    • Use your fingernail or a spudger to lift the battery on the right side where the notch is.

  5. Teenage Engineering OP-Z Volume Potentiometer Replacement: 5 단계, 이미지 1/2 Teenage Engineering OP-Z Volume Potentiometer Replacement: 5 단계, 이미지 2/2
    • Remove the battery.

    • When installing the new battery make sure you put it in contact side first.

  6. Teenage Engineering OP-Z Volume Potentiometer Replacement, Expansion Module: 6 단계, 이미지 1/2 Teenage Engineering OP-Z Volume Potentiometer Replacement, Expansion Module: 6 단계, 이미지 2/2
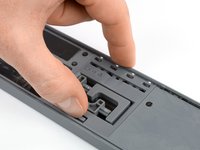
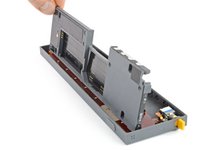
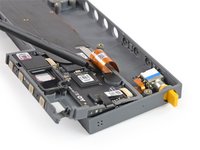
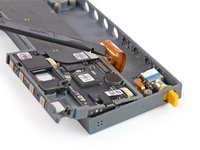
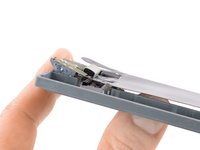
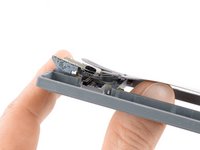
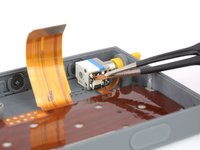
    • Use your finger or a spudger to push up on the small tab on the bottom of the module.

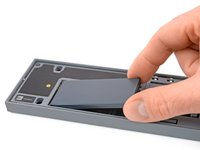
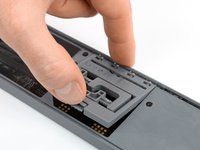
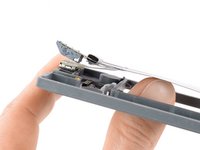
    • Lift the module up and out of its recess bottom first.

  7. Teenage Engineering OP-Z Volume Potentiometer Replacement: 7 단계, 이미지 1/1
    • Remove the module.

    • When inserting another module make sure you put it in outputs first. Then push down the bottom part for the tab to engage.

  8. Teenage Engineering OP-Z Volume Potentiometer Replacement, Midframe: 8 단계, 이미지 1/1
    • Remove the five Torx T4 screws.

  9. Teenage Engineering OP-Z Volume Potentiometer Replacement: 9 단계, 이미지 1/2 Teenage Engineering OP-Z Volume Potentiometer Replacement: 9 단계, 이미지 2/2
    • Place a spudger in the cutout of the extension module to lift the midframe.

    • Be careful not to damage the highway flex cable underneath.

    • Don’t remove the midframe yet. It is still connected to the rest of the OP-Z.

  10. Teenage Engineering OP-Z Volume Potentiometer Replacement: 10 단계, 이미지 1/3 Teenage Engineering OP-Z Volume Potentiometer Replacement: 10 단계, 이미지 2/3 Teenage Engineering OP-Z Volume Potentiometer Replacement: 10 단계, 이미지 3/3
    • Flip the midframe over to gain access to the flex cable connector underneath.

  11. Teenage Engineering OP-Z Volume Potentiometer Replacement: 11 단계, 이미지 1/2 Teenage Engineering OP-Z Volume Potentiometer Replacement: 11 단계, 이미지 2/2
    • Use the flat end of a spudger to disconnect the flex cable from the front panel assembly.

  12. Teenage Engineering OP-Z Volume Potentiometer Replacement, Highway Flex Cable: 12 단계, 이미지 1/2 Teenage Engineering OP-Z Volume Potentiometer Replacement, Highway Flex Cable: 12 단계, 이미지 2/2
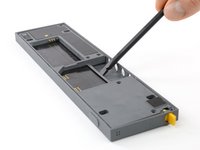
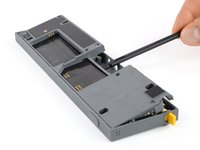
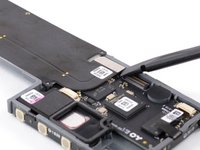
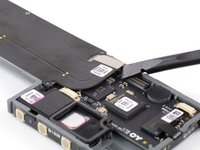
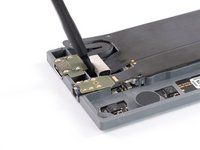
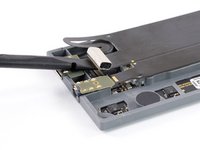
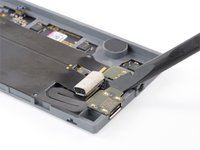
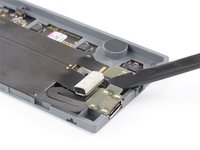
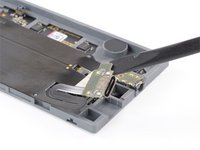
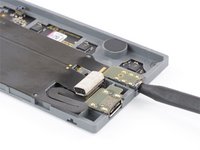
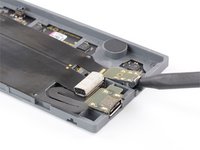
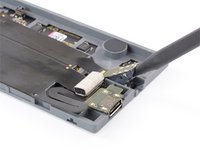
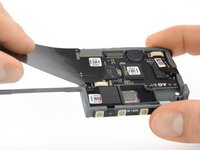
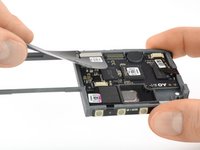
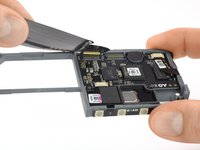
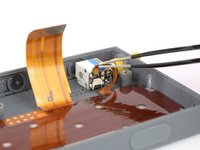
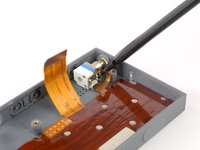
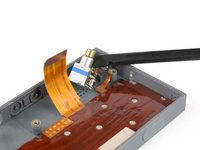
    • Use a spudger to disconnect the highway flex cable from the DSP board.

  13. Teenage Engineering OP-Z Volume Potentiometer Replacement: 13 단계, 이미지 1/2 Teenage Engineering OP-Z Volume Potentiometer Replacement: 13 단계, 이미지 2/2
    • Use the spudger to disconnect the flex cable from the encoder board.

  14. Teenage Engineering OP-Z Volume Potentiometer Replacement: 14 단계, 이미지 1/3 Teenage Engineering OP-Z Volume Potentiometer Replacement: 14 단계, 이미지 2/3 Teenage Engineering OP-Z Volume Potentiometer Replacement: 14 단계, 이미지 3/3
    • Slowly pry the USB-C connector out of its recess. Use the flat end of a spudger on the small nib on the USB-C board.

    • The connector is slightly glued down.

  15. Teenage Engineering OP-Z Volume Potentiometer Replacement: 15 단계, 이미지 1/3 Teenage Engineering OP-Z Volume Potentiometer Replacement: 15 단계, 이미지 2/3 Teenage Engineering OP-Z Volume Potentiometer Replacement: 15 단계, 이미지 3/3
    • Insert the pointy end of the spudger into the line-out jack and lever it up carefully.

    • The jack connector might sit tight and is slightly glued down.

  16. Teenage Engineering OP-Z Volume Potentiometer Replacement: 16 단계, 이미지 1/3 Teenage Engineering OP-Z Volume Potentiometer Replacement: 16 단계, 이미지 2/3 Teenage Engineering OP-Z Volume Potentiometer Replacement: 16 단계, 이미지 3/3
    • The highway flex cable is slightly adhered to the midframe. To remove it, gently push it out from underneath.

    • A small transparent part may pop out. This is the light guide for the bluetooth indicator. Just hinge it back onto the midframe as seen here.

  17. Teenage Engineering OP-Z Volume Potentiometer Replacement: 17 단계, 이미지 1/3 Teenage Engineering OP-Z Volume Potentiometer Replacement: 17 단계, 이미지 2/3 Teenage Engineering OP-Z Volume Potentiometer Replacement: 17 단계, 이미지 3/3
    • Peel the highway flex cable off the midframe and remove it.

  18. Teenage Engineering OP-Z Volume Potentiometer Replacement, Volume Pot: 18 단계, 이미지 1/2 Teenage Engineering OP-Z Volume Potentiometer Replacement, Volume Pot: 18 단계, 이미지 2/2
    • Use one arm of a tweezer to lift the small black flap of the ZIF connector.

  19. Teenage Engineering OP-Z Volume Potentiometer Replacement: 19 단계, 이미지 1/2 Teenage Engineering OP-Z Volume Potentiometer Replacement: 19 단계, 이미지 2/2
    • Use a pair of flat nose tweezers to pull the small flex cable up and out out the ZIF connector.

    • When reassembling make sure to insert the flex cable all the way.

  20. Teenage Engineering OP-Z Volume Potentiometer Replacement: 20 단계, 이미지 1/2 Teenage Engineering OP-Z Volume Potentiometer Replacement: 20 단계, 이미지 2/2
    • Grab the volume knob with your fingers or a pair of pliers and pull it off its axle.

  21. Teenage Engineering OP-Z Volume Potentiometer Replacement: 21 단계, 이미지 1/2 Teenage Engineering OP-Z Volume Potentiometer Replacement: 21 단계, 이미지 2/2
    • Use a spudger to lever up the axle of the volume potentiometer. This way it will clear the frame’s cutout.

    • The volume pot is slightly glued down.

  22. Teenage Engineering OP-Z Volume Potentiometer Replacement: 22 단계, 이미지 1/1
    • Remove the volume potentiometer.

결론

To reassemble your device, follow these instructions in reverse order.

Tobias Isakeit

회원 가입일: 03/31/14

116,767 평판

안내서 188개 작성하였습니다

Master Techs Master Techs 회원

Community

322 회원들

안내서 2,506개 작성하였습니다

댓글 0개

댓글 쓰기

조회 통계:

24 시간 전: 1

7일 전: 4

30일 전: 23

전체 시간: 1,104