주요 콘텐츠로 건너뛰기

Television Coaxial Connector Replacement

필요한 것

  1. Television Coaxial Connector Replacement, Coaxial Connector: 1 단계, 이미지 1/1
    • Kids pulled the cable connector off the back of the hello kitty TV

  2. Television Coaxial Connector Replacement: 2 단계, 이미지 1/1
    • Remove screws from back, there's 5 in this case circled in red.

    • Notice the parts container highlighted in orange always a good idea for screws.

    • Cookie circled in pink for good measure.

  3. Television Coaxial Connector Replacement: 3 단계, 이미지 1/1
    • asess damaged area once cover is off.

  4. Television Coaxial Connector Replacement: 4 단계, 이미지 1/1
    • Beware the danger areas, Capacitors (especially big ones) can hold a charge for months, enough to throw you across the room and melt tools.

    • High voltage areas are outlined in red.

    • Delicate sensitive areas outlined in blue.

  5. Television Coaxial Connector Replacement: 5 단계, 이미지 1/1
    • remove both covers on video input box, use a small prying tool if necessary, but you should be able to remove them by hand as seen here.

  6. Television Coaxial Connector Replacement: 6 단계, 이미지 1/1
    이 단계에 사용된 도구:
    Desoldering Pump
    $3.99
    구매
    • Use a soldering iron, and solder sucker to remove excess solder from the connector area. You can also use solder-absorbing braided wick.

  7. Television Coaxial Connector Replacement: 7 단계, 이미지 1/1
    • identify, where the centre pin connector was ripped from the board.

    • Use needle-nose pliers to straighten out the tin bracket as much as possible. It does not need to be perfect, but this helps with the alignment of the connector to the back of the tv cover.

  8. Television Coaxial Connector Replacement: 8 단계, 이미지 1/1
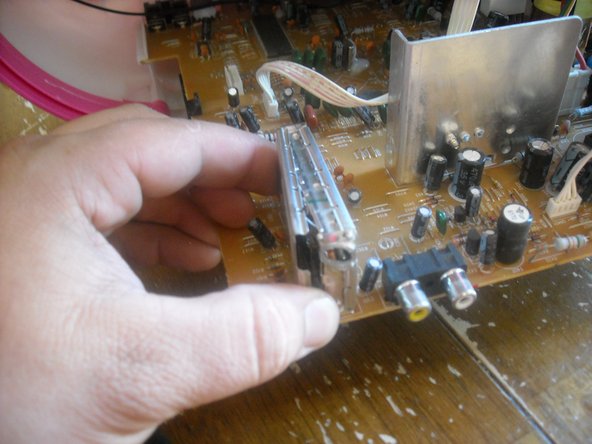
    • Align the connector, ensuring the center pin can reach the the spot on the board where it needs to be re-connected.

    • Solder the barrel of the connector to the metal bracket first, try not to let it get too hot. You may want to use a solder gun with dual heat of at least 50 watts for this part.

    • When that's done don't forget to solder the center pin to the board using as little solder as possible, to ensure there's no grounding to the metal cover.

  9. Television Coaxial Connector Replacement: 9 단계, 이미지 1/1
    • Re-seat both covers using needle nose pliers to ensure they're seated properly.

  10. Television Coaxial Connector Replacement: 10 단계, 이미지 1/1
    • Carefully reconnect the coax jack.

  11. Television Coaxial Connector Replacement: 11 단계, 이미지 1/1
    • Carefully replace the plastic cover. Replace cover screws.

    • Repairing is more environmentally responsible than disposing of a TV in a landfill. You are saving the environment from the Lead (Pb) glass from the rear of the CRT and Barium (Ba) glass in front screen.

    • There is very little danger of the CRT imploding or cracking if you use common sense, they are built for shipping and rough handling. The cadmium in the screen is unlikely to escape even during breakage, and is not much of an environmental hazard.

결론

To reassemble your device, follow these instructions in reverse order.

다른 8명이 해당 안내서를 완성하였습니다.

brant

회원 가입일: 08/30/10

237 평판

안내서 1개 작성함

댓글 6개

cara memperbaiki warna

Abdullah Rojai - 답글

where can i get the connectors?

Dominic Bronson - 답글

C'est très intéressant, Mais seulement si vous pouvez traduire en français

Mohamed Bouchouit - 답글

11.11.16 Francais en anglaise= French to english. It's very interesting. I only wish u'd translate into French!

Franchette DuBose-Burgess -

Nice work, what do use to take great pics?

Matt - 답글

댓글 쓰기

조회 통계:

24 시간 전: 1

7일 전: 20

30일 전: 83

전체 시간: 48,945