주요 콘텐츠로 건너뛰기

Toshiba SD-K740 Front Flap Tray Door Replacement

필요한 것

  1. Toshiba SD-K740 Front Flap Tray Door Replacement, Top Panel: 1 단계, 이미지 1/1
    • Unplug the DVD player before beginning.

    • Remove the three 7.7 mm screws from the back panel using a Phillips #0 screwdriver.

  2. Toshiba SD-K740 Front Flap Tray Door Replacement: 2 단계, 이미지 1/2 Toshiba SD-K740 Front Flap Tray Door Replacement: 2 단계, 이미지 2/2
    • Turn the DVD player on its side.

    • Remove the 7.7 mm screw.

    • Flip the DVD player onto its other side.

    • Remove the 7.7 mm screw.

  3. Toshiba SD-K740 Front Flap Tray Door Replacement: 3 단계, 이미지 1/1
    • Flip the DVD player over onto its front face.

    • Remove the back panel by lifting up and pulling it towards yourself.

  4. Toshiba SD-K740 Front Flap Tray Door Replacement, Front Panel: 4 단계, 이미지 1/1
    • Flip the DVD player so its top is sitting on your working surface.

    • Lift and push away the two tabs located in the middle of the player.

    • The front panel will not detach during this step, so do not force it.

  5. Toshiba SD-K740 Front Flap Tray Door Replacement: 5 단계, 이미지 1/1
    • Flip the DVD player on its side.

    • Lift and slide forward the single tab on the side.

    • The front panel will not detach during this step, so do not force it.

  6. Toshiba SD-K740 Front Flap Tray Door Replacement: 6 단계, 이미지 1/2 Toshiba SD-K740 Front Flap Tray Door Replacement: 6 단계, 이미지 2/2
    • Grasp the front panel and pull forward to your right to remove it.

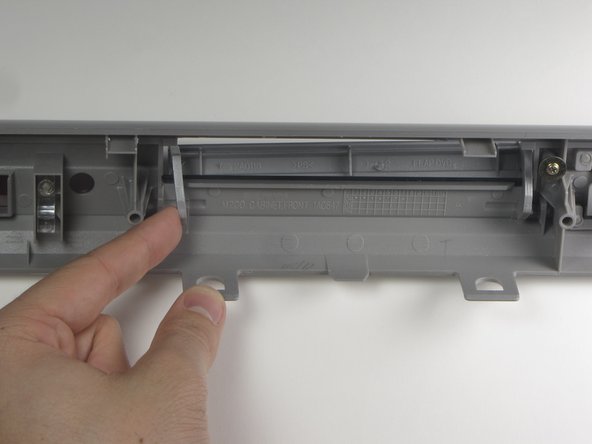
  7. Toshiba SD-K740 Front Flap Tray Door Replacement, Front Flap Tray Door: 7 단계, 이미지 1/2 Toshiba SD-K740 Front Flap Tray Door Replacement, Front Flap Tray Door: 7 단계, 이미지 2/2
    • On back side of front panel very carefully apply pressure to the left hand side of the flap hinge.

    • There is just enough tolerance in the plastic to allow removal, be careful of brittle plastic.

  8. Toshiba SD-K740 Front Flap Tray Door Replacement: 8 단계, 이미지 1/1
    • Once the peg is free from the left restraint, carefully remove the left part of the flap.

    • Carefully remove the right peg from the restraint.

    • Do not pull away from the front panel because the spring is still attached.

    • Do not force the plastic.

  9. Toshiba SD-K740 Front Flap Tray Door Replacement: 9 단계, 이미지 1/1
    • Remove the spring from the end of the right peg by pulling the door away from the spring.

    • Do not pull away from the front panel until the spring has been removed from the flap.

결론

To reassemble your device, follow these instructions in reverse order.

John Lokker

회원 가입일: 01/20/11

324 평판

안내서 3개 작성하였습니다

Cal Poly, Team 1-16, Amido Winter 2011 Cal Poly, Team 1-16, Amido Winter 2011 회원

CPSU-AMIDO-W11S1G16

4 회원들

안내서 8개 작성하였습니다

댓글 0개

댓글 쓰기

조회 통계:

24 시간 전: 0

7일 전: 1

30일 전: 2

전체 시간: 1,392