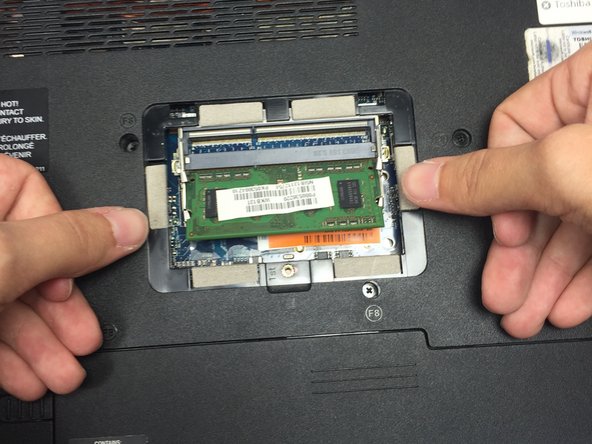
주요 콘텐츠로 건너뛰기

Toshiba Satellite A665-S5170 RAM Replacement

필요한 것

  1. Toshiba Satellite A665-S5170 RAM Replacement, RAM: 1 단계, 이미지 1/1
    • Turn your computer upside down so that the bottom of your laptop is facing up.

    • Position your laptop so that you are able to read the words printed on the labels on the bottom of the computer from left to right.

    • Using a Phillips head 0 screw driver, remove the 2mm Phillips head screw at the bottom edge of the RAM panel (located in the center of the bottom of the laptop) by rotating the screw counterclockwise.

  2. Toshiba Satellite A665-S5170 RAM Replacement: 2 단계, 이미지 1/2 Toshiba Satellite A665-S5170 RAM Replacement: 2 단계, 이미지 2/2
    • Insert something thin, such as your fingernail or a credit card, into the slot at the bottom edge of the RAM panel.

    • Pull up with your hand until the cover of the RAM panel pops out of place and can be removed completely.

  3. Toshiba Satellite A665-S5170 RAM Replacement: 3 단계, 이미지 1/2 Toshiba Satellite A665-S5170 RAM Replacement: 3 단계, 이미지 2/2
    • With your thumbs, press down on the small silver clamps on the left and right edges of the upper green RAM chip until the clamps release the chip.

    • When the chip is released, it will pop up and stick out at a 45 degree angle from the computer.

  4. Toshiba Satellite A665-S5170 RAM Replacement: 4 단계, 이미지 1/1
    • Remove the upper RAM chip from its socket by gently gripping the left and right edges with your fingers and pulling the chip towards your body until it slides completely free of the computer.

  5. Toshiba Satellite A665-S5170 RAM Replacement: 5 단계, 이미지 1/2 Toshiba Satellite A665-S5170 RAM Replacement: 5 단계, 이미지 2/2
    • With your thumbs, press down on the small silver clamps on the left and right edges of the lower green RAM chip until the clamps release the chip.

    • When the chip is released, it will pop up and stick out at a 45 degree angle from the computer.

  6. Toshiba Satellite A665-S5170 RAM Replacement: 6 단계, 이미지 1/1
    • Remove the lower RAM chip from its socket by gently gripping the left and right edges with your fingers and pulling the chip towards your body until it slides completely free of the computer.

결론

To reassemble your device, follow these instructions in reverse order.

다른 한 분이 해당 안내서를 완성하였습니다.

Will Peterson

회원 가입일: 10/31/16

121 평판

안내서 1개 작성함

Baylor, Team 4-5, Williams Fall 2016 Baylor, Team 4-5, Williams Fall 2016 회원

BU-WILLIAMS-F16S4G5

3 회원들

안내서 12개 작성하였습니다

댓글 0개

댓글 쓰기

조회 통계:

24 시간 전: 0

7일 전: 0

30일 전: 5

전체 시간: 790