주요 콘텐츠로 건너뛰기

Toshiba Satellite C55D-B5206 Motherboard Replacement

필요한 것

  1. Toshiba Satellite C55D-B5206 Motherboard Replacement, Battery: 1 단계, 이미지 1/2 Toshiba Satellite C55D-B5206 Motherboard Replacement, Battery: 1 단계, 이미지 2/2
    • Turn the laptop upside down so the battery faces upwards.

    • Remove the two 7 mm Phillips screws that secure the battery.

  2. Toshiba Satellite C55D-B5206 Motherboard Replacement: 2 단계, 이미지 1/2 Toshiba Satellite C55D-B5206 Motherboard Replacement: 2 단계, 이미지 2/2
    • Place both thumbs on the outside edges of the battery that meet the device.

    • Push the battery out and away from the laptop.

    • The battery should slide out with little resistance.

  3. Toshiba Satellite C55D-B5206 Motherboard Replacement, Back Casing: 3 단계, 이미지 1/1
    • Remove the thirteen 7 mm Phillips #1 screws from the bottom of the chassis.

  4. Toshiba Satellite C55D-B5206 Motherboard Replacement: 4 단계, 이미지 1/1
    • Starting at the center, insert a spudger into the crevice between the bottom casing and the keyboard and pry upwards.

    • Gently slide the spudger along the entire perimeter of the device and pry the casing loose to unhook six clips.

    • These images show a metal spudger, which has the potential to damage the device. Use a plastic opening tool or standard spudger instead.

    • Do not be alarmed if you feel a gentle tug or hear a click as you slide your spudger. These sounds are the clips detaching from the casing.

  5. Toshiba Satellite C55D-B5206 Motherboard Replacement: 5 단계, 이미지 1/3 Toshiba Satellite C55D-B5206 Motherboard Replacement: 5 단계, 이미지 2/3 Toshiba Satellite C55D-B5206 Motherboard Replacement: 5 단계, 이미지 3/3
    • Use your fingers to finish removing the casing from the device.

  6. Toshiba Satellite C55D-B5206 Motherboard Replacement, Fan: 6 단계, 이미지 1/2 Toshiba Satellite C55D-B5206 Motherboard Replacement, Fan: 6 단계, 이미지 2/2
    • Remove the three 7 mm Philips head screws by turning the screws counter clockwise.

  7. Toshiba Satellite C55D-B5206 Motherboard Replacement: 7 단계, 이미지 1/1
    • Gently lift the copper heat sink to make the fan more accessible.

    • The copper heat sink should not detach. Do not pull on it too hard.

  8. Toshiba Satellite C55D-B5206 Motherboard Replacement: 8 단계, 이미지 1/2 Toshiba Satellite C55D-B5206 Motherboard Replacement: 8 단계, 이미지 2/2
    • Maneuver the fan's bottom left corner above the copper heat sink.

  9. Toshiba Satellite C55D-B5206 Motherboard Replacement: 9 단계, 이미지 1/1
    • Cautiously move the white cable cover to allow for the fan to be lifted away.

    • Do not detach the white cable cover.

  10. Toshiba Satellite C55D-B5206 Motherboard Replacement: 10 단계, 이미지 1/1
    • Lift the fan approximately one inch upward from back of the laptop.

    • Detach the white cable connector from the connective port.

  11. Toshiba Satellite C55D-B5206 Motherboard Replacement: 11 단계, 이미지 1/1
    • Once the cable port is detached, lift the fan free from the device.

  12. Toshiba Satellite C55D-B5206 Motherboard Replacement, Hard Drive: 12 단계, 이미지 1/1
    • Once the device is open from the bottom, look for the bright blue plastic frame which encases the hard drive

  13. Toshiba Satellite C55D-B5206 Motherboard Replacement: 13 단계, 이미지 1/3 Toshiba Satellite C55D-B5206 Motherboard Replacement: 13 단계, 이미지 2/3 Toshiba Satellite C55D-B5206 Motherboard Replacement: 13 단계, 이미지 3/3
    • Locate the four side plugs of the blue plastic casing which secure the hard drive in place.

    • Unplug the four clips by gently pulling them upward.

  14. Toshiba Satellite C55D-B5206 Motherboard Replacement: 14 단계, 이미지 1/2 Toshiba Satellite C55D-B5206 Motherboard Replacement: 14 단계, 이미지 2/2
    • Gently slide the hard disk towards the right side of your laptop.

    • The hard disk drive should now be free from the black connector port.

  15. Toshiba Satellite C55D-B5206 Motherboard Replacement: 15 단계, 이미지 1/3 Toshiba Satellite C55D-B5206 Motherboard Replacement: 15 단계, 이미지 2/3 Toshiba Satellite C55D-B5206 Motherboard Replacement: 15 단계, 이미지 3/3
    • Gently lift the hard drive upward, removing it from the Toshiba device.

    • The hard disk should now be completely removed from the Toshiba Satellite C55D device.

  16. Toshiba Satellite C55D-B5206 Motherboard Replacement, Motherboard: 16 단계, 이미지 1/1
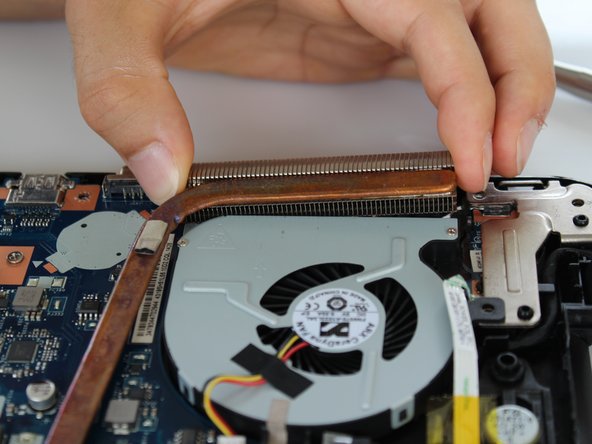
    • Remove all pieces of yellow polyimide tape that covers the connectors and cables on the motherboard.

  17. Toshiba Satellite C55D-B5206 Motherboard Replacement: 17 단계, 이미지 1/3 Toshiba Satellite C55D-B5206 Motherboard Replacement: 17 단계, 이미지 2/3 Toshiba Satellite C55D-B5206 Motherboard Replacement: 17 단계, 이미지 3/3
    • Unplug all wires from the motherboard. Large wires will be held in by gray plastic clips on the sides of the plugs that are to be pushed out. Smaller wires either pull straight out or will have a gray tab to lift out before pulling the wire out.

  18. Toshiba Satellite C55D-B5206 Motherboard Replacement: 18 단계, 이미지 1/1
    • Remove the three screws circled in the picture.

  19. Toshiba Satellite C55D-B5206 Motherboard Replacement: 19 단계, 이미지 1/1
    • Carefully remove the motherboard from the laptop.

결론

To reassemble your device, follow these instructions in reverse order.

Drew Fryman

회원 가입일: 04/11/22

193 평판

안내서 2개 작성하였습니다

IUPUI, Team 1-2, Beck Spring 2022 IUPUI, Team 1-2, Beck Spring 2022 회원

IUPUI-BECK-S22S1G2

4 회원들

안내서 12개 작성하였습니다

댓글 0개

댓글 쓰기

조회 통계:

24 시간 전: 1

7일 전: 2

30일 전: 9

전체 시간: 326