주요 콘텐츠로 건너뛰기

Toshiba Satellite CL15t-B1204X Screen Display Assembly Replacement

필요한 것

  1. Toshiba Satellite CL15t-B1204X Screen Display Assembly Replacement, Battery: 1 단계, 이미지 1/1
    • Flip the laptop over so the bottom of the device is facing upward.

  2. Toshiba Satellite CL15t-B1204X Screen Display Assembly Replacement: 2 단계, 이미지 1/1
    • Unscrew the 10 5mm Phillips screws, located on the bottom side of the notebook using the PH1 bit and the Magnetic Driver.

  3. Toshiba Satellite CL15t-B1204X Screen Display Assembly Replacement: 3 단계, 이미지 1/1
    • Pry open the bottom cover of the notebook with the plastic spudger tools. Slide a thin tool along the edges without ports to pop open the latches.

    • Be careful not to bend or crack the plastic back cover.

  4. Toshiba Satellite CL15t-B1204X Screen Display Assembly Replacement: 4 단계, 이미지 1/1
    • Remove the 1" yellow tape on top of the battery. This piece of tape is holding down the battery connection cable.

  5. Toshiba Satellite CL15t-B1204X Screen Display Assembly Replacement: 5 단계, 이미지 1/1
    • Lightly grip the battery on the two longest sides. Gently pull up until the adhesive on the notebook is separated from the battery.

  6. Toshiba Satellite CL15t-B1204X Screen Display Assembly Replacement: 6 단계, 이미지 1/1
    • Carefully unplug the battery from the device motherboard.

  7. Toshiba Satellite CL15t-B1204X Screen Display Assembly Replacement, Screen Display Assembly: 7 단계, 이미지 1/3 Toshiba Satellite CL15t-B1204X Screen Display Assembly Replacement, Screen Display Assembly: 7 단계, 이미지 2/3 Toshiba Satellite CL15t-B1204X Screen Display Assembly Replacement, Screen Display Assembly: 7 단계, 이미지 3/3
    • Unplug the power connector by pulling back the tape and sliding the connector away using the blue opening tool.

  8. Toshiba Satellite CL15t-B1204X Screen Display Assembly Replacement: 8 단계, 이미지 1/3 Toshiba Satellite CL15t-B1204X Screen Display Assembly Replacement: 8 단계, 이미지 2/3 Toshiba Satellite CL15t-B1204X Screen Display Assembly Replacement: 8 단계, 이미지 3/3
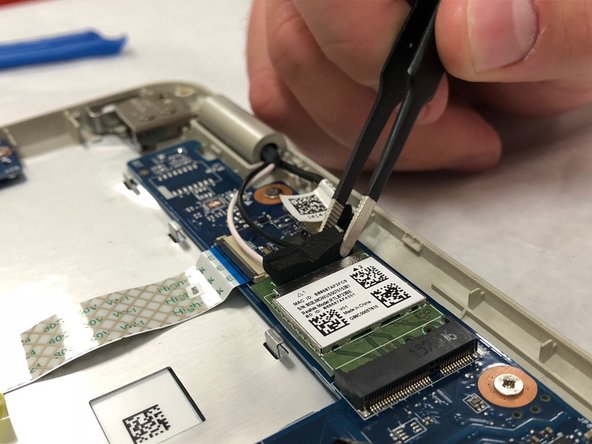
    • Remove the foam and unplug the black and white coaxial cables to the network card by pulling upward using the black tweezers.

  9. Toshiba Satellite CL15t-B1204X Screen Display Assembly Replacement: 9 단계, 이미지 1/2 Toshiba Satellite CL15t-B1204X Screen Display Assembly Replacement: 9 단계, 이미지 2/2
    • Remove the black webcam connector by pulling backwards with the tweezers.

  10. Toshiba Satellite CL15t-B1204X Screen Display Assembly Replacement: 10 단계, 이미지 1/1
    • Using a Phillips #1 screwdriver, remove four 5.00 mm screws from both corner hinges of the display assembly.

  11. Toshiba Satellite CL15t-B1204X Screen Display Assembly Replacement: 11 단계, 이미지 1/3 Toshiba Satellite CL15t-B1204X Screen Display Assembly Replacement: 11 단계, 이미지 2/3 Toshiba Satellite CL15t-B1204X Screen Display Assembly Replacement: 11 단계, 이미지 3/3
    • Open the laptop and remove the display assembly from the keyboard assembly.

결론

To reassemble your device, follow these instructions in reverse order.

다른 한 분이 해당 안내서를 완성하였습니다.

Matthew Hook

회원 가입일: 03/25/19

439 평판

안내서 4개 작성하였습니다

IUPUI, Team S1-G6, Hovde Fall 2019 IUPUI, Team S1-G6, Hovde Fall 2019 회원

IUPUI-HOVDE-F19S1G6

4 회원들

안내서 6개 작성하였습니다

댓글 0개

댓글 쓰기

조회 통계:

24 시간 전: 1

7일 전: 1

30일 전: 4

전체 시간: 283