주요 콘텐츠로 건너뛰기

Toshiba Satellite L305-S5875 Speakers Replacement

필요한 것

  1. Toshiba Satellite L305-S5875 Speakers Replacement, Battery: 1 단계, 이미지 1/1
    • Close the laptop lid and flip the laptop over.

    • Switch the lock button on the left to the unlock position. (The unlock position is to the left side.)

  2. Toshiba Satellite L305-S5875 Speakers Replacement: 2 단계, 이미지 1/3 Toshiba Satellite L305-S5875 Speakers Replacement: 2 단계, 이미지 2/3 Toshiba Satellite L305-S5875 Speakers Replacement: 2 단계, 이미지 3/3
    • Push the release button to the right.

    • Hold the release button to the right and lift the battery out of its housing.

  3. Toshiba Satellite L305-S5875 Speakers Replacement, Keyboard: 3 단계, 이미지 1/3 Toshiba Satellite L305-S5875 Speakers Replacement, Keyboard: 3 단계, 이미지 2/3 Toshiba Satellite L305-S5875 Speakers Replacement, Keyboard: 3 단계, 이미지 3/3
    • Open the laptop so the keyboard is facing you.

    • Using your fingers, remove the thin plastic cover above the keyboard.

    • Potential for device damage: Do not apply too much force when removing the cover piece as it can break.

  4. Toshiba Satellite L305-S5875 Speakers Replacement: 4 단계, 이미지 1/1
    • Remove the two 4.8 mm screws from underneath the plastic cover piece using a Phillips #00 screwdriver.

  5. Toshiba Satellite L305-S5875 Speakers Replacement: 5 단계, 이미지 1/2 Toshiba Satellite L305-S5875 Speakers Replacement: 5 단계, 이미지 2/2
    • Starting at the top, gently raise the keyboard enough to remove it from the socket.

    • Potential for device damage: DO NOT pull out the keyboard after it's out of its socket. The keyboard is connected to the hard drive through a data cable and removing forcefully could damage the cable and laptop.

  6. Toshiba Satellite L305-S5875 Speakers Replacement: 6 단계, 이미지 1/2 Toshiba Satellite L305-S5875 Speakers Replacement: 6 단계, 이미지 2/2
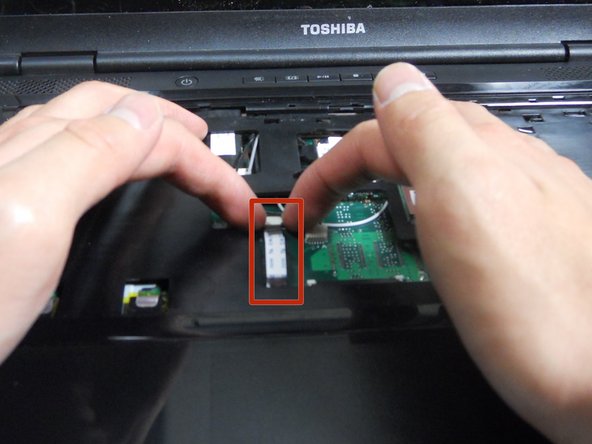
    • Locate the data cable that is connected to the motherboard.

    • Pull the white ZIF connector towards the screen to remove it.

    • Pull the black ribbon cable away from the screen.

  7. Toshiba Satellite L305-S5875 Speakers Replacement: 7 단계, 이미지 1/1
    • With the black ribbon cable now disconnected, remove the keyboard from its housing.

  8. Toshiba Satellite L305-S5875 Speakers Replacement, Speakers: 8 단계, 이미지 1/1
    • Close the laptop and flip it over onto its back.

    • Remove the eleven 6.6 mm type-00 Phillips head screws along the perimeter and in the center of the laptop, per image 1.

  9. Toshiba Satellite L305-S5875 Speakers Replacement: 9 단계, 이미지 1/1
    • Remove the three 3.7 mm type-00 Phillips head screws located in the battery compartment, per image 1.

  10. Toshiba Satellite L305-S5875 Speakers Replacement: 10 단계, 이미지 1/2 Toshiba Satellite L305-S5875 Speakers Replacement: 10 단계, 이미지 2/2
    • Flip the laptop back over again, and open the screen as far back as it can go.

  11. Toshiba Satellite L305-S5875 Speakers Replacement: 11 단계, 이미지 1/2 Toshiba Satellite L305-S5875 Speakers Replacement: 11 단계, 이미지 2/2
    • Using your fingers, slide the black ZIF connector out, per image 1.

    • Once the ZIF connector has been moved, the white ribbon cable can be removed, per image 2.

  12. Toshiba Satellite L305-S5875 Speakers Replacement: 12 단계, 이미지 1/2 Toshiba Satellite L305-S5875 Speakers Replacement: 12 단계, 이미지 2/2
    • Using your fingers, remove the white plastic connector located to the right of the ribbon connector, per image 1.

  13. Toshiba Satellite L305-S5875 Speakers Replacement: 13 단계, 이미지 1/3 Toshiba Satellite L305-S5875 Speakers Replacement: 13 단계, 이미지 2/3 Toshiba Satellite L305-S5875 Speakers Replacement: 13 단계, 이미지 3/3
    • Use the iFixit opening tool to begin removing the cover.

    • After creating enough space, you can use your hands to completely open the cover.

    • Possible Device Damage: Make sure all the screws have been removed before attempting to open the cover, or else the screw threads might strip if too much force is applied.

  14. Toshiba Satellite L305-S5875 Speakers Replacement: 14 단계, 이미지 1/2 Toshiba Satellite L305-S5875 Speakers Replacement: 14 단계, 이미지 2/2
    • Put the laptop aside and locate the speakers attached to the cover, per image 1.

    • Remove the two 3.6 mm type-00 Phillips head screws from each speaker.

    • Remove the old speakers and replace with the new ones.

    • Congratulations, the repair is now complete!

결론

To reassemble your device, follow these instructions in reverse order.

Juan

회원 가입일: 01/11/13

109 평판

안내서 3개 작성하였습니다

Cal Poly, Team 20-5, Maness Winter 2013 Cal Poly, Team 20-5, Maness Winter 2013 회원

CPSU-MANESS-W13S20G5

4 회원들

안내서 10개 작성하였습니다

댓글 0개

댓글 쓰기

조회 통계:

24 시간 전: 0

7일 전: 1

30일 전: 12

전체 시간: 1,883