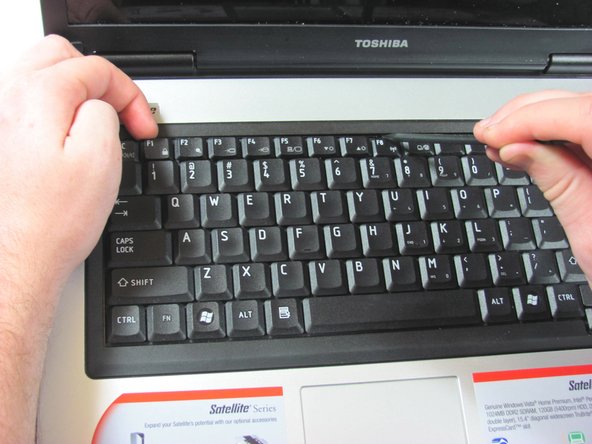
주요 콘텐츠로 건너뛰기

Toshiba Satellite L45-S7423 Keyboard Replacement

필요한 것

  1. Toshiba Satellite L45-S7423 Keyboard Replacement, Battery: 1 단계, 이미지 1/3 Toshiba Satellite L45-S7423 Keyboard Replacement, Battery: 1 단계, 이미지 2/3 Toshiba Satellite L45-S7423 Keyboard Replacement, Battery: 1 단계, 이미지 3/3
    • Make sure the battery lock switch is switched to the unlocked position.

    • The battery is unlocked when the battery lock switch is slid to the side with an image of an unlocked lock.

  2. Toshiba Satellite L45-S7423 Keyboard Replacement: 2 단계, 이미지 1/2 Toshiba Satellite L45-S7423 Keyboard Replacement: 2 단계, 이미지 2/2
    • Slide the battery release switch to the left.

    • The switch is spring loaded, so you must hold the switch in place while removing the battery.

  3. Toshiba Satellite L45-S7423 Keyboard Replacement: 3 단계, 이미지 1/2 Toshiba Satellite L45-S7423 Keyboard Replacement: 3 단계, 이미지 2/2
    • Using a finger, lift up the battery.

    • The battery release switch must be held in place.

  4. Toshiba Satellite L45-S7423 Keyboard Replacement, Bottom Access Panel: 4 단계, 이미지 1/3 Toshiba Satellite L45-S7423 Keyboard Replacement, Bottom Access Panel: 4 단계, 이미지 2/3 Toshiba Satellite L45-S7423 Keyboard Replacement, Bottom Access Panel: 4 단계, 이미지 3/3
    • Remove the 5 Phillips screws holding the panel in place.

    • These screws are permanently fastened to the panel; they are designed to be removed only partially to avoid loss.

  5. Toshiba Satellite L45-S7423 Keyboard Replacement: 5 단계, 이미지 1/3 Toshiba Satellite L45-S7423 Keyboard Replacement: 5 단계, 이미지 2/3 Toshiba Satellite L45-S7423 Keyboard Replacement: 5 단계, 이미지 3/3
    • Use a finger to remove the panel by lifting up on the provided removal tab.

  6. Toshiba Satellite L45-S7423 Keyboard Replacement, Keyboard: 6 단계, 이미지 1/3 Toshiba Satellite L45-S7423 Keyboard Replacement, Keyboard: 6 단계, 이미지 2/3 Toshiba Satellite L45-S7423 Keyboard Replacement, Keyboard: 6 단계, 이미지 3/3
    • Remove the two screws holding the keyboard in place.

    • Two 5.7 mm Phillips screws.

    • 'KB' is written alongside the screw holes. This indicates the screws hold the keyboard in place.

  7. Toshiba Satellite L45-S7423 Keyboard Replacement: 7 단계, 이미지 1/3 Toshiba Satellite L45-S7423 Keyboard Replacement: 7 단계, 이미지 2/3 Toshiba Satellite L45-S7423 Keyboard Replacement: 7 단계, 이미지 3/3
    • There are three tabs holding the keyboard in place.

    • They are located under the ESC, F8, and DEL keys.

    • Expose the tabs by pressing down on adjacent keys.

  8. Toshiba Satellite L45-S7423 Keyboard Replacement: 8 단계, 이미지 1/3 Toshiba Satellite L45-S7423 Keyboard Replacement: 8 단계, 이미지 2/3 Toshiba Satellite L45-S7423 Keyboard Replacement: 8 단계, 이미지 3/3
    • While you press down the ESC key, push the tab with the spudger to release that side of the keyboard.

    • Use a finger to prevent the keyboard from locking back in place.

    • Repeat the previous step for the tabs under the F8 and DEL keys.

  9. Toshiba Satellite L45-S7423 Keyboard Replacement: 9 단계, 이미지 1/3 Toshiba Satellite L45-S7423 Keyboard Replacement: 9 단계, 이미지 2/3 Toshiba Satellite L45-S7423 Keyboard Replacement: 9 단계, 이미지 3/3
    • Pick up the keyboard. This exposes a cable that connects the keyboard to the laptop.

    • Lift the keyboard gently. The cable connecting it to the computer is a ribbon. If pulled too hard, the ribbon may be damaged.

  10. Toshiba Satellite L45-S7423 Keyboard Replacement: 10 단계, 이미지 1/2 Toshiba Satellite L45-S7423 Keyboard Replacement: 10 단계, 이미지 2/2
    • Gently unplug the ribbon cable connecting the keyboard to the laptop by pulling horizontally.

결론

To reassemble your device, follow these instructions in reverse order.

다른 3명이 해당 안내서를 완성하였습니다.

Stephen Sippel

회원 가입일: 04/16/13

194 평판

안내서 9개 작성하였습니다

Cal Poly, Team 21-54, Johann Spring 2013 Cal Poly, Team 21-54, Johann Spring 2013 회원

CPSU-JOHANN-S13S21G54

4 회원들

안내서 18개 작성하였습니다

댓글 한 개

Great instuctions plus photos. Spot on, tx

Darrell - 답글

댓글 쓰기

조회 통계:

24 시간 전: 1

7일 전: 9

30일 전: 19

전체 시간: 3,188