주요 콘텐츠로 건너뛰기

이 안내서에는 최근 변경 사항이 더 있습니다. 최신 비검증 버전으로 전환하십시오.

Toshiba Satellite M45 Power Button Replacement

필요한 것

  1. Toshiba Satellite M45 Power Button Replacement, Battery: 1 단계, 이미지 1/3 Toshiba Satellite M45 Power Button Replacement, Battery: 1 단계, 이미지 2/3 Toshiba Satellite M45 Power Button Replacement, Battery: 1 단계, 이미지 3/3
    • Turn the computer off and disconnect the power supply from the power supply port in the back of the computer.

    • Caution: Hazardous situation which, if not avoided, could result in minor or moderate injury. Remove battery to reduce chance of electrical shock and to prevent damage to the electrical components.

    • Locate the two battery locks and slide to disconnect the battery.

    • Pull the battery (with casing) horizontally away from the computer to remove.

  2. Toshiba Satellite M45 Power Button Replacement: 2 단계, 이미지 1/3 Toshiba Satellite M45 Power Button Replacement: 2 단계, 이미지 2/3 Toshiba Satellite M45 Power Button Replacement: 2 단계, 이미지 3/3
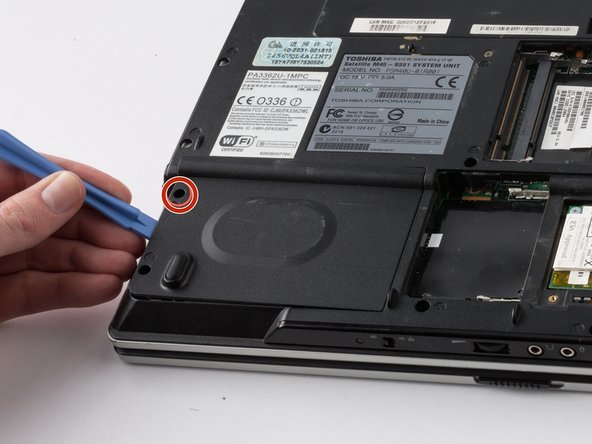
    • Unscrew the RAM cover panel screws with a #1 Phillips head screwdriver. Then pry the RAM cover panel off with a flat edge tool.

    • Push the tabs that secure the RAM outward (away from the RAM) using your fingers. The RAM should then pop up.

    • Pull the RAM away from the connection to remove. Continue this process until all RAM drives have been removed from the device.

  3. Toshiba Satellite M45 Power Button Replacement: 3 단계, 이미지 1/3 Toshiba Satellite M45 Power Button Replacement: 3 단계, 이미지 2/3 Toshiba Satellite M45 Power Button Replacement: 3 단계, 이미지 3/3
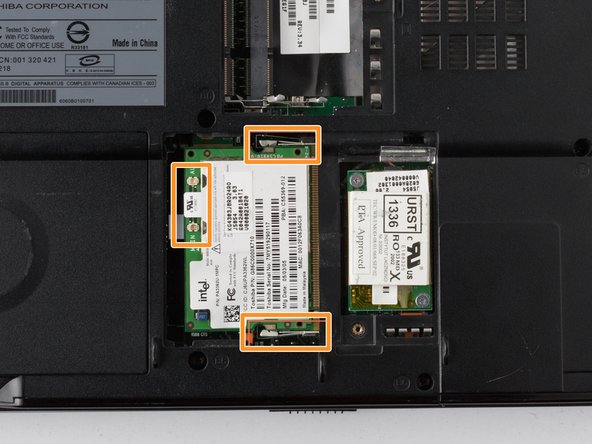
    • Unscrew the Wi-Fi panel screw with a #1 Phillips head screwdriver. Then pry the cover panel off with a flat edge tool.

    • Disconnect the black and white wires. Then push the tabs outward (away from the Wi-Fi card) using your fingers. The card should then pop up.

    • Pull the Wi-Fi card out from the device at a slight angle (horizontal with the casing).

  4. Toshiba Satellite M45 Power Button Replacement: 4 단계, 이미지 1/3 Toshiba Satellite M45 Power Button Replacement: 4 단계, 이미지 2/3 Toshiba Satellite M45 Power Button Replacement: 4 단계, 이미지 3/3
    • Unscrew the hard-drive panel screw with a #1 Phillips head screwdriver. Then use a flat edge tool to pry the cover off.

    • Grasp the plastic flap on the hard-drive and pry the hard-drive out of its slot.

  5. Toshiba Satellite M45 Power Button Replacement: 5 단계, 이미지 1/3 Toshiba Satellite M45 Power Button Replacement: 5 단계, 이미지 2/3 Toshiba Satellite M45 Power Button Replacement: 5 단계, 이미지 3/3
    • Unscrew the ODD screw with a #1 Phillips head screwdriver.

    • Pry it the ODD drive out of it slot from the side of the casing using a flat edge tool. Pull the drive the rest of the way out with your hands.

  6. Toshiba Satellite M45 Power Button Replacement: 6 단계, 이미지 1/3 Toshiba Satellite M45 Power Button Replacement: 6 단계, 이미지 2/3 Toshiba Satellite M45 Power Button Replacement: 6 단계, 이미지 3/3
    • Pry off the panel above the keyboard using a flat edge tool. Perform action on both sides of the panel.

    • Turn the laptop screen so that it is horizontal with the laptop base.

    • Remove the clips on the screen hinges that hold the panel. Take off the panel.

  7. Toshiba Satellite M45 Power Button Replacement: 7 단계, 이미지 1/3 Toshiba Satellite M45 Power Button Replacement: 7 단계, 이미지 2/3 Toshiba Satellite M45 Power Button Replacement: 7 단계, 이미지 3/3
    • Unscrew the two screws on the upper outer edges of the keyboard with a #1 Phillips head screwdriver.

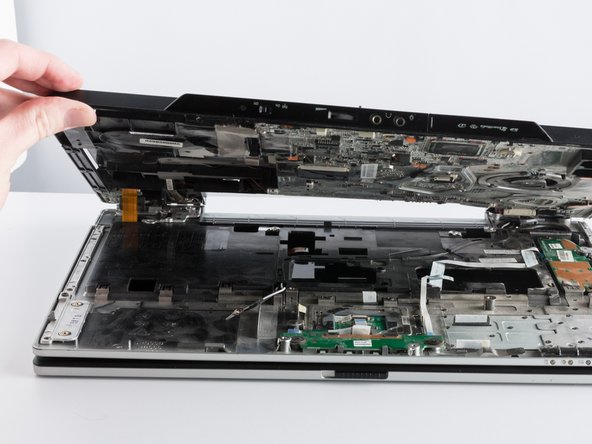
    • Pry the upper outer edges of the keyboard from the laptop using a flat edge tool.

    • Lift the keyboard away from the laptop and remove the ribbon that connects the keyboard to the laptop base.

  8. Toshiba Satellite M45 Power Button Replacement: 8 단계, 이미지 1/3 Toshiba Satellite M45 Power Button Replacement: 8 단계, 이미지 2/3 Toshiba Satellite M45 Power Button Replacement: 8 단계, 이미지 3/3
    • Pull the video cable near the left speaker upwards to disconnect the cable.

    • Pull the brown ribbon away from the connector located in the middle of the laptop base.

    • Pull the two other white ribbons away from the connector located near the top right half of the laptop base.

  9. Toshiba Satellite M45 Power Button Replacement: 9 단계, 이미지 1/2 Toshiba Satellite M45 Power Button Replacement: 9 단계, 이미지 2/2
    • Unscrew all the screws using a micro-screwdriver.

    • Unscrew the three additional screws located in the optical drive.

  10. Toshiba Satellite M45 Power Button Replacement: 10 단계, 이미지 1/3 Toshiba Satellite M45 Power Button Replacement: 10 단계, 이미지 2/3 Toshiba Satellite M45 Power Button Replacement: 10 단계, 이미지 3/3
    • Pry the case upward using a flat edge tool to remove the case from the laptop base.

    • Potential for device damage. Pull the case up slowly to avoid damaging the white ribbon.

    • Disconnect the large white ribbon, and let the ribbon slide through the top half of the case as you lift the case away from the laptop base.

  11. Toshiba Satellite M45 Power Button Replacement: 11 단계, 이미지 1/3 Toshiba Satellite M45 Power Button Replacement: 11 단계, 이미지 2/3 Toshiba Satellite M45 Power Button Replacement: 11 단계, 이미지 3/3
    • Unscrew the two screws located above the power button logic board using a #1 Phillips head screwdriver.

    • Move the logic board slowly out of its slot using a flat edge tool and your index finger.

    • Pull the white ribbon upwards to disconnect the ribbon from the power button logic board.

결론

After installing a new power button logic board, follow these instructions in reverse order to reassemble your device.

Stephen Bond

회원 가입일: 03/12/14

158 평판

안내서 1개 작성함

UMass Dartmouth, Team 1-3, Cichon Spring 2014 UMass Dartmouth, Team 1-3, Cichon Spring 2014 회원

UMASSD-CICHON-S14S1G3

3 회원들

안내서 1개 작성하였습니다

댓글 0개

댓글 쓰기

조회 통계:

24 시간 전: 0

7일 전: 0

30일 전: 4

전체 시간: 8,091