주요 콘텐츠로 건너뛰기

Toshiba Satellite P55W-C5316 Hard Drive Replacement

필요한 것

  1. Toshiba Satellite P55W-C5316 Hard Drive Replacement, Back Panel: 1 단계, 이미지 1/2 Toshiba Satellite P55W-C5316 Hard Drive Replacement, Back Panel: 1 단계, 이미지 2/2
    • To prevent injury, ensure the laptop is powered off before starting your work.

    • Unscrew the .3mm Phillips head screws on the back panel using the PH1 screwdriver.

  2. Toshiba Satellite P55W-C5316 Hard Drive Replacement: 2 단계, 이미지 1/3 Toshiba Satellite P55W-C5316 Hard Drive Replacement: 2 단계, 이미지 2/3 Toshiba Satellite P55W-C5316 Hard Drive Replacement: 2 단계, 이미지 3/3
    • Be careful to not crack the panel where the USB and power cord ports are.

    • Insert the opening tool in between the back panel and the laptop to pry it open.

    • The back panel is magnetically attached at the front of the laptop so you may have to move the opening tool along the length of the panel.

    • Lift the panel from the front off of the laptop.

  3. Toshiba Satellite P55W-C5316 Hard Drive Replacement, Battery: 3 단계, 이미지 1/3 Toshiba Satellite P55W-C5316 Hard Drive Replacement, Battery: 3 단계, 이미지 2/3 Toshiba Satellite P55W-C5316 Hard Drive Replacement, Battery: 3 단계, 이미지 3/3
    • The battery is located in the bottom right corner of the laptop.

    • Remove the four .5mm Phillips head screws on the battery using the PH1 screwdriver.

  4. Toshiba Satellite P55W-C5316 Hard Drive Replacement: 4 단계, 이미지 1/2 Toshiba Satellite P55W-C5316 Hard Drive Replacement: 4 단계, 이미지 2/2
    • Do not tug on the cord or battery. Instead, pull evenly on the connector.

    • Lift the battery and gently pull out the bundled cable connector.

  5. Toshiba Satellite P55W-C5316 Hard Drive Replacement, Hard Drive: 5 단계, 이미지 1/3 Toshiba Satellite P55W-C5316 Hard Drive Replacement, Hard Drive: 5 단계, 이미지 2/3 Toshiba Satellite P55W-C5316 Hard Drive Replacement, Hard Drive: 5 단계, 이미지 3/3
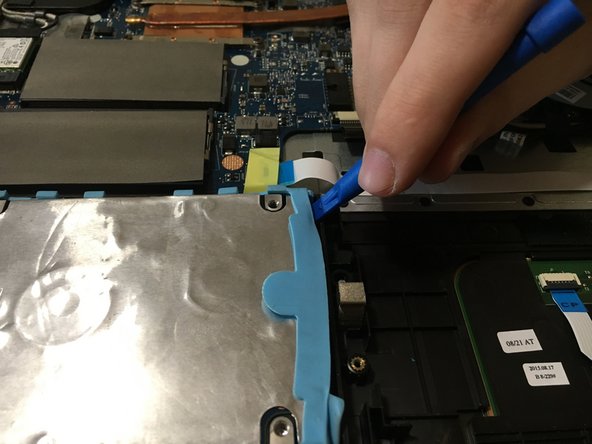
    • Insert the opening tool between the hard drive and the laptop on the right hand side.

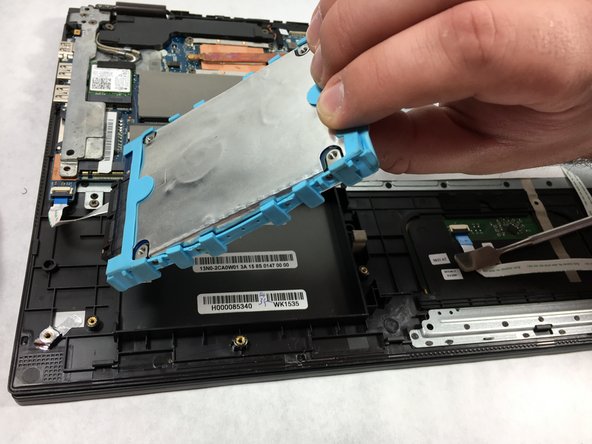
    • Gently lift the hard drive from the laptop.

  6. Toshiba Satellite P55W-C5316 Hard Drive Replacement: 6 단계, 이미지 1/3 Toshiba Satellite P55W-C5316 Hard Drive Replacement: 6 단계, 이미지 2/3 Toshiba Satellite P55W-C5316 Hard Drive Replacement: 6 단계, 이미지 3/3
    • Do not pull on the ZIF connector that connects the hard drive to the laptop.

    • Lift the black clip on the end of the ZIF connector.

    • Gently remove the cable from the connector.

결론

To reassemble your device, follow these instructions in reverse order.

Alec Bonnell

회원 가입일: 10/18/17

497 평판

안내서 4개 작성하였습니다

UMass Dartmouth, Team S3-G2, Bailey Fall 2017 UMass Dartmouth, Team S3-G2, Bailey Fall 2017 회원

UMASSD-BAILEY-F17S3G2

3 회원들

안내서 7개 작성하였습니다

댓글 3개

Toshiba P55W CI HOPE SOMEONE CAN HELP ME TO SOLVE MY PROBLEM

Why does my laptop not work unless it is plugged into the wall

My Toshiba P55W C5314 saids it is fully charged. The battery icon is indicated and does not show as any issues. But once I unplug it from the AC adapter it turns off immediately and will not power back on unless plugged in. It almost like my laptop is functioning like a desktop. Any advice?

metin - 답글

I've successfully removed and replaced my failed hdd with a new ssd but am unable to boot frim this drive because it lacks my operating system. What should i do next? Should I try contacting Toshiba? I can't do a factory reset for some reason “the hold 0 method doesn't work” and i dont have a OS disk. When turned on it simply says no bootable device go to bios ect. I was able to salvage the windows key from a program in Ubuntu but im not sure if its the right key since I am not used to using linux. I have another computer in home using Windows 10.

Solly - 답글

need help identifying different ic’s on p55w motherboard,such as audio,bios etc.

Thank you.

Steve - 답글

댓글 쓰기

조회 통계:

24 시간 전: 0

7일 전: 1

30일 전: 3

전체 시간: 1,520