주요 콘텐츠로 건너뛰기

Toshiba Satellite P55t-A5116 Keyboard Replacement

필요한 것

동영상 개요

  1. Toshiba Satellite P55t-A5116 Keyboard Replacement, Back Casing: 1 단계, 이미지 1/2 Toshiba Satellite P55t-A5116 Keyboard Replacement, Back Casing: 1 단계, 이미지 2/2
    • Close laptop and turn it upside down

    • Remove the 14 circular rubber covers with tweezers along with one smaller more cylindrical rubber cover.

  2. Toshiba Satellite P55t-A5116 Keyboard Replacement: 2 단계, 이미지 1/2 Toshiba Satellite P55t-A5116 Keyboard Replacement: 2 단계, 이미지 2/2
    • Using the #PH0 screw head, remove 14 (5.7 mm) screws from the back casing.

  3. Toshiba Satellite P55t-A5116 Keyboard Replacement: 3 단계, 이미지 1/3 Toshiba Satellite P55t-A5116 Keyboard Replacement: 3 단계, 이미지 2/3 Toshiba Satellite P55t-A5116 Keyboard Replacement: 3 단계, 이미지 3/3
    • Gently pry off the bottom case with the plastic opening tools.

    • Find the seam between the back case and the rest of the laptop casing.

  4. Toshiba Satellite P55t-A5116 Keyboard Replacement, Battery: 4 단계, 이미지 1/2 Toshiba Satellite P55t-A5116 Keyboard Replacement, Battery: 4 단계, 이미지 2/2
    • Use the #PH0 screw head, remove 4 (5.7mm) screws.

    • Unplug the battery's 10 pin connector and gently lift the battery out of the laptop.

  5. Toshiba Satellite P55t-A5116 Keyboard Replacement: 5 단계, 이미지 1/1
    • Gently remove battery from the laptop.

  6. Toshiba Satellite P55t-A5116 Keyboard Replacement, Power Jack: 6 단계, 이미지 1/3 Toshiba Satellite P55t-A5116 Keyboard Replacement, Power Jack: 6 단계, 이미지 2/3 Toshiba Satellite P55t-A5116 Keyboard Replacement, Power Jack: 6 단계, 이미지 3/3
    • Using the #PH0 screw head, remove 2 (5.7 mm) screws.

    • Remove metal plate.

    • Using the #PH0 screw head remove 1 (5.7mm) screw and 1 (4.15mm) screw.

  7. Toshiba Satellite P55t-A5116 Keyboard Replacement: 7 단계, 이미지 1/2 Toshiba Satellite P55t-A5116 Keyboard Replacement: 7 단계, 이미지 2/2
    • Use the plastic opening tool to push the left hinge up.

  8. Toshiba Satellite P55t-A5116 Keyboard Replacement: 8 단계, 이미지 1/2 Toshiba Satellite P55t-A5116 Keyboard Replacement: 8 단계, 이미지 2/2
    • Gently pull up the power jack. Follow the cord until you reach the connector.

    • Unplug the 4 pin connector and remove from laptop

  9. Toshiba Satellite P55t-A5116 Keyboard Replacement, Fan & CPU Cooler: 9 단계, 이미지 1/1
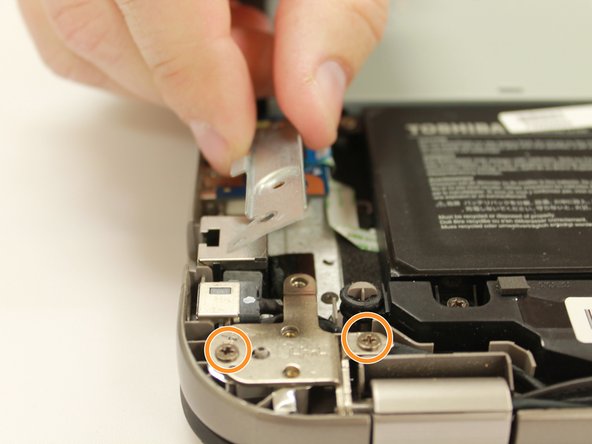
    • Using a PH0 screwdriver, remove 2 (5.7mm) screws.

    • Using a PH0 screwdriver, remove 4 (3.68mm) screws.

  10. Toshiba Satellite P55t-A5116 Keyboard Replacement: 10 단계, 이미지 1/2 Toshiba Satellite P55t-A5116 Keyboard Replacement: 10 단계, 이미지 2/2
    • Unplug the 3 pin connector

    • Remove fan.

  11. Toshiba Satellite P55t-A5116 Keyboard Replacement, Keyboard: 11 단계, 이미지 1/3 Toshiba Satellite P55t-A5116 Keyboard Replacement, Keyboard: 11 단계, 이미지 2/3 Toshiba Satellite P55t-A5116 Keyboard Replacement, Keyboard: 11 단계, 이미지 3/3
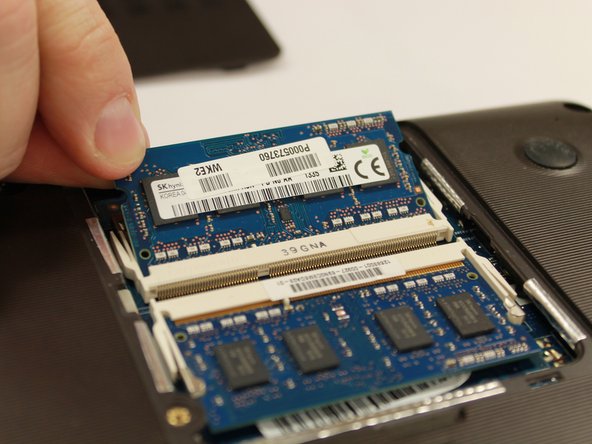
    • Pull out the latches on either side.

    • The RAM should pop up.

    • Remove the RAM.

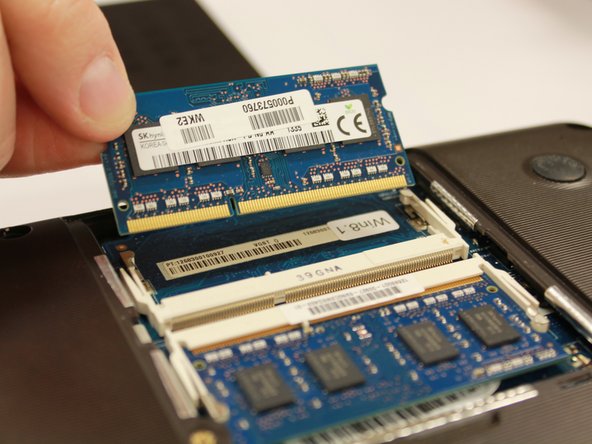
    • Repeat for the other side.

  12. Toshiba Satellite P55t-A5116 Keyboard Replacement: 12 단계, 이미지 1/2 Toshiba Satellite P55t-A5116 Keyboard Replacement: 12 단계, 이미지 2/2
    • Remove the DVD drive by pulling it sideways out of the laptop

  13. Toshiba Satellite P55t-A5116 Keyboard Replacement: 13 단계, 이미지 1/2 Toshiba Satellite P55t-A5116 Keyboard Replacement: 13 단계, 이미지 2/2
    • Using the PH0 screw head, remove 2 (4.23mm) screws.

    • Slide the hard drive out.

  14. Toshiba Satellite P55t-A5116 Keyboard Replacement: 14 단계, 이미지 1/3 Toshiba Satellite P55t-A5116 Keyboard Replacement: 14 단계, 이미지 2/3 Toshiba Satellite P55t-A5116 Keyboard Replacement: 14 단계, 이미지 3/3
    • Use a plastic opening tool to gently lift the black ribbon tab and unplug the ribbon cable.

    • Remove the ribbon.

    • Lightly pull up the USB Port from the metal supports and take out of the laptop.

  15. Toshiba Satellite P55t-A5116 Keyboard Replacement: 15 단계, 이미지 1/2 Toshiba Satellite P55t-A5116 Keyboard Replacement: 15 단계, 이미지 2/2
    • Remove LAN port/ ethernet port. Lift up the ethernet port.

    • Unplug the 8 pin connector.

  16. Toshiba Satellite P55t-A5116 Keyboard Replacement: 16 단계, 이미지 1/2 Toshiba Satellite P55t-A5116 Keyboard Replacement: 16 단계, 이미지 2/2
    • Using the PH0 screw head, remove 1 (3.8mm) screw.

    • Separate the wireless adapter chip from the motherboard.

  17. Toshiba Satellite P55t-A5116 Keyboard Replacement: 17 단계, 이미지 1/3 Toshiba Satellite P55t-A5116 Keyboard Replacement: 17 단계, 이미지 2/3 Toshiba Satellite P55t-A5116 Keyboard Replacement: 17 단계, 이미지 3/3
    • Using a plastic opening tool, lift up the black ribbon tab and the smaller orange tab which are connected to the keyboard underneath.

    • Unplug the ribbons.

  18. Toshiba Satellite P55t-A5116 Keyboard Replacement: 18 단계, 이미지 1/1
    • Using the PH0 screw head, remove 2 (5.7mm) screws.

    • Using the PH0 screw head, remove 1 (4.2mm) screw.

  19. Toshiba Satellite P55t-A5116 Keyboard Replacement: 19 단계, 이미지 1/2 Toshiba Satellite P55t-A5116 Keyboard Replacement: 19 단계, 이미지 2/2
    • Using a plastic opening tool, remove the CP Tab that was plugged into the touchpad.

  20. Toshiba Satellite P55t-A5116 Keyboard Replacement: 20 단계, 이미지 1/1
    • Lift up the mother board and gently flip it over to sit upside down next to the laptop.

  21. Toshiba Satellite P55t-A5116 Keyboard Replacement: 21 단계, 이미지 1/2 Toshiba Satellite P55t-A5116 Keyboard Replacement: 21 단계, 이미지 2/2
    • Using the #J000 screw head, remove 20 (1.67mm) small screws.

    • Using the #J000 screw head, remove 4 (2.44mm) wide flathead screws.

    • Using the #J000 screw head, remove 1 (4.1mm) screw.

    • Gently lift up the metal frame from the laptop.

  22. Toshiba Satellite P55t-A5116 Keyboard Replacement: 22 단계, 이미지 1/2 Toshiba Satellite P55t-A5116 Keyboard Replacement: 22 단계, 이미지 2/2
    • Using the #J000 screw head, remove 4 small (1.67 mm) screws.

  23. Toshiba Satellite P55t-A5116 Keyboard Replacement: 23 단계, 이미지 1/2 Toshiba Satellite P55t-A5116 Keyboard Replacement: 23 단계, 이미지 2/2
    • Gently lift up the keyboard out of the laptop.

결론

To reassemble your device, follow these instructions in reverse order.

다른 3명이 해당 안내서를 완성하였습니다.

Brittany Castillo

회원 가입일: 01/19/17

878 평판

안내서 5개 작성하였습니다

댓글 2개

This is by far the most informative instructions I have ever come upon. Not only does it explain the keyboard removal (which was my issue), but also explains the removal of pretty much every component that might need to be replaced excluding the screen. Thumbs up! I will definitely refer all my friends all colleagues to iFixit. Again Thumbs up!

Steven L Koontz - 답글

Make certain you view the comment at Step 3, it’s hidden unless you click on it. May save you time…

Steve Chamberlin - 답글

댓글 쓰기

조회 통계:

24 시간 전: 1

7일 전: 4

30일 전: 9

전체 시간: 2,842