주요 콘텐츠로 건너뛰기

Toshiba Satellite P855-S5312 Hinge Replacement

필요한 것

  1. Toshiba Satellite P855-S5312 Hinge  Replacement, Fan: 1 단계, 이미지 1/3 Toshiba Satellite P855-S5312 Hinge  Replacement, Fan: 1 단계, 이미지 2/3 Toshiba Satellite P855-S5312 Hinge  Replacement, Fan: 1 단계, 이미지 3/3
    • Unscrew the one 1.5mm screw using a Philips #0 screwdriver holding the L shape panel.

    • Pry up the panel to gain access to hidden screws.

  2. Toshiba Satellite P855-S5312 Hinge  Replacement: 2 단계, 이미지 1/2 Toshiba Satellite P855-S5312 Hinge  Replacement: 2 단계, 이미지 2/2
    • Remove the fourteen (14) screws using a Philips #0 screwdriver for the 1.5mm screws on the underside of casing.

  3. Toshiba Satellite P855-S5312 Hinge  Replacement: 3 단계, 이미지 1/3 Toshiba Satellite P855-S5312 Hinge  Replacement: 3 단계, 이미지 2/3 Toshiba Satellite P855-S5312 Hinge  Replacement: 3 단계, 이미지 3/3
    • Unscrew the nine 1.5mm screws using a Philips #0 screwdriver under the keyboard with the F6 printed next to them.

    • Unplug the three no-fuss ribbon cable connector cables by gently pulling on them away from you towards the keyboard.

  4. Toshiba Satellite P855-S5312 Hinge  Replacement: 4 단계, 이미지 1/2 Toshiba Satellite P855-S5312 Hinge  Replacement: 4 단계, 이미지 2/2
    • Pry apart the casing with the plastic opening tool.

    • Removing the cover under keyboard.

  5. Toshiba Satellite P855-S5312 Hinge  Replacement: 5 단계, 이미지 1/3 Toshiba Satellite P855-S5312 Hinge  Replacement: 5 단계, 이미지 2/3 Toshiba Satellite P855-S5312 Hinge  Replacement: 5 단계, 이미지 3/3
    • Unplug the single no-fuss cable connector using the plastic opening tool pushing the edges towards the fan.

    • Unscrew the two 1.5mm screws using a Philips #0 screwdriver by the head mounting holding down the fan.

    • Pull the fan up and remove it from the device.

  6. Toshiba Satellite P855-S5312 Hinge  Replacement, Screen: 6 단계, 이미지 1/3 Toshiba Satellite P855-S5312 Hinge  Replacement, Screen: 6 단계, 이미지 2/3 Toshiba Satellite P855-S5312 Hinge  Replacement, Screen: 6 단계, 이미지 3/3
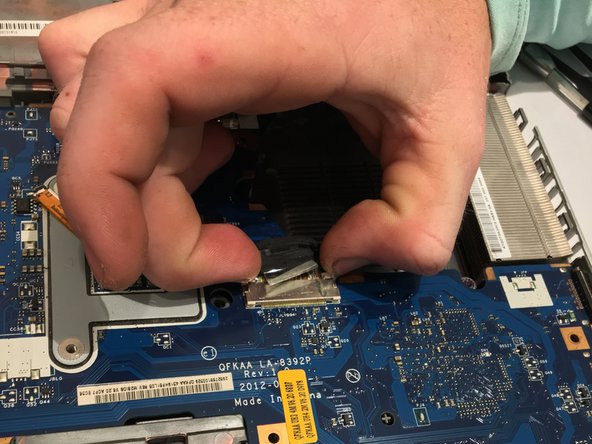
    • Turn laptop upside down with the spine facing towards you and locate the microchip.

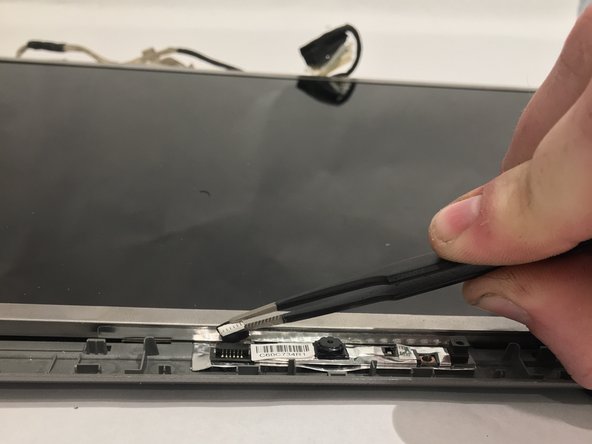
    • Remove the white and black sliding connector wires by prying upward with tweezers gently pulling the black and white wires upwards.

  7. Toshiba Satellite P855-S5312 Hinge  Replacement: 7 단계, 이미지 1/2 Toshiba Satellite P855-S5312 Hinge  Replacement: 7 단계, 이미지 2/2
    • Unplug the single ZIF connector ribbon by gently pulling up.

    • Pull the white and black wires through from the underside of device.

  8. Toshiba Satellite P855-S5312 Hinge  Replacement: 8 단계, 이미지 1/3 Toshiba Satellite P855-S5312 Hinge  Replacement: 8 단계, 이미지 2/3 Toshiba Satellite P855-S5312 Hinge  Replacement: 8 단계, 이미지 3/3
    • Unscrew the four hinges mounting the 1.5mm screws on each side from casing using a Philips #0 screwdriver.

    • Remove entire screen assembly from casing.

  9. Toshiba Satellite P855-S5312 Hinge  Replacement: 9 단계, 이미지 1/3 Toshiba Satellite P855-S5312 Hinge  Replacement: 9 단계, 이미지 2/3 Toshiba Satellite P855-S5312 Hinge  Replacement: 9 단계, 이미지 3/3
    • Locate the two black sticker covers on the bottom of both sides of the monitor

    • Using a pair of tweezers, carefully remove black stickers concealing two screws

  10. Toshiba Satellite P855-S5312 Hinge  Replacement: 10 단계, 이미지 1/3 Toshiba Satellite P855-S5312 Hinge  Replacement: 10 단계, 이미지 2/3 Toshiba Satellite P855-S5312 Hinge  Replacement: 10 단계, 이미지 3/3
    • Using a prying tool, carefully pry along the edges of the screen cover

  11. Toshiba Satellite P855-S5312 Hinge  Replacement: 11 단계, 이미지 1/2 Toshiba Satellite P855-S5312 Hinge  Replacement: 11 단계, 이미지 2/2
    • Unscrew the two 1.5mm screws at the bottom of monitor using a Philips #0 screwdriver.

  12. Toshiba Satellite P855-S5312 Hinge  Replacement: 12 단계, 이미지 1/3 Toshiba Satellite P855-S5312 Hinge  Replacement: 12 단계, 이미지 2/3 Toshiba Satellite P855-S5312 Hinge  Replacement: 12 단계, 이미지 3/3
    • With all the edges of the screen cover pried up, carefully remove the screen cover.

  13. Toshiba Satellite P855-S5312 Hinge  Replacement: 13 단계, 이미지 1/3 Toshiba Satellite P855-S5312 Hinge  Replacement: 13 단계, 이미지 2/3 Toshiba Satellite P855-S5312 Hinge  Replacement: 13 단계, 이미지 3/3
    • Using the Philips #0 screwdriver, remove the four 1.5mm screws at the corners of the screen.

  14. Toshiba Satellite P855-S5312 Hinge  Replacement: 14 단계, 이미지 1/3 Toshiba Satellite P855-S5312 Hinge  Replacement: 14 단계, 이미지 2/3 Toshiba Satellite P855-S5312 Hinge  Replacement: 14 단계, 이미지 3/3
    • At the top of the screen, using the tweezers, remove the ZIF ribbon connector by gently pushing it up.

  15. Toshiba Satellite P855-S5312 Hinge  Replacement: 15 단계, 이미지 1/2 Toshiba Satellite P855-S5312 Hinge  Replacement: 15 단계, 이미지 2/2
    • Remove the screen from the device.

    • Make sure to be carful because the screen is very fragile.

  16. Toshiba Satellite P855-S5312 Hinge  Replacement, Hinge: 16 단계, 이미지 1/3 Toshiba Satellite P855-S5312 Hinge  Replacement, Hinge: 16 단계, 이미지 2/3 Toshiba Satellite P855-S5312 Hinge  Replacement, Hinge: 16 단계, 이미지 3/3
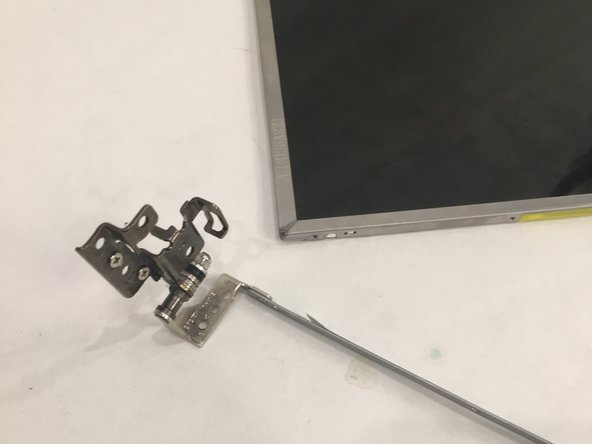
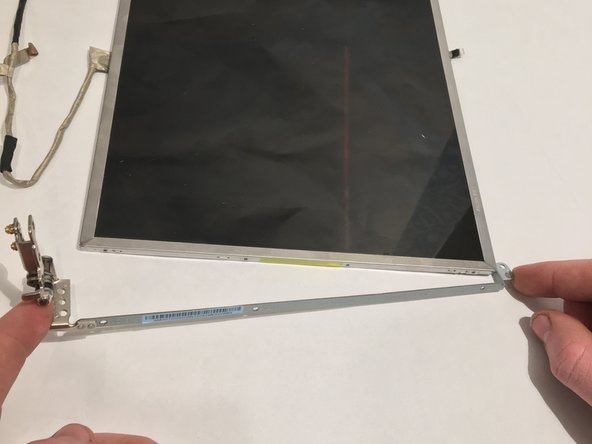
    • Remove the three screws on the sides of the screen using the Philips #0 screwdriver.

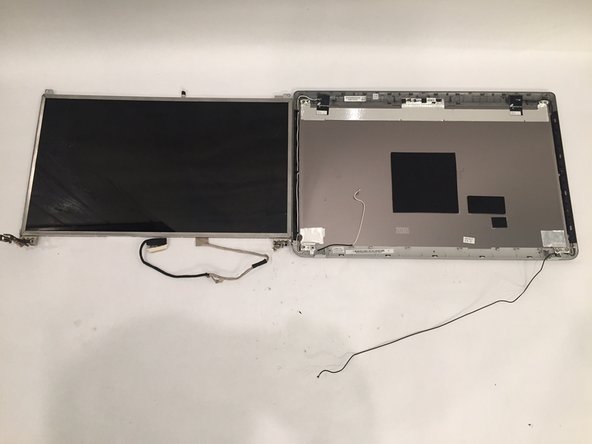
    • Once unscrewed, pull the frame off along with the hinge.

결론

To reassemble your device, follow these instructions in reverse order.

James Wiehle

회원 가입일: 10/02/17

236 평판

안내서 2개 작성하였습니다

USF Tampa, Team S10-G2, Thompson Fall 2017 USF Tampa, Team S10-G2, Thompson Fall 2017 회원

USFT-THOMPSON-F17S10G2

3 회원들

안내서 6개 작성하였습니다

댓글 0개

댓글 쓰기

조회 통계:

24 시간 전: 0

7일 전: 3

30일 전: 6

전체 시간: 1,644