이 버전에는 잘못된 편집 사항이 있을 수 있습니다. 최신 확인된 스냅샷으로 전환하십시오.
필요한 것
-
이 단계는 번역되지 않았습니다. 번역을 도와주십시오
-
First we have to take out the battery
-
Pull the switch on the left to the left
-
then hold the switch on the right to the right direction
-
then pull up the bttery from the point inbetween the 2 switches
-
-
이 단계는 번역되지 않았습니다. 번역을 도와주십시오
-
Unscrew the screw located next to the information sticker
-
Then get a screw driver or prier to gently pry the covering plate
-
-
이 단계는 번역되지 않았습니다. 번역을 도와주십시오
-
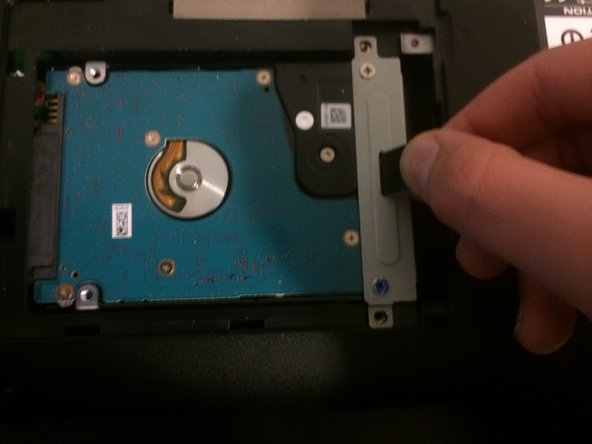
Unscrew the black screws and then pull the black tab to the right
-
Then lift it out and place it somewhere
-
-
-
이 단계는 번역되지 않았습니다. 번역을 도와주십시오
-
Screw the silver screws into the screw slots furthest away from the connectors
-
Note: This computer is only compatible with 2.5 inch SATA 3Gbps
-
-
이 단계는 번역되지 않았습니다. 번역을 도와주십시오
-
Put the Hard Drive in slot (make sure the connectors are on the same side of the connectors
-
Push the Hard Driver into the connector and screw the black screws in
-
-
이 단계는 번역되지 않았습니다. 번역을 도와주십시오
-
Put on the backplate and put pressure arround the edges of the blackplate so it stays flat with the case
-
Then screw in the screw next to the information sticker
-
-
이 단계는 번역되지 않았습니다. 번역을 도와주십시오
-
Place the battery in the slot
-
Then hold the right switch to the right and push the battery in, then release the switch.
-
move the left switch to the right
-


다른 한 분이 해당 안내서를 완성하였습니다.