주요 콘텐츠로 건너뛰기

UTILITECH #HVT-8H Motor Replacement

필요한 것

  1. UTILITECH #HVT-8H Motor Replacement, Motor: 1 단계, 이미지 1/1
    • Use a spudger to remove the screw covers.

    • Pry gently to avoid breaking the clips.

  2. UTILITECH #HVT-8H Motor Replacement: 2 단계, 이미지 1/3 UTILITECH #HVT-8H Motor Replacement: 2 단계, 이미지 2/3 UTILITECH #HVT-8H Motor Replacement: 2 단계, 이미지 3/3
    • Use your Phillips #0 screwdriver to remove the 8 mm screw that attaches the fan to its stand.

    • Repeat step 1 and 2 on the other side of the fan.

  3. UTILITECH #HVT-8H Motor Replacement: 3 단계, 이미지 1/2 UTILITECH #HVT-8H Motor Replacement: 3 단계, 이미지 2/2
    • Use a spudger to remove the silver screw cover from the front of the fan.

    • Do not try to force the piece off as it could break. Instead, gently pry around the entire fan until it pops loose.

  4. UTILITECH #HVT-8H Motor Replacement: 4 단계, 이미지 1/2 UTILITECH #HVT-8H Motor Replacement: 4 단계, 이미지 2/2
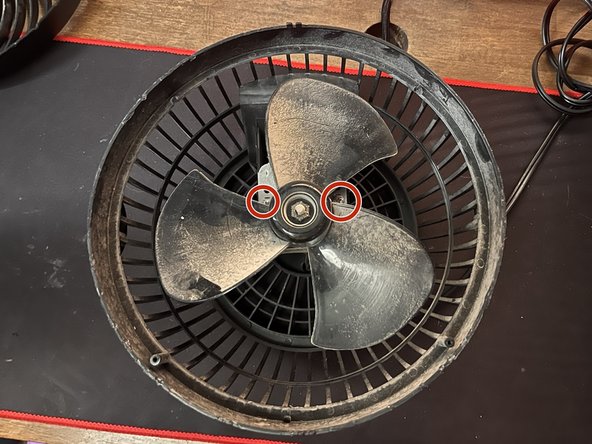
    • Use a Phillips #00 screwdriver to remove the four 6 mm screws that hold the fan cover in place.

  5. UTILITECH #HVT-8H Motor Replacement: 5 단계, 이미지 1/3 UTILITECH #HVT-8H Motor Replacement: 5 단계, 이미지 2/3 UTILITECH #HVT-8H Motor Replacement: 5 단계, 이미지 3/3
    • Use a Phillips #0 screwdriver to remove the two 8 mm screws that attach the motor assembly to the base of the fan.

  6. UTILITECH #HVT-8H Motor Replacement: 6 단계, 이미지 1/3 UTILITECH #HVT-8H Motor Replacement: 6 단계, 이미지 2/3 UTILITECH #HVT-8H Motor Replacement: 6 단계, 이미지 3/3
    • Remove the power control knob by pulling on the knob backward.

    • Use a 10 mm socket wrench to remove the 10 mm nut that holds the power control piece in place.

  7. UTILITECH #HVT-8H Motor Replacement: 7 단계, 이미지 1/2 UTILITECH #HVT-8H Motor Replacement: 7 단계, 이미지 2/2
    • Use a Phillips #0 screwdriver to remove the two 8 mm screws that fasten the power plug to the base.

  8. UTILITECH #HVT-8H Motor Replacement: 8 단계, 이미지 1/3 UTILITECH #HVT-8H Motor Replacement: 8 단계, 이미지 2/3 UTILITECH #HVT-8H Motor Replacement: 8 단계, 이미지 3/3
    • Cut the two black cables to release them from the motor assembly.

    • Be sure to cut as closely as you can to the base of the cables so you don't lose a lot of length.

  9. UTILITECH #HVT-8H Motor Replacement: 9 단계, 이미지 1/2 UTILITECH #HVT-8H Motor Replacement: 9 단계, 이미지 2/2
    • Use a wire stripper on the black wires to expose the metal underneath the rubber.

    • Strip about 13 mm from the end of both wires.

  10. UTILITECH #HVT-8H Motor Replacement: 10 단계, 이미지 1/2 UTILITECH #HVT-8H Motor Replacement: 10 단계, 이미지 2/2
    • Connect the exposed power plug wires to the new motor assembly by twisting the two exposed wires together.

    • Wrap electrical tape around the newly connected wires.

결론

To reassemble your device, follow these instructions in reverse order.

Joseph Pemberton

회원 가입일: 02/26/24

181 평판

안내서 1개 작성함

Austin Community College, Team 52-5, Watkins Spring 2024 Austin Community College, Team 52-5, Watkins Spring 2024 회원

AUSTINCC-WATKINS-S24S52G5

1 회원

안내서 1개 작성하였습니다

댓글 0개

댓글 쓰기

조회 통계:

24 시간 전: 2

7일 전: 21

30일 전: 50

전체 시간: 101