소개
I share how I repaired my Urbanears speaker “stammen”. Since I couldn’t find any information regarding the repair of Urbanears Speakers, I decided to share this guide for those willing to repair their Urbanears speaker.
Please Note: This guide shows how to replace a SMD component named TPS54335A that was responsible for a short circuit on the main board causing the speaker not to turn on. The reason why your speaker is not functioning may be different!
Technical Side Information:
This particular speaker can be accessed from two sides. The bottom and the side. Yet, in order to properly troubleshoot the speaker, both sides must be opened for better access to the internals. On the bottom are 6 screws hidden under the supporting cushions and caps. On the side of the unit is a square panel that has been inserted into the side of the speaker. This panel is glued in place with lots of adhesive. Inside we have a AC to DC inverter (230Vac to 18Vdc) and a rectangular main board screwed on the inside wall of the speaker. The main board consists of 2 board stacked together with screws.
Troubleshooting Carried Out:
After swapping the power cord and checking the inverter output voltage to be 18 Volt DC, assumed is the AC & DC power source most likely functioned properly. Therefore I went on to troubleshoot the main board. To diagnose the main board, use a multi meter in continuity mode and check all caps if they short to ground.
After a brief inspection it was found that in one corner of the lower main board a number of caps are shorted to ground.
Since there is no thermal camera available, a voltage injection tool was used to find the component responsible for the short.
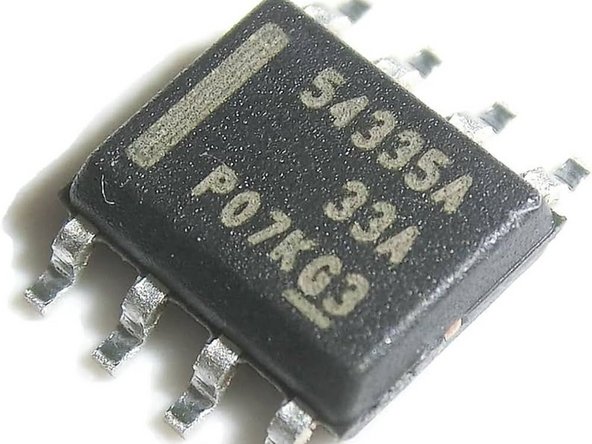
Unfortunately the rather cheap voltage injection tool doesn’t allow a too high current draw and turns itself off for protection. I went over to the manual way meaning each component that was shorting to ground was removed one by one from the board by using a hot air station with remeasuring in between each removal to check when the short would disappear. After removing and replacing around 10 caps to the board it was noticed that the short was still there. A neighbouring buck converter seemed to be linked to most of the caps. When I removed this component the short disappeared. This component was a DC - DC buck converter in a SMD format( DDA Package, 8 Pin SO PowerPad) called TPS54335A from Texas Instruments. It can be ordered online. The function is to reduce the incoming 18V to a lower voltage suitable for the main processing chips. After replacing the buck converter, the speaker immediately started working again.
Side Notes:
This guide required the use of hot air rework. Not everyone owns one of these stations and know how to use it to replace SMD components. In addition, it may be possible that in your case another issue is causing the speaker not to work. Still, the troubleshooting in this post may help to pinpoint the cause of the problem.
필요한 것
-
-
With a metal spudger or a dull bread knife with a large surface, pry open the side cover of the speaker that is attached to the body by sticky tape. Take you time, the adhesive is very strong. Be careful not to damage the wooden body of the speaker during prying.
-
-
-
Next, continue by removing the screws hidden under these 6 rubber feet. Use a spudger to remove the rubber feet. Use a large philips screw driver for the screws. Then, remove the bottom cover, but be mindful to first remove the internal power cable that is attached to the internal power supply of the speaker (marked in red, last image).
-
-
-
-
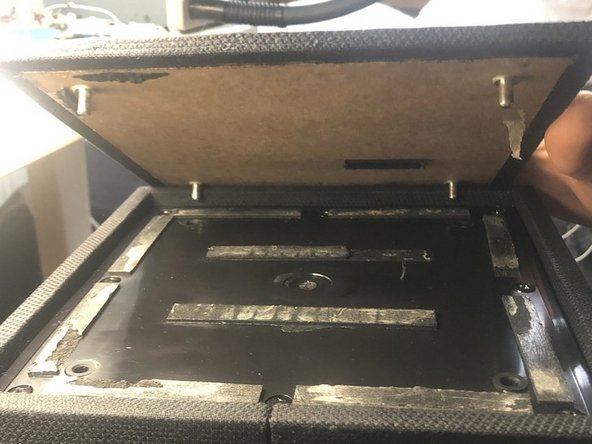
Remove the 6 screws on the side of the speaker the loosen the lower side panel. The main board of the speaker is attached to the inside of this lower side panel (Marked in red, second image). The board is attached to other components with cables. Be mindful to unplug each cable carefully upon removing the side panel.
-
-
-
The main board consists of 2 board seperarte boards stacked together. The lower larger board hosts the TPS54335A. The function is to reduce the incoming 18V to a lower voltage suitable for the main processing chips. Uncrew the top board carfully to make space. Beware to shield any plastic connectors from hot air upon replacing the TPS54335A.
-


After replacing the TPS54335A, re-assemble the speaker by following the steps in reversed order.
다른 한 분이 해당 안내서를 완성하였습니다.

2가이드 댓글
Thanks for the guide! I had managed to open the device and analyze the problem, but this page reassured me that it was indeed due to a defective TPS54335A chip. I went to to have it replaced by a professional repair shop and the speaker immediately started working again.
Thanks a lot for the guide! The TPS54335A was also defective in my speaker, and I replaced it. It helps a lot to remove the heat sink on the back while soldering.
Unfortunately, I still have a short circuit in the plugged-in WiFi and Bluetooth board with the large heat sink. It appears to be a ready-made module FS5332 from Frontier Silicon. But the components are much too small and some are BGAs, so I can't figure out what is broken. Does anyone have any idea what could be wrong on the module or a tip where I can buy the whole module?