주요 콘텐츠로 건너뛰기

VTech Kidizoom Camera Connect Speaker Replacement

필요한 것

  1. VTech Kidizoom Camera Connect Speaker Replacement, Front Case: 1 단계, 이미지 1/2 VTech Kidizoom Camera Connect Speaker Replacement, Front Case: 1 단계, 이미지 2/2
    • Remove batteries and SD card before beginning disassembly!

    • Locate the four plastic screw covers denoted by the markers and gently pry them up with the metal spudger.

  2. VTech Kidizoom Camera Connect Speaker Replacement: 2 단계, 이미지 1/2 VTech Kidizoom Camera Connect Speaker Replacement: 2 단계, 이미지 2/2
    • Remove all four (11mm) screws with the Philips #0 screwdriver.

  3. VTech Kidizoom Camera Connect Speaker Replacement: 3 단계, 이미지 1/3 VTech Kidizoom Camera Connect Speaker Replacement: 3 단계, 이미지 2/3 VTech Kidizoom Camera Connect Speaker Replacement: 3 단계, 이미지 3/3
    • Remove the two battery cartridges located on the underside of the camera.

    • Once cartridges are removed, use the metal spudger to pry open the top, bottom, and both sides of the camera.

  4. VTech Kidizoom Camera Connect Speaker Replacement: 4 단계, 이미지 1/1
    • Beware of the two black viewfinder lens falling out as you pry open the device!

    • The device should now be open and ready for further repair and/or replacement parts.

  5. VTech Kidizoom Camera Connect Speaker Replacement, Motherboard: 5 단계, 이미지 1/1
    • Locate and remove the screws circled in the provided image with a Philips #0 screwdriver.

  6. VTech Kidizoom Camera Connect Speaker Replacement: 6 단계, 이미지 1/2 VTech Kidizoom Camera Connect Speaker Replacement: 6 단계, 이미지 2/2
    • Unsolder the connection points on the motherboard.

  7. VTech Kidizoom Camera Connect Speaker Replacement: 7 단계, 이미지 1/3 VTech Kidizoom Camera Connect Speaker Replacement: 7 단계, 이미지 2/3 VTech Kidizoom Camera Connect Speaker Replacement: 7 단계, 이미지 3/3
    • Unsolder the connections to the right battery terminal. Removing the terminal allows easier access to the motherboard.

  8. VTech Kidizoom Camera Connect Speaker Replacement: 8 단계, 이미지 1/3 VTech Kidizoom Camera Connect Speaker Replacement: 8 단계, 이미지 2/3 VTech Kidizoom Camera Connect Speaker Replacement: 8 단계, 이미지 3/3
    • Carefully pull up on the motherboard and pink plastic underneath the motherboard. The pink plastic contains the display and is connected to the motherboard.

  9. VTech Kidizoom Camera Connect Speaker Replacement, Speaker: 9 단계, 이미지 1/1
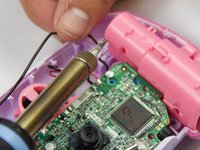
    • The speaker is glued in so you must use the metal spudger to break the seal made by the glue.

  10. VTech Kidizoom Camera Connect Speaker Replacement: 10 단계, 이미지 1/1
    • Once the seal is broken the speaker should move freely. Carefully lift and remove the speaker along with its attached red and black wires.

결론

To reassemble your device, follow these instructions in reverse order.

다른 한 분이 해당 안내서를 완성하였습니다.

Justin Sanchez

회원 가입일: 02/08/16

520 평판

안내서 4개 작성하였습니다

USF Tampa, Team 6-4, Eyestone Spring 2016 USF Tampa, Team 6-4, Eyestone Spring 2016 회원

USFT-EYESTONE-S16S6G4

4 회원들

안내서 5개 작성하였습니다

댓글 0개

댓글 쓰기

조회 통계:

24 시간 전: 0

7일 전: 0

30일 전: 4

전체 시간: 560