주요 콘텐츠로 건너뛰기

Velocity Micro Cruz T301 Speakers Replacement

필요한 것

  1. Velocity Micro Cruz T301 Speakers Replacement, Speakers: 1 단계, 이미지 1/1
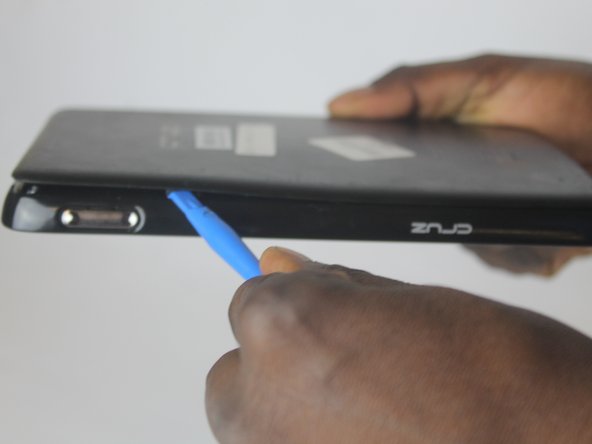
    • Insert an opening tool in the SD port, with the edge pointing towards the rear panel.

    • Use the opening tool to pry the back plate up.

  2. Velocity Micro Cruz T301 Speakers Replacement: 2 단계, 이미지 1/1
    • Insert a second opening tool into the space created by the first opening tool.

  3. Velocity Micro Cruz T301 Speakers Replacement: 3 단계, 이미지 1/1
    • Remove the first opening tool.

  4. Velocity Micro Cruz T301 Speakers Replacement: 4 단계, 이미지 1/2 Velocity Micro Cruz T301 Speakers Replacement: 4 단계, 이미지 2/2
    • Slide the opening tool across the back plate to disconnect the clips joining the plate to the tablet.

  5. Velocity Micro Cruz T301 Speakers Replacement: 5 단계, 이미지 1/1
    • Remove the four screws in the metal plate covering the battery using a Phillips #0 screwdriver.

  6. Velocity Micro Cruz T301 Speakers Replacement: 6 단계, 이미지 1/1
    • Using a plastic spudger to remove the battery connector.

    • Failure to follow this step may result in an electric shock.

  7. Velocity Micro Cruz T301 Speakers Replacement: 7 단계, 이미지 1/1
    • Remove the battery with a spudger.

    • The photos in this guide use a metal spudger. Do not use a metal spudger as it can damage the device or conduct electricity causing a shock.

  8. Velocity Micro Cruz T301 Speakers Replacement: 8 단계, 이미지 1/1
    • Remove the twelve screws in the cover with a Phillips #0 screwdriver.

  9. Velocity Micro Cruz T301 Speakers Replacement: 9 단계, 이미지 1/1
    • Place a spudger between the tablet base and the screen.

    • Again this photo shows the use of a metal spudger. The use of a metal spudger can cause damage to the device and can lead to an electric shock.

  10. Velocity Micro Cruz T301 Speakers Replacement: 10 단계, 이미지 1/1
    • Move the spudger around the face to release the clips attached to the tablet base.

  11. Velocity Micro Cruz T301 Speakers Replacement: 11 단계, 이미지 1/1
    • Locate the speaker on the motherboard. Use the plastic spudger to disconnect the speaker from the connection port.

    • Plug the new speaker into the port, then use the plastic spudger to gently push it in.

결론

To reassemble your device, follow these instructions in reverse order.

Ali Rashid Al Araimi

회원 가입일: 10/05/16

371 평판

안내서 3개 작성하였습니다

USF Tampa, Team 1-6, Cagle Fall 2016 USF Tampa, Team 1-6, Cagle Fall 2016 회원

USFT-CAGLE-F16S1G6

3 회원들

안내서 5개 작성하였습니다

댓글 0개

댓글 쓰기

조회 통계:

24 시간 전: 0

7일 전: 1

30일 전: 6

전체 시간: 108