주요 콘텐츠로 건너뛰기

Velocity Micro Tablet T301 Screen Display. Replacement

필요한 것

  1. Velocity Micro Tablet T301 Screen Display. Replacement, Screen Display.: 1 단계, 이미지 1개 중 1개
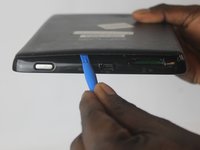
    • Insert the larger plastic opening tool in the SD port. The edge point should be pointed towards the rear panel.

  2. Velocity Micro Tablet T301 Screen Display. Replacement: 2 단계, 이미지 1개 중 1개
    • Insert a small opening tool between the rear panel and the tablet.

  3. Velocity Micro Tablet T301 Screen Display. Replacement: 3 단계, 이미지 1개 중 1개
    • The large opening tool can now be removed, leaving only the small opening tool in place.

  4. Velocity Micro Tablet T301 Screen Display. Replacement: 4 단계, 이미지 2개 중 1개 Velocity Micro Tablet T301 Screen Display. Replacement: 4 단계, 이미지 2개 중 2개
    • Slide the small opening tool along the seam of the rear panel to fully remove it.

  5. Velocity Micro Tablet T301 Screen Display. Replacement: 5 단계, 이미지 1개 중 1개
    • Using a PH0 Phillips Driver, remove the 4 screws holding down the battery.

  6. Velocity Micro Tablet T301 Screen Display. Replacement: 6 단계, 이미지 1개 중 1개
    • Using a plastic spudger, disconnect the wire attaching the battery to the tablet.

  7. Velocity Micro Tablet T301 Screen Display. Replacement: 7 단계, 이미지 1개 중 1개
    • Using a PH0 Phillips Driver, remove the 12 screws around the frame.

  8. Velocity Micro Tablet T301 Screen Display. Replacement: 8 단계, 이미지 1개 중 1개
    • Insert a metal spudger in the seam of the screen and the back cover.

  9. Velocity Micro Tablet T301 Screen Display. Replacement: 9 단계, 이미지 1개 중 1개
    • Slide the spudger around the tablet to release the clips attached to the screen, thus detaching the back and revealing the motherboard.

  10. Velocity Micro Tablet T301 Screen Display. Replacement: 10 단계, 이미지 1개 중 1개
    • Use a plastic spudger to disconnect the wires between the speakers and the motherboard as shown in the picture.

  11. Velocity Micro Tablet T301 Screen Display. Replacement: 11 단계, 이미지 1개 중 1개
    • Using a metal spudger, remove the top plug connector from the motherboard.

  12. Velocity Micro Tablet T301 Screen Display. Replacement: 12 단계, 이미지 2개 중 1개 Velocity Micro Tablet T301 Screen Display. Replacement: 12 단계, 이미지 2개 중 2개
    • Use a metal spudger to remove both screen cable connectors.

  13. Velocity Micro Tablet T301 Screen Display. Replacement: 13 단계, 이미지 1개 중 1개
    • Use opening tools to remove the motherboard.

  14. Velocity Micro Tablet T301 Screen Display. Replacement: 14 단계, 이미지 1개 중 1개
    • Remove the motherboard cover to access the screen display.

결론

To reassemble your device, follow these instructions in reverse order.

작성자

6다른 기여자 명과 함께

James Napoleon

회원 가입일: 10/05/16

101 평판

안내서 1개를 작성함

USF Tampa, Team 1-6, Cagle Fall 2016 USF Tampa, Team 1-6, Cagle Fall 2016 회원

USFT-CAGLE-F16S1G6

3 회원들

안내서 5개를 작성함

0가이드 댓글

댓글 쓰기

조회 통계:

지난 24시간: 0

지난 7일: 1

지난 30일: 3

전체 시간: 175