소개
This guide will teach you how to remove the back and replace the battery on the Verizon Ellipsis 7 tablet. A prying tool is required to remove the back plate of the phone, and the process is not very hazardous. This could be useful to replace a faulty battery or if you have multiple batteries to keep your device running on the go.
필요한 것
-
-
Power down device by holding down the power button until the screen goes black.
-
Remove the SIM card from the device to prevent damage.
-
To remove the SIM card, open the SIM card cover on the side of the device.
-
Push SIM card in and then pull out after hearing a click.
-
-
-
-
Take off the back panel.
-
Pry open the back cover carefully with a plastic opening tool.
-
Use the opening tool to disconnect the cover completely. Do not attempt to pull the back cover off with your hands.
Looking to purchase a back cover for this ellipsis model #QTASYN1. can you helo?
Needing to purchase a back cover for an ellipsis model. #QTASYN1. Can anyone please help
-
-
-
Remove the charging (micro-USB) port by unscrewing the indicated screws using the Phillips #00 screwdriver.
-
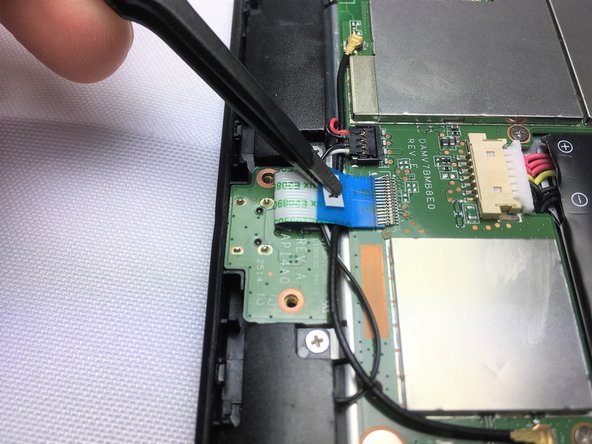
Disconnect the ribbon cable connecting the charging port board to the motherboard using tweezers.
-
Use the tweezers to grab the sides of black, plastic connector. Do not grab from the wires or try to wedge it out from the bottom.
I called Verizon and they said that they didn't have a replacement.
Maudie Cox - 답글
Was thinking removing the battery was simpler. Thought also doing so , like a phone, would be the same as a hard reboot. I guess maybe not do much…
So did it work afterwards? My battery is a McNair MLP3970125. Who was your vendor of choice?
Did it work?
Interested in seeing if this actually fixes the battery
Yeah, I think this article was mislabeled. Should have been “Replacing the micro USB charging port”
Do not remove the micro USB charging port as shown in step 3 if only the battery is to be changed. Before trying to remove the battery carefully unplug the battery connector. You will not be able to completely clear the connector from its plug and that’s ok as long as it is partially removed. It will come clear when the battery is removed. Using a pry tool, preferably metal, insert the tool around the battery prying it loose from the two strips of double backed tape. You may need to work the tool around the battery a few times-this tape is really strong! After the battery is removed the replacement can be inserted. Before seating the new battery reattach the connector and be sure the battery is aligned properly because once the battery is seated the double backed tape will seize the battery the same way the original battery was stuck.
-


To reassemble your device, follow these instructions in reverse order.
To reassemble your device, follow these instructions in reverse order.
다른 11명이 해당 안내서를 완성하였습니다.

팀

Cal Poly, Team 13-5, Banghart Winter 2017 Cal Poly, Team 13-5, Banghart Winter 2017 회원
CPSU-BANGHART-W17S13G5
4 회원들
안내서 4개 작성하였습니다
댓글 8개
so much for the charging port. You didn’t mention the battery. ?
Well….ok…..but were we here for removing the charging port? Ha ha….I think not. So how about we lift out the battery and unplug it instead. Takes a bit of effort , it seems. That sucker is stuck down pretty good with some really good double sided tape. Lift carefully. I pried it up with the same plastic case tool I used to remove the back cover. The same tool also helped me remove the battery plug.
David Shaw - 답글
Look at the stats..
Why suddenly are so many units failing at or about the same time? I'm not a conspirist but,
Don't you think it's a strange coincidence?
Ok…. where’s the rest of the instructions?!?!?!
Be nice if they actually show how to remove the battery.
Instructor went off the rail and never did come back to battery. I know nothing about electronics and even I knew he was heading in the wrong directions.Step your game up!
Donna Rawls 4/25/2021