주요 콘텐츠로 건너뛰기

Wacker Concrete Vibrator M1500120 REV 100 2016 Power Cable Replacement

필요한 것

  1. Wacker Concrete Vibrator M1500120  REV 100 2016 Power Cable Replacement, Disconnect the flex shaft: 1 단계, 이미지 1/3 Wacker Concrete Vibrator M1500120  REV 100 2016 Power Cable Replacement, Disconnect the flex shaft: 1 단계, 이미지 2/3 Wacker Concrete Vibrator M1500120  REV 100 2016 Power Cable Replacement, Disconnect the flex shaft: 1 단계, 이미지 3/3
    • Before starting, ensure the device is unplugged from power.

    • Pull up on the quick-disconnect handle to release the lock on the flex shaft.

    • Remove the flex shaft.

  2. Wacker Concrete Vibrator M1500120  REV 100 2016 Power Cable Replacement, Remove the housing screws: 2 단계, 이미지 1/1
    • Use a T20 Torx screwdriver to remove the nineteen screws securing the two halves of the device housing.

  3. Wacker Concrete Vibrator M1500120  REV 100 2016 Power Cable Replacement, Remove the dust filter: 3 단계, 이미지 1/2 Wacker Concrete Vibrator M1500120  REV 100 2016 Power Cable Replacement, Remove the dust filter: 3 단계, 이미지 2/2
    • Lay the device down onto its right side, screw holes facing up.

    • Remove the rear dust filter.

  4. Wacker Concrete Vibrator M1500120  REV 100 2016 Power Cable Replacement, Separate the halves: 4 단계, 이미지 1/3 Wacker Concrete Vibrator M1500120  REV 100 2016 Power Cable Replacement, Separate the halves: 4 단계, 이미지 2/3 Wacker Concrete Vibrator M1500120  REV 100 2016 Power Cable Replacement, Separate the halves: 4 단계, 이미지 3/3
    • Lift to remove the left half of the device housing.

    • If the housings feel stuck together, use a flathead screwdriver to create a gap between the halves.

  5. Wacker Concrete Vibrator M1500120  REV 100 2016 Power Cable Replacement, Lift up the switch: 5 단계, 이미지 1/2 Wacker Concrete Vibrator M1500120  REV 100 2016 Power Cable Replacement, Lift up the switch: 5 단계, 이미지 2/2
    • Lift the switch out of its recess in the case housing.

  6. Wacker Concrete Vibrator M1500120  REV 100 2016 Power Cable Replacement, Disconnect the power wires: 6 단계, 이미지 1/3 Wacker Concrete Vibrator M1500120  REV 100 2016 Power Cable Replacement, Disconnect the power wires: 6 단계, 이미지 2/3 Wacker Concrete Vibrator M1500120  REV 100 2016 Power Cable Replacement, Disconnect the power wires: 6 단계, 이미지 3/3
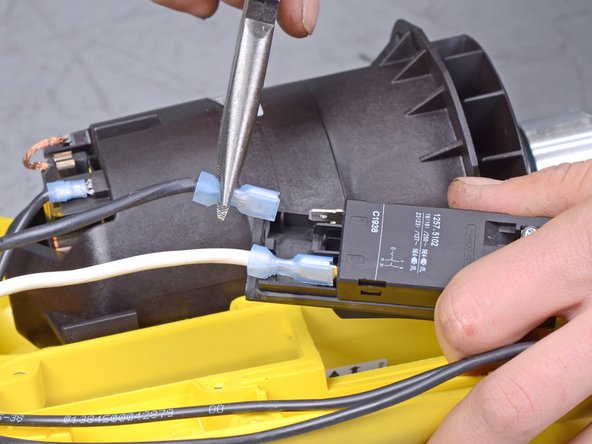
    • Use a pair of needle nose pliers to disconnect the black and white power wires from their terminals on the switch.

  7. Wacker Concrete Vibrator M1500120  REV 100 2016 Power Cable Replacement, Remove the power cable clamp: 7 단계, 이미지 1/1
    • Use a T20 Torx screwdriver to remove the two screws securing the power cable clamp to the housing.

  8. Wacker Concrete Vibrator M1500120  REV 100 2016 Power Cable Replacement: 8 단계, 이미지 1/2 Wacker Concrete Vibrator M1500120  REV 100 2016 Power Cable Replacement: 8 단계, 이미지 2/2
    • Remove the power cable clamp.

  9. Wacker Concrete Vibrator M1500120  REV 100 2016 Power Cable Replacement, Remove the power cable assembly: 9 단계, 이미지 1/2 Wacker Concrete Vibrator M1500120  REV 100 2016 Power Cable Replacement, Remove the power cable assembly: 9 단계, 이미지 2/2
    • Lift the power cable assembly up and away from the device.

  10. Wacker Concrete Vibrator M1500120  REV 100 2016 Power Cable Replacement, Remove the reinforcing sleeve: 10 단계, 이미지 1/3 Wacker Concrete Vibrator M1500120  REV 100 2016 Power Cable Replacement, Remove the reinforcing sleeve: 10 단계, 이미지 2/3 Wacker Concrete Vibrator M1500120  REV 100 2016 Power Cable Replacement, Remove the reinforcing sleeve: 10 단계, 이미지 3/3
    • Slide the reinforcing sleeve up and off of the power cable.

  11. Wacker Concrete Vibrator M1500120  REV 100 2016 Power Cable Replacement: 11 단계, 이미지 1/1
    • Only the power cable remains.

결론

To reassemble your device, follow these instructions in reverse order.

Carsten Frauenheim

회원 가입일: 03/10/20

114,134 평판

안내서 338개 작성하였습니다

iFixit iFixit 회원

Staff

135 회원들

안내서 17,199개 작성하였습니다

댓글 0개

댓글 쓰기

조회 통계:

24 시간 전: 0

7일 전: 0

30일 전: 6

전체 시간: 318