필요한 것
-
-
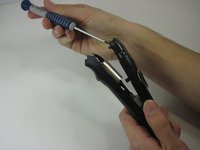
Begin by removing the rubber grip along the handle.
-
-
-
-
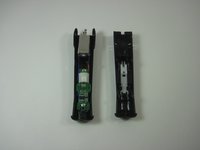
Remove the chip set, motor and battery from the plastic body. This photo shows the motor and wires connecting it to the battery.
-


To reassemble your device, follow these instructions in reverse order.
To reassemble your device, follow these instructions in reverse order.
다른 18명이 해당 안내서를 완성하였습니다.
팀

University of Maryland, Team 1-3, Shastany Fall 2013 University of Maryland, Team 1-3, Shastany Fall 2013 회원
UMD-SHASTANY-F13S1G3
3 회원들
안내서 12개를 작성함
댓글 19개
Great guide but I made the mistake of buying just a standard 3.7v 750mAh battery to try and fit into the trimmer. The battery in the trimmer has metal terminals "stamped" to each end, so the terminals can't be unsoldered from the battery. I was hoping to just unsolder the existing battery and then solder in the new one but no such luck. New trimmer for me now lol
DM, I used a dremel tool with a thin grinding wheel to cut off the metal terminals just below the stamp point. After cutting off the metal terminals below the stamp point, approximately 1/4" inch of the terminals still remained which was just enough to connect the new battery to the remaining metal terminals with a small dab of solder. Little bit more work than I was anticipating but the trimmer works like new again. Found the 3.7v 750mAh battery at onlybatteries.com for $5 plus about $5.94 for shipping. Hope this helps for you DIYers!!
Dean Lamborn, 10/25/2015
Is it an 18650 size?
Nope, it is a AA size 14500 lithium battery.
To Nathan, DM and DL, I was with Nathan until I read about soldering a dremel (which i I own) and cutting off the metal terminals below the stamp point. Can any of you fine 'fixers' show pictures along with the soldering, dremel, cutting, terminals description? I want my Chromado to work like new too! Thanks in advance, Ka