주요 콘텐츠로 건너뛰기

Weller WLC100 Soldering Station NTW56058 TRIAC 16amp switch Replacement

필요한 것

  1. Weller WLC100 Soldering Station  NTW56058 TRIAC 16amp switch Replacement, NTW56058 TRIAC 16amp switch: 1 단계, 이미지 1/1
    • Remove the knob from the adjustment dial.

  2. Weller WLC100 Soldering Station  NTW56058 TRIAC 16amp switch Replacement: 2 단계, 이미지 1/1
    • Remove two 8.6 mm Phillips #1 screws from soldering station bottom.

  3. Weller WLC100 Soldering Station  NTW56058 TRIAC 16amp switch Replacement: 3 단계, 이미지 1/1
    • Remove the rubber feet to access the remaining screws.

  4. Weller WLC100 Soldering Station  NTW56058 TRIAC 16amp switch Replacement: 4 단계, 이미지 1/1
    • Remove the remaining two 8.6 mm Phillips #1 screws from soldering station bottom.

  5. Weller WLC100 Soldering Station  NTW56058 TRIAC 16amp switch Replacement: 5 단계, 이미지 1/1
    • Separate the bottom and top half of the soldering station.

  6. Weller WLC100 Soldering Station  NTW56058 TRIAC 16amp switch Replacement: 6 단계, 이미지 1/1
    • Remove the adjustable heat dial board.

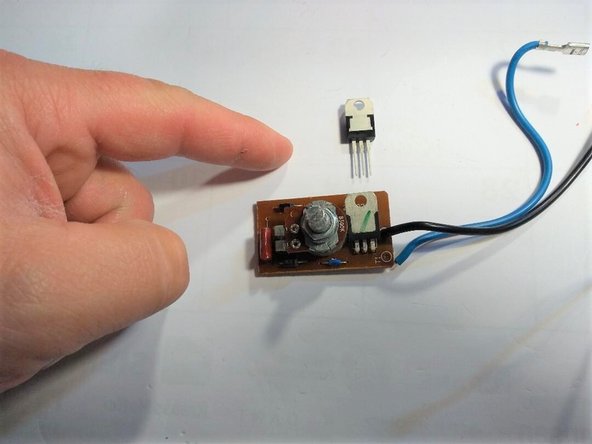
  7. Weller WLC100 Soldering Station  NTW56058 TRIAC 16amp switch Replacement: 7 단계, 이미지 1/2 Weller WLC100 Soldering Station  NTW56058 TRIAC 16amp switch Replacement: 7 단계, 이미지 2/2
    • Orient the new TRIAC switch the same way as the old TRIAC switch is located.

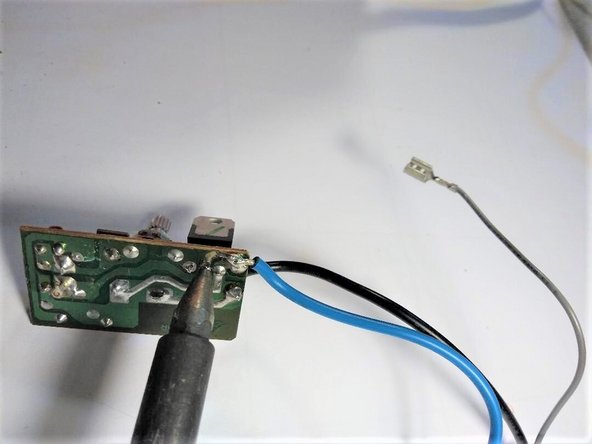
  8. Weller WLC100 Soldering Station  NTW56058 TRIAC 16amp switch Replacement: 8 단계, 이미지 1/2 Weller WLC100 Soldering Station  NTW56058 TRIAC 16amp switch Replacement: 8 단계, 이미지 2/2
  9. Weller WLC100 Soldering Station  NTW56058 TRIAC 16amp switch Replacement: 9 단계, 이미지 1/1
    • Remove the TRIAC switch when all the solder is removed from the pins.

  10. Weller WLC100 Soldering Station  NTW56058 TRIAC 16amp switch Replacement: 10 단계, 이미지 1/1
    • Insert the new TRIAC switch into the three holes left when you removed the old TRIAC switch.

  11. Weller WLC100 Soldering Station  NTW56058 TRIAC 16amp switch Replacement: 11 단계, 이미지 1/1
    • Solder the new TRIAC switch onto board.

  12. Weller WLC100 Soldering Station  NTW56058 TRIAC 16amp switch Replacement: 12 단계, 이미지 1/1
    • Verify all three pins are soldered in and the solder is not touching the other pins.

  13. Weller WLC100 Soldering Station  NTW56058 TRIAC 16amp switch Replacement: 13 단계, 이미지 1/1
    • Re-install the board into the soldering station.

  14. Weller WLC100 Soldering Station  NTW56058 TRIAC 16amp switch Replacement: 14 단계, 이미지 1/1
    • Push the knob into the hole so that is it protruding out of the other side.

  15. Weller WLC100 Soldering Station  NTW56058 TRIAC 16amp switch Replacement: 15 단계, 이미지 1/1
    • Verify the knob is sticking out of the other side of soldering station.

  16. Weller WLC100 Soldering Station  NTW56058 TRIAC 16amp switch Replacement: 16 단계, 이미지 1/1
    • Replace the dial onto the knob.

  17. Weller WLC100 Soldering Station  NTW56058 TRIAC 16amp switch Replacement: 17 단계, 이미지 1/1
    • Replace the bottom and replace all four screws and rubber feet, reversing steps four though two.

결론

To reassemble your device, follow these instructions in reverse order.

다른 2명이 해당 안내서를 완성하였습니다.

Terence Ryan

회원 가입일: 02/16/21

292 평판

안내서 1개 작성함

댓글 0개

댓글 쓰기

조회 통계:

24 시간 전: 0

7일 전: 3

30일 전: 33

전체 시간: 1,302