주요 콘텐츠로 건너뛰기

Whirlpool Dryer Drive Belt Replacement

필요한 것

  1. Whirlpool Dryer Drive Belt Replacement, Safety Precautions: 1 단계, 이미지 1/1
    • Before you begin your repair, unplug your dryer.

    • Your power cord may have four prongs rather than three. The additional prong is a ground connection.

  2. Whirlpool Dryer Drive Belt Replacement, Unfasten the top panel: 2 단계, 이미지 1/3 Whirlpool Dryer Drive Belt Replacement, Unfasten the top panel: 2 단계, 이미지 2/3 Whirlpool Dryer Drive Belt Replacement, Unfasten the top panel: 2 단계, 이미지 3/3
    이 단계에 사용된 도구:
    FixMat
    $36.95
    구매
    • Throughout this guide, keep track of each screw and reinstall it exactly where it came from.

    • Use a nut driver to remove the screws securing the top panel to the rear panel bracket.

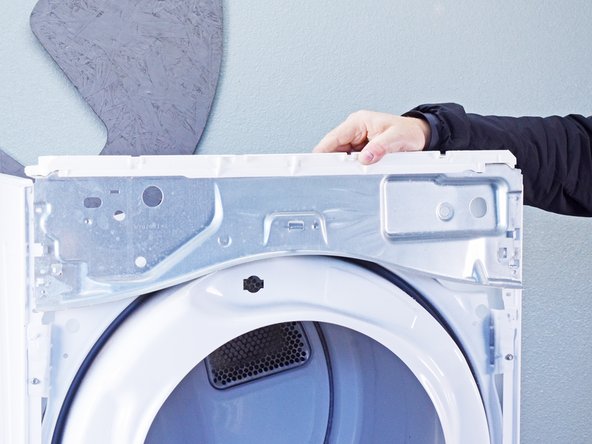
  3. Whirlpool Dryer Drive Belt Replacement, Remove the top panel: 3 단계, 이미지 1/2 Whirlpool Dryer Drive Belt Replacement, Remove the top panel: 3 단계, 이미지 2/2
    • Grasp the top and slide it 1/2 to 1 inch toward the rear of the machine.

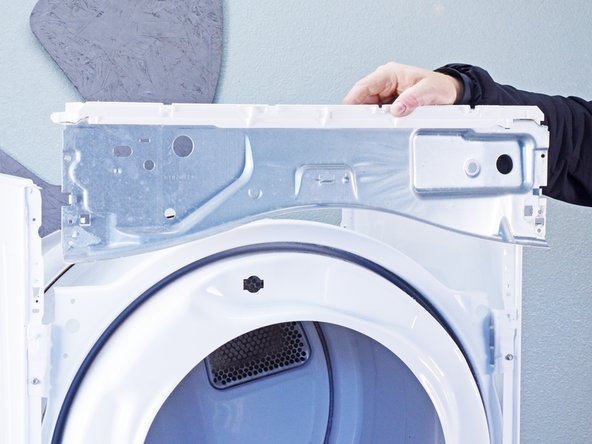
  4. Whirlpool Dryer Drive Belt Replacement: 4 단계, 이미지 1/2 Whirlpool Dryer Drive Belt Replacement: 4 단계, 이미지 2/2
    • Lift the top panel upward to separate it from the chassis.

    • Remove the top panel from the machine.

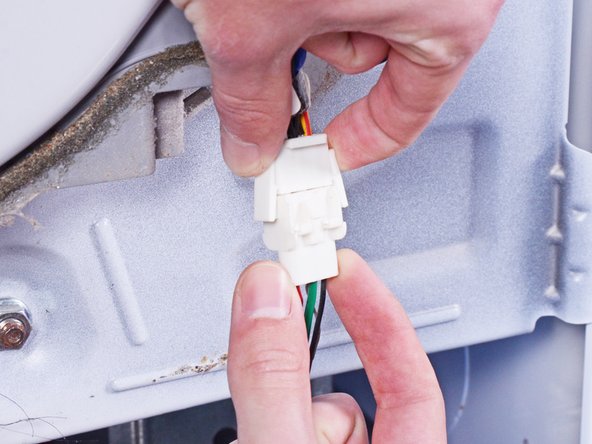
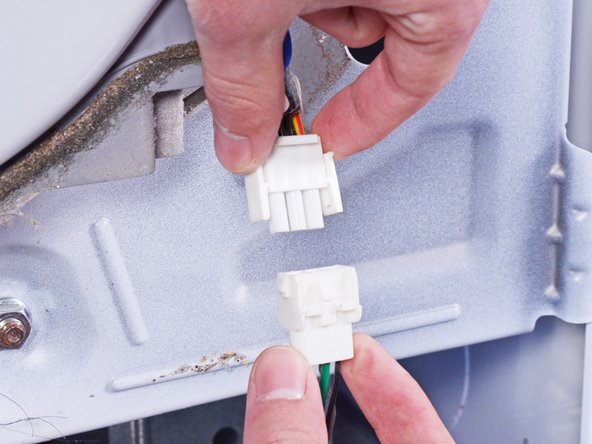
  5. Whirlpool Dryer Drive Belt Replacement, Disconnect the control panel: 5 단계, 이미지 1/2 Whirlpool Dryer Drive Belt Replacement, Disconnect the control panel: 5 단계, 이미지 2/2
    • Disconnect the control panel cable from the main board.

  6. Whirlpool Dryer Drive Belt Replacement: 6 단계, 이미지 1/2 Whirlpool Dryer Drive Belt Replacement: 6 단계, 이미지 2/2
    • Disconnect the drum light connector.

  7. Whirlpool Dryer Drive Belt Replacement, Unfasten the control panel: 7 단계, 이미지 1/2 Whirlpool Dryer Drive Belt Replacement, Unfasten the control panel: 7 단계, 이미지 2/2
    • Remove the screws securing the control panel.

  8. Whirlpool Dryer Drive Belt Replacement, Remove the control panel: 8 단계, 이미지 1/3 Whirlpool Dryer Drive Belt Replacement, Remove the control panel: 8 단계, 이미지 2/3 Whirlpool Dryer Drive Belt Replacement, Remove the control panel: 8 단계, 이미지 3/3
    • Lift the control panel up and tilt it away from the chassis to remove it.

    • Make sure to thread the cable through the hole in the chassis.

    • During reassembly, thread the cable through its proper hole before reinstalling the control panel.

  9. Whirlpool Dryer Drive Belt Replacement, Disconnect the door switch: 9 단계, 이미지 1/3 Whirlpool Dryer Drive Belt Replacement, Disconnect the door switch: 9 단계, 이미지 2/3 Whirlpool Dryer Drive Belt Replacement, Disconnect the door switch: 9 단계, 이미지 3/3
    • Use a small flat blade screwdriver or a spudger to unlatch both sides of the door switch connector.

    • Unplug the connector.

  10. Whirlpool Dryer Drive Belt Replacement, Unfasten the front panel: 10 단계, 이미지 1/2 Whirlpool Dryer Drive Belt Replacement, Unfasten the front panel: 10 단계, 이미지 2/2
    • Remove the upper front panel sheet metal screws.

    • Tilt the machine backwards and prop it securely, or have a friend hold it.

    • Remove the sheet metal screws on the bottom edge of the panel.

  11. Whirlpool Dryer Drive Belt Replacement: 11 단계, 이미지 1/1
    • Remove the screws inside the door area below the drum opening.

  12. Whirlpool Dryer Drive Belt Replacement, Remove the front panel: 12 단계, 이미지 1/3 Whirlpool Dryer Drive Belt Replacement, Remove the front panel: 12 단계, 이미지 2/3 Whirlpool Dryer Drive Belt Replacement, Remove the front panel: 12 단계, 이미지 3/3
    • The panel is heavy and awkward. You may want to have a friend help you with this step.

    • Pull the bottom of the panel away from the chassis about two to three inches.

    • Lift the front panel off the small tabs on the chassis near the top of the panel and remove it.

    • Make sure you don't snag the door switch wire harness as you remove the panel.

  13. Whirlpool Dryer Drive Belt Replacement, Unfasten the cover plate: 13 단계, 이미지 1/1
    • Remove the cover plate screw.

  14. Whirlpool Dryer Drive Belt Replacement, Remove the cover plate: 14 단계, 이미지 1/3 Whirlpool Dryer Drive Belt Replacement, Remove the cover plate: 14 단계, 이미지 2/3 Whirlpool Dryer Drive Belt Replacement, Remove the cover plate: 14 단계, 이미지 3/3
    • Remove the cover plate.

  15. Whirlpool Dryer Drive Belt Replacement, Disconnect the cord: 15 단계, 이미지 1/1
    • Remove the screws securing the cord cables.

    • Mark the cables with a permanent marker if needed and take a picture or draw a diagram.

  16. Whirlpool Dryer Drive Belt Replacement, Remove the cord: 16 단계, 이미지 1/3 Whirlpool Dryer Drive Belt Replacement, Remove the cord: 16 단계, 이미지 2/3 Whirlpool Dryer Drive Belt Replacement, Remove the cord: 16 단계, 이미지 3/3
    • Pull the cord carefully down through the round hole.

    • Make sure you replace the connections correctly when you reassemble.

  17. Whirlpool Dryer Drive Belt Replacement, Unfasten the cord terminal block: 17 단계, 이미지 1/1
    • Remove the green ground screw.

    • Remove the cord terminal block screws.

  18. Whirlpool Dryer Drive Belt Replacement, Move the cord terminal block: 18 단계, 이미지 1/3 Whirlpool Dryer Drive Belt Replacement, Move the cord terminal block: 18 단계, 이미지 2/3 Whirlpool Dryer Drive Belt Replacement, Move the cord terminal block: 18 단계, 이미지 3/3
    • Move the cord terminal block behind the rear panel.

  19. Whirlpool Dryer Drive Belt Replacement, Unfasten the rear panel: 19 단계, 이미지 1/2 Whirlpool Dryer Drive Belt Replacement, Unfasten the rear panel: 19 단계, 이미지 2/2
    이 단계에 사용된 도구:
    FixMat
    $36.95
    구매
    • Remove the rear panel screws.

    • Throughout this guide, keep track of each screw and reinstall it exactly where it came from.

  20. Whirlpool Dryer Drive Belt Replacement: 20 단계, 이미지 1/2 Whirlpool Dryer Drive Belt Replacement: 20 단계, 이미지 2/2
    • Remove the screw holding the main board bracket to the chassis.

    • Remove the screws from the top rear of the machine.

  21. Whirlpool Dryer Drive Belt Replacement, Remove the rear panel: 21 단계, 이미지 1/3 Whirlpool Dryer Drive Belt Replacement, Remove the rear panel: 21 단계, 이미지 2/3 Whirlpool Dryer Drive Belt Replacement, Remove the rear panel: 21 단계, 이미지 3/3
    • Put on gloves before continuing, as the rear panel is sharp.

    • Lift the panel about 1/2 inch and tilt it to the rear to release it from the vent pipe.

    • Slide the panel off the vent pipe and remove it.

  22. Whirlpool Dryer Drive Belt Replacement, Reassembly information: 22 단계, 이미지 1/2 Whirlpool Dryer Drive Belt Replacement, Reassembly information: 22 단계, 이미지 2/2
    • During reassembly, perform the following:

    • Make sure that the vent pipe is fitted into the collar on the panel.

    • Make sure the tabs at the bottom are aligned to the bottom rim of the chassis.

    • Position the panel so its screw holes match with the chassis.

  23. Whirlpool Dryer Drive Belt Replacement, Remove the lint filter: 23 단계, 이미지 1/3 Whirlpool Dryer Drive Belt Replacement, Remove the lint filter: 23 단계, 이미지 2/3 Whirlpool Dryer Drive Belt Replacement, Remove the lint filter: 23 단계, 이미지 3/3
    • Pull the lint filter up out of the lint filter slot to remove it.

    • These photos show the front panel in place, but the procedure is the same if the front panel is already removed.

  24. Whirlpool Dryer Drive Belt Replacement, Unfasten the lint filter housing: 24 단계, 이미지 1/1
    • Remove the mounting screws securing the lint filter housing.

  25. Whirlpool Dryer Drive Belt Replacement, Remove the lint filter housing: 25 단계, 이미지 1/3 Whirlpool Dryer Drive Belt Replacement, Remove the lint filter housing: 25 단계, 이미지 2/3 Whirlpool Dryer Drive Belt Replacement, Remove the lint filter housing: 25 단계, 이미지 3/3
    • Pull the filter housing outward from the chassis and down to remove it.

  26. Whirlpool Dryer Drive Belt Replacement, Disconnect the moisture sensor: 26 단계, 이미지 1/3 Whirlpool Dryer Drive Belt Replacement, Disconnect the moisture sensor: 26 단계, 이미지 2/3 Whirlpool Dryer Drive Belt Replacement, Disconnect the moisture sensor: 26 단계, 이미지 3/3
    • Squeeze the locking tabs on the moisture sensor connector.

    • Disconnect the connector.

  27. Whirlpool Dryer Drive Belt Replacement, Disconnect the main board: 27 단계, 이미지 1/3 Whirlpool Dryer Drive Belt Replacement, Disconnect the main board: 27 단계, 이미지 2/3 Whirlpool Dryer Drive Belt Replacement, Disconnect the main board: 27 단계, 이미지 3/3
    • Label, photograph or make a sketch of the connector locations and of the main board bracket position on your machine.

    • Disconnect all of the connectors on the main board front half.

  28. Whirlpool Dryer Drive Belt Replacement: 28 단계, 이미지 1/3 Whirlpool Dryer Drive Belt Replacement: 28 단계, 이미지 2/3 Whirlpool Dryer Drive Belt Replacement: 28 단계, 이미지 3/3
    • Label, photograph or make a sketch of the connector locations and of the main board bracket position on your machine.

    • Disconnect all the connectors from the rear half of the main board.

  29. Whirlpool Dryer Drive Belt Replacement, Unfasten the main board from the main board bracket: 29 단계, 이미지 1/1
    • Remove the sheet metal screw that retains the main board to the main board bracket.

  30. Whirlpool Dryer Drive Belt Replacement, Separate the main board from the main board bracket: 30 단계, 이미지 1/3 Whirlpool Dryer Drive Belt Replacement, Separate the main board from the main board bracket: 30 단계, 이미지 2/3 Whirlpool Dryer Drive Belt Replacement, Separate the main board from the main board bracket: 30 단계, 이미지 3/3
    • Lift the rear corner of the main board nearest to the side walls of the chassis.

    • You want to release the locking tab on the side of the main board.

    • Slide the main board toward the front of the dryer to release the tabs securing it to the main board bracket.

  31. Whirlpool Dryer Drive Belt Replacement, Remove the main board: 31 단계, 이미지 1/1
    • Remove the main board from the main board bracket.

  32. Whirlpool Dryer Drive Belt Replacement, Remove the main board bracket: 32 단계, 이미지 1/1
    • Remove the sheet metal screw holding the main board bracket.

  33. Whirlpool Dryer Drive Belt Replacement, Remove the wiring harness from the main board bracket: 33 단계, 이미지 1/3 Whirlpool Dryer Drive Belt Replacement, Remove the wiring harness from the main board bracket: 33 단계, 이미지 2/3 Whirlpool Dryer Drive Belt Replacement, Remove the wiring harness from the main board bracket: 33 단계, 이미지 3/3
    • Lift off the main board bracket from the chassis and turn it so the bottom is exposed.

    • Using long nose or slip joint pliers, pinch the locking wings of the harness retainer clamp.

    • Separate the harness from the main board bracket and remove the main board bracket.

  34. Whirlpool Dryer Drive Belt Replacement, Unfasten the upper front bulkhead: 34 단계, 이미지 1/3 Whirlpool Dryer Drive Belt Replacement, Unfasten the upper front bulkhead: 34 단계, 이미지 2/3 Whirlpool Dryer Drive Belt Replacement, Unfasten the upper front bulkhead: 34 단계, 이미지 3/3
    • Remove the screws securing the upper front bulkhead to the front of the chassis.

    • Remove the sheet metal screws securing the top plastic portion to the upper front bulkhead.

  35. Whirlpool Dryer Drive Belt Replacement, Remove the upper front bulkhead: 35 단계, 이미지 1/3 Whirlpool Dryer Drive Belt Replacement, Remove the upper front bulkhead: 35 단계, 이미지 2/3 Whirlpool Dryer Drive Belt Replacement, Remove the upper front bulkhead: 35 단계, 이미지 3/3
    • Remove the upper front bulkhead and set it aside.

  36. Whirlpool Dryer Drive Belt Replacement, Release the belt tension: 36 단계, 이미지 1/3 Whirlpool Dryer Drive Belt Replacement, Release the belt tension: 36 단계, 이미지 2/3 Whirlpool Dryer Drive Belt Replacement, Release the belt tension: 36 단계, 이미지 3/3
    • Take careful note of the belt path before proceeding.

    • Be careful during this procedure! The idler arm is under spring tension and may pinch you, or it could damage the belt switch if the arm is allowed to snap down.

    • Push the idler arm (the metal upside-down "L") up to relieve the tension on the drive belt.

    • Remove the belt from the motor pulley.

    • Gently lower the idler arm until it rests parallel to the dryer floor.

    • During reassembly, refer to your notes or the belt path link to rethread the drive belt.

  37. Whirlpool Dryer Drive Belt Replacement, Unfasten the lower front bulkhead: 37 단계, 이미지 1/2 Whirlpool Dryer Drive Belt Replacement, Unfasten the lower front bulkhead: 37 단계, 이미지 2/2
    • Remove the screws securing the lower front bulkhead.

  38. Whirlpool Dryer Drive Belt Replacement, Remove the lower front bulkhead: 38 단계, 이미지 1/3 Whirlpool Dryer Drive Belt Replacement, Remove the lower front bulkhead: 38 단계, 이미지 2/3 Whirlpool Dryer Drive Belt Replacement, Remove the lower front bulkhead: 38 단계, 이미지 3/3
    • While supporting the drum, lift the lower front bulkhead off of the hooks on the chassis.

  39. Whirlpool Dryer Drive Belt Replacement: 39 단계, 이미지 1/3 Whirlpool Dryer Drive Belt Replacement: 39 단계, 이미지 2/3 Whirlpool Dryer Drive Belt Replacement: 39 단계, 이미지 3/3
    • Lower the bulkhead about 2 inches to free the drum rollers tucked under the drum.

    • While supporting the drum, remove the lower front bulkhead.

    • During reassembly, tilt the bulkhead to the right to get the rollers under the lip on the front of the drum. Once the drum is on the rollers, you can move the bulkhead to the upright position.

  40. Whirlpool Dryer Drive Belt Replacement, Remove the drum: 40 단계, 이미지 1/3 Whirlpool Dryer Drive Belt Replacement, Remove the drum: 40 단계, 이미지 2/3 Whirlpool Dryer Drive Belt Replacement, Remove the drum: 40 단계, 이미지 3/3
    • Use the belt to lift the drum a few inches.

    • Swing the drum out of the front of the dryer.

    • Note which end of the drum faces the front.

    • If the belt is broken, stand in front of the drum and put your arms inside it. Lift it up and pull it through the front opening of the machine. Having someone to help you with this is a good idea.

    • Make sure you get your drum back on the rollers when you reinstall the lower front bulkhead. Take your time and don't force it.

  41. Whirlpool Dryer Drive Belt Replacement, Remove the drive belt: 41 단계, 이미지 1/3 Whirlpool Dryer Drive Belt Replacement, Remove the drive belt: 41 단계, 이미지 2/3 Whirlpool Dryer Drive Belt Replacement, Remove the drive belt: 41 단계, 이미지 3/3
    • Slip the belt off the drum.

    • Don't let the belt drag on the ground if you need to reinstall it as you might damage it.

    • During reassembly, make sure the smooth side of the belt is facing out and the grooved side of the belt is against the drum.

    • Pull the belt snug against the drum when reinstalling.

결론

To reassemble your device, follow these instructions in reverse order.

Repair didn’t go as planned? Ask our Answers community for help.

다른 한 분이 해당 안내서를 완성하였습니다.

Bill Gilbert

회원 가입일: 06/30/22

30,088 평판

안내서 213개 작성하였습니다

iFixit iFixit 회원

Staff

136 회원들

안내서 17,411개 작성하였습니다

댓글 0개

댓글 쓰기

조회 통계:

24 시간 전: 3

7일 전: 26

30일 전: 103

전체 시간: 684