주요 콘텐츠로 건너뛰기

Whirlpool Dryer Idler Pulley Replacement

필요한 것

  1. Whirlpool Dryer Idler Pulley Replacement, Safety Precautions: 1 단계, 이미지 1/1
    • Before you begin your repair, unplug your dryer.

    • Your power cord may have four prongs rather than three. The additional prong is a ground connection.

  2. Whirlpool Dryer Idler Pulley Replacement, Unfasten the top panel: 2 단계, 이미지 1/3 Whirlpool Dryer Idler Pulley Replacement, Unfasten the top panel: 2 단계, 이미지 2/3 Whirlpool Dryer Idler Pulley Replacement, Unfasten the top panel: 2 단계, 이미지 3/3
    이 단계에 사용된 도구:
    FixMat
    $36.95
    구매
    • Throughout this guide, keep track of each screw and reinstall it exactly where it came from.

    • Use a nut driver to remove the screws securing the top panel to the rear panel bracket.

  3. Whirlpool Dryer Idler Pulley Replacement, Remove the top panel: 3 단계, 이미지 1/2 Whirlpool Dryer Idler Pulley Replacement, Remove the top panel: 3 단계, 이미지 2/2
    • Grasp the top and slide it 1/2 to 1 inch toward the rear of the machine.

  4. Whirlpool Dryer Idler Pulley Replacement: 4 단계, 이미지 1/2 Whirlpool Dryer Idler Pulley Replacement: 4 단계, 이미지 2/2
    • Lift the top panel upward to separate it from the chassis.

    • Remove the top panel from the machine.

  5. Whirlpool Dryer Idler Pulley Replacement, Unfasten the cover plate: 5 단계, 이미지 1/1
    • Remove the cover plate screw.

  6. Whirlpool Dryer Idler Pulley Replacement, Remove the cover plate: 6 단계, 이미지 1/3 Whirlpool Dryer Idler Pulley Replacement, Remove the cover plate: 6 단계, 이미지 2/3 Whirlpool Dryer Idler Pulley Replacement, Remove the cover plate: 6 단계, 이미지 3/3
    • Remove the cover plate.

  7. Whirlpool Dryer Idler Pulley Replacement, Disconnect the cord: 7 단계, 이미지 1/1
    • Remove the screws securing the cord cables.

    • Mark the cables with a permanent marker if needed and take a picture or draw a diagram.

  8. Whirlpool Dryer Idler Pulley Replacement, Remove the cord: 8 단계, 이미지 1/3 Whirlpool Dryer Idler Pulley Replacement, Remove the cord: 8 단계, 이미지 2/3 Whirlpool Dryer Idler Pulley Replacement, Remove the cord: 8 단계, 이미지 3/3
    • Pull the cord carefully down through the round hole.

    • Make sure you replace the connections correctly when you reassemble.

  9. Whirlpool Dryer Idler Pulley Replacement, Unfasten the cord terminal block: 9 단계, 이미지 1/1
    • Remove the green ground screw.

    • Remove the cord terminal block screws.

  10. Whirlpool Dryer Idler Pulley Replacement, Move the cord terminal block: 10 단계, 이미지 1/3 Whirlpool Dryer Idler Pulley Replacement, Move the cord terminal block: 10 단계, 이미지 2/3 Whirlpool Dryer Idler Pulley Replacement, Move the cord terminal block: 10 단계, 이미지 3/3
    • Move the cord terminal block behind the rear panel.

  11. Whirlpool Dryer Idler Pulley Replacement, Unfasten the rear panel: 11 단계, 이미지 1/2 Whirlpool Dryer Idler Pulley Replacement, Unfasten the rear panel: 11 단계, 이미지 2/2
    이 단계에 사용된 도구:
    FixMat
    $36.95
    구매
    • Remove the rear panel screws.

    • Throughout this guide, keep track of each screw and reinstall it exactly where it came from.

  12. Whirlpool Dryer Idler Pulley Replacement: 12 단계, 이미지 1/2 Whirlpool Dryer Idler Pulley Replacement: 12 단계, 이미지 2/2
    • Remove the screw holding the main board bracket to the chassis.

    • Remove the screws from the top rear of the machine.

  13. Whirlpool Dryer Idler Pulley Replacement, Remove the rear panel: 13 단계, 이미지 1/3 Whirlpool Dryer Idler Pulley Replacement, Remove the rear panel: 13 단계, 이미지 2/3 Whirlpool Dryer Idler Pulley Replacement, Remove the rear panel: 13 단계, 이미지 3/3
    • Put on gloves before continuing, as the rear panel is sharp.

    • Lift the panel about 1/2 inch and tilt it to the rear to release it from the vent pipe.

    • Slide the panel off the vent pipe and remove it.

  14. Whirlpool Dryer Idler Pulley Replacement, Reassembly information: 14 단계, 이미지 1/2 Whirlpool Dryer Idler Pulley Replacement, Reassembly information: 14 단계, 이미지 2/2
    • During reassembly, perform the following:

    • Make sure that the vent pipe is fitted into the collar on the panel.

    • Make sure the tabs at the bottom are aligned to the bottom rim of the chassis.

    • Position the panel so its screw holes match with the chassis.

  15. Whirlpool Dryer Idler Pulley Replacement, Unfasten the idler arm: 15 단계, 이미지 1/1
    • Remove the bolt securing the idler arm to the motor frame.

  16. Whirlpool Dryer Idler Pulley Replacement, Remove the idler arm: 16 단계, 이미지 1/3 Whirlpool Dryer Idler Pulley Replacement, Remove the idler arm: 16 단계, 이미지 2/3 Whirlpool Dryer Idler Pulley Replacement, Remove the idler arm: 16 단계, 이미지 3/3
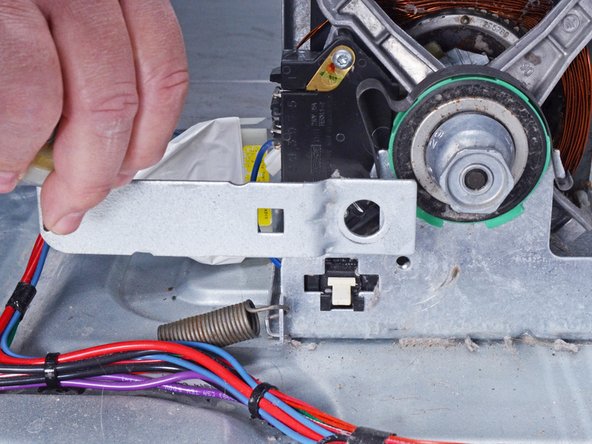
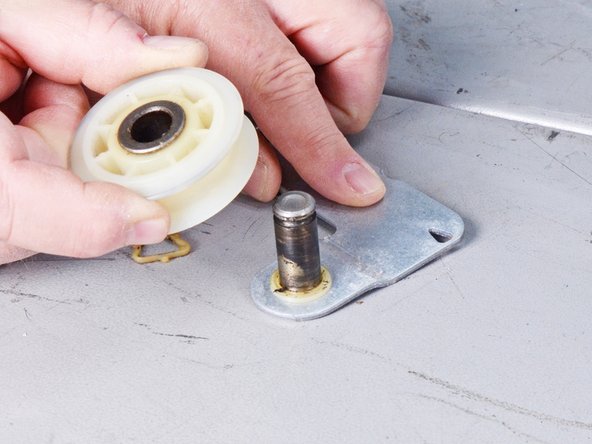
    • Move the idler arm toward the side of the dryer to unhook the idler arm tension spring from the arm.

    • Remove the idler arm.

    • During reassembly, be sure to reattach the spring before securing the arm.

  17. Whirlpool Dryer Idler Pulley Replacement, Remove the retaining clip: 17 단계, 이미지 1/3 Whirlpool Dryer Idler Pulley Replacement, Remove the retaining clip: 17 단계, 이미지 2/3 Whirlpool Dryer Idler Pulley Replacement, Remove the retaining clip: 17 단계, 이미지 3/3
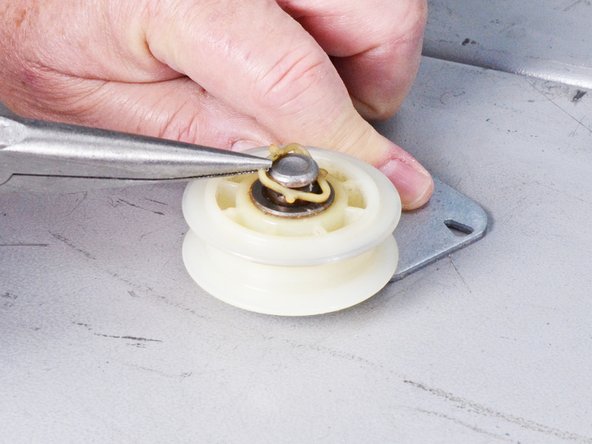
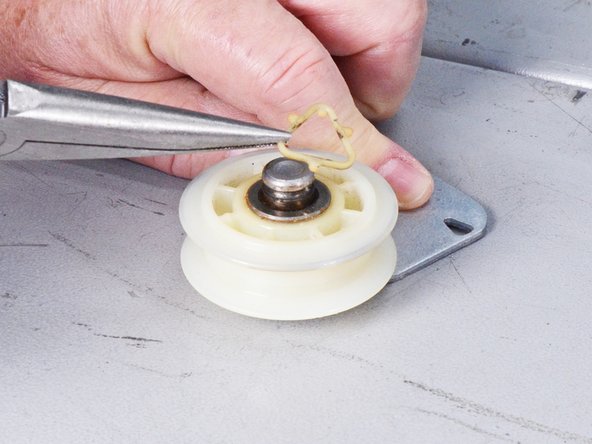
    • Use long nose pliers to remove the plastic retaining clip from the groove in the idler pulley shaft.

  18. Whirlpool Dryer Idler Pulley Replacement, Remove the idler pulley: 18 단계, 이미지 1/3 Whirlpool Dryer Idler Pulley Replacement, Remove the idler pulley: 18 단계, 이미지 2/3 Whirlpool Dryer Idler Pulley Replacement, Remove the idler pulley: 18 단계, 이미지 3/3
    • Lift the idler pulley straight off its shaft and remove it.

결론

To reassemble your device, follow these instructions in reverse order.

Repair didn’t go as planned? Ask our Answers community for help.

Bill Gilbert

회원 가입일: 06/30/22

30,138 평판

안내서 213개 작성하였습니다

iFixit iFixit 회원

Staff

136 회원들

안내서 17,439개 작성하였습니다

댓글 3개

Thank you for the very detailed instructions! I can’t get the back off of my WED6120HC0 and I don’t want to damage it by pulling it. It feels as though it’s still fastened though I don’t see anything further to remove. Any help would greatly appreciated!

Ken - 답글

Hi Ken! Where does it feel like is is still fastened? There is a sleeve on the back panel that goes around the exhaust duct that could be binding a bit. Does it feel like it is fastened near the bottom? Remember that you have to lift up slightly.Look at step 13 of the guide and Step 14 as well to see how you have to reassemble it. It can feel a little stuck. Make sure you got every single fastener.

Bill Gilbert -

(Edit) The Service Manual I found does not give instructions for removing the rear panel if you are doing the idler pulley. So, I imagine it is similar to what I have shown. They do say to remove the rear panel for the water inlet valve, so it must be removable.

Bill Gilbert -

댓글 쓰기

조회 통계:

24 시간 전: 2

7일 전: 32

30일 전: 118

전체 시간: 657