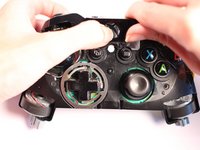
주요 콘텐츠로 건너뛰기

Xbox One Wireless Controller Model 1537 (Left) Bumper Replacement

필요한 것

  1. Xbox One Wireless Controller Model 1537 (Left) Bumper Replacement, Bumper: 1 단계, 이미지 1/1
    • Remove the battery cover.

    • Remove batteries.

  2. Xbox One Wireless Controller Model 1537 (Left) Bumper Replacement: 2 단계, 이미지 1/3 Xbox One Wireless Controller Model 1537 (Left) Bumper Replacement: 2 단계, 이미지 2/3 Xbox One Wireless Controller Model 1537 (Left) Bumper Replacement: 2 단계, 이미지 3/3
    • Grip the controller firmly to remove the side handle cover.

    • Use a flathead screwdriver or a spudger to wedge between the seams of the front to the side handle of the controller.

    • Move the flathead screwdriver all the way around the side plates seam and push the plate forward.

  3. Xbox One Wireless Controller Model 1537 (Left) Bumper Replacement: 3 단계, 이미지 1/2 Xbox One Wireless Controller Model 1537 (Left) Bumper Replacement: 3 단계, 이미지 2/2
    • Use a screwdriver and punch a hole directly in the center label. There you will find a hidden screw.

    • Remove the five 10mm screws located on the back of the controller using a T8 screwdriver.

  4. Xbox One Wireless Controller Model 1537 (Left) Bumper Replacement: 4 단계, 이미지 1/2 Xbox One Wireless Controller Model 1537 (Left) Bumper Replacement: 4 단계, 이미지 2/2
    • Remove the backplate.

  5. Xbox One Wireless Controller Model 1537 (Left) Bumper Replacement: 5 단계, 이미지 1/2 Xbox One Wireless Controller Model 1537 (Left) Bumper Replacement: 5 단계, 이미지 2/2
    • Remove the faceplate.

  6. Xbox One Wireless Controller Model 1537 (Left) Bumper Replacement: 6 단계, 이미지 1/3 Xbox One Wireless Controller Model 1537 (Left) Bumper Replacement: 6 단계, 이미지 2/3 Xbox One Wireless Controller Model 1537 (Left) Bumper Replacement: 6 단계, 이미지 3/3
    • Remove the cover piece surrounding the Xbox button off of its pegs.

    • Firmly hold controller and push cover piece up from the pegs.

    • Press the Xbox button down to assist in the unclipping of the piece.

  7. Xbox One Wireless Controller Model 1537 (Left) Bumper Replacement: 7 단계, 이미지 1/2 Xbox One Wireless Controller Model 1537 (Left) Bumper Replacement: 7 단계, 이미지 2/2
    • Remove the broken bumper by unclipping it from its pegs.

    • Hold the controller firmly and push the bumper piece up from its pegs to unclip.

  8. Xbox One Wireless Controller Model 1537 (Left) Bumper Replacement: 8 단계, 이미지 1/3 Xbox One Wireless Controller Model 1537 (Left) Bumper Replacement: 8 단계, 이미지 2/3 Xbox One Wireless Controller Model 1537 (Left) Bumper Replacement: 8 단계, 이미지 3/3
    • Align the replacement bumper onto the pegs, push gently and click into place.

결론

To reassemble your device, follow these instructions in reverse order.

다른 19명이 해당 안내서를 완성하였습니다.

Cristyne Ramirez

회원 가입일: 01/24/18

571 평판

안내서 1개 작성함

USF Sarasota-Manatee, Team S1-G1, Stewart Spring 2018 USF Sarasota-Manatee, Team S1-G1, Stewart Spring 2018 회원

USFSM-STEWART-S18S1G1

15 회원들

안내서 25개 작성하였습니다

댓글 2개

On my controller the screws were T8 security type, so you'll need bits with a hole in the middle

Sean H - 답글

Is there a way to do this without removing all of the front and grip.

Alan Marantos - 답글

댓글 쓰기

조회 통계:

24 시간 전: 18

7일 전: 126

30일 전: 643

전체 시간: 47,184