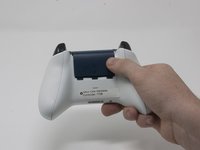
주요 콘텐츠로 건너뛰기

Xbox One Wireless Controller Model 1708 3.5 mm Audio Port Replacement

필요한 것

  1. Xbox One Wireless Controller Model 1708 3.5 mm Audio Port Replacement, Cover Plate: 1 단계, 이미지 1/2 Xbox One Wireless Controller Model 1708 3.5 mm Audio Port Replacement, Cover Plate: 1 단계, 이미지 2/2
    • Slide the battery cover toward the top of the controller to remove it.

    • Lift up the batteries or the battery pack from the battery compartment.

  2. Xbox One Wireless Controller Model 1708 3.5 mm Audio Port Replacement: 2 단계, 이미지 1/2 Xbox One Wireless Controller Model 1708 3.5 mm Audio Port Replacement: 2 단계, 이미지 2/2
    • Insert a plastic opening tool into the top seam, and gently work the opening tool to the bottom of the controller.

    • Continue using the opening tool to gently pry the side plate off of the controller.

    • Repeat this process for the second side plate.

  3. Xbox One Wireless Controller Model 1708 3.5 mm Audio Port Replacement: 3 단계, 이미지 1/1
    • Gently peel the battery label or punch a hole in the center of the sticker in the battery compartment to reveal the hidden screw.

    • Remove the five 9mm torx-9 security screws from the back of the controller.

  4. Xbox One Wireless Controller Model 1708 3.5 mm Audio Port Replacement, Tape Shock Motors in place: 4 단계, 이미지 1/3 Xbox One Wireless Controller Model 1708 3.5 mm Audio Port Replacement, Tape Shock Motors in place: 4 단계, 이미지 2/3 Xbox One Wireless Controller Model 1708 3.5 mm Audio Port Replacement, Tape Shock Motors in place: 4 단계, 이미지 3/3
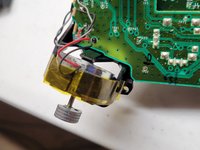
    • Tape the Rumbler/shock motors in place.

    • This will prevent the motors from falling out.

  5. Xbox One Wireless Controller Model 1708 3.5 mm Audio Port Replacement: 5 단계, 이미지 1/2 Xbox One Wireless Controller Model 1708 3.5 mm Audio Port Replacement: 5 단계, 이미지 2/2
    • Orient the controller so the front plate is facing up.

    • Lift the front cover off of the controller.

  6. Xbox One Wireless Controller Model 1708 3.5 mm Audio Port Replacement: 6 단계, 이미지 1/1
    • Turn the controller face down and gently lift the rear plate.

    • Be careful with the rumble motors, as they tend to fall out, risking damage to the motherboard.

  7. Xbox One Wireless Controller Model 1708 3.5 mm Audio Port Replacement, Directional Pad: 7 단계, 이미지 1/1
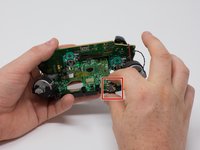
    • Turn the device over and remove the directional pad by gently pulling it away from the controller.

  8. Xbox One Wireless Controller Model 1708 3.5 mm Audio Port Replacement, Joystick Caps: 8 단계, 이미지 1/1
    • Pull the joysticks off of the controller.

  9. Xbox One Wireless Controller Model 1708 3.5 mm Audio Port Replacement, Top Motherboard: 9 단계, 이미지 1/1
    • If the rumble motors fall out of frame, the wires may disconnect from the motherboard . The wires will have to be soldered to reattach the motor.

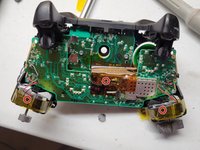
    • Turn the device over and remove the two 7mm torx-6 screws in the bottom left and right corners.

  10. Xbox One Wireless Controller Model 1708 3.5 mm Audio Port Replacement, De-soldering required: 10 단계, 이미지 1/3 Xbox One Wireless Controller Model 1708 3.5 mm Audio Port Replacement, De-soldering required: 10 단계, 이미지 2/3 Xbox One Wireless Controller Model 1708 3.5 mm Audio Port Replacement, De-soldering required: 10 단계, 이미지 3/3
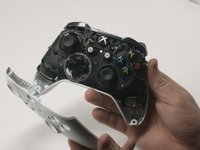
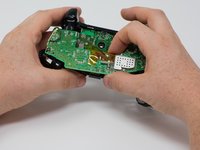
    • Firmly grasp the top and bottom motherboards in opposite hands, then gently pull them apart.

    • The top motherboard is still connected to the bottom motherboard. To fully separate the top motherboard, you will need to use a soldering iron.

    • Warning: Do not attempt to disconnect the shielded (gold colored) connector as it is extremely fragile you will break it. It runs between the two boards.

    • De-solder the shielded cable from the lower board instead of attempting to disconnect the connector. De-solder using micro soldering techniquest.

  11. Xbox One Wireless Controller Model 1708 3.5 mm Audio Port Replacement, 3.5 mm Audio Port: 11 단계, 이미지 1/2 Xbox One Wireless Controller Model 1708 3.5 mm Audio Port Replacement, 3.5 mm Audio Port: 11 단계, 이미지 2/2
    • Remove the audio port from the bottom mother board.

결론

To reassemble your device, follow these instructions in reverse order.

다른 24명이 해당 안내서를 완성하였습니다.

Dylan Gross

회원 가입일: 09/25/17

4,692 평판

안내서 4개 작성하였습니다

Cal Poly, Team S18-G3, Forte Fall 2017 Cal Poly, Team S18-G3, Forte Fall 2017 회원

CPSU-FORTE-F17S18G3

4 회원들

안내서 32개 작성하였습니다

댓글 6개

Where do I get a replacement audio port?

cory steers - 답글

Hey Cory,

Sorry, didn’t realize that the part wouldn’t get listed for the guide. I looked around a bit and I would say that it seems the best place to pick these up is ebay.

I found one on there from a reputable seller for $3:

https://www.ebay.com/itm/Repair-Part-3-5...

The seller seems to sell a good amount of these.

Hope that helps!

Dylan Gross -

Anyone know the pin out for this part? I want to just hard wire in a female 3.5mm jack - the way they built this controller is just bad design.

emb - 답글

u can get these on Amazon. i ordered a 3-pack of replacement audio jacks that came with the two security screw drivers and a pry tool. $12 free shipping.

Kaladin - 답글

I removed the 3.5mm jack, cleaned the contacts with a fibre glass contact cleaning brush, and then cleaned both the audio connector and the gold plated PCB pads with IPA, reassembled, and everything worked perfectly. Thanks for the guide, it’s boarder line perfect ;-)

Paul Hough - 답글

댓글 쓰기

조회 통계:

24 시간 전: 8

7일 전: 44

30일 전: 199

전체 시간: 19,967