주요 콘텐츠로 건너뛰기

Xelio P1001A-BK Speakers Replacement

필요한 것

  1. Xelio P1001A-BK Speakers Replacement, Back Cover: 1 단계, 이미지 1/2 Xelio P1001A-BK Speakers Replacement, Back Cover: 1 단계, 이미지 2/2
    • Remove the two 3 mm retaining screws from the side of the tablet with a Phillips #0 screwdriver.

  2. Xelio P1001A-BK Speakers Replacement: 2 단계, 이미지 1/2 Xelio P1001A-BK Speakers Replacement: 2 단계, 이미지 2/2
    • Insert the plastic opening tool in between the shelf halves and lift the top shelf half to detach the securing tabs.

    • There are four securing tabs located on each long side.

    • Before fully separating the shell halves, observe if the speakers are separated from the shell half. If they are still in their sockets, gently pry them loose with the plastic opening tool.

  3. Xelio P1001A-BK Speakers Replacement, Speakers: 3 단계, 이미지 1/2 Xelio P1001A-BK Speakers Replacement, Speakers: 3 단계, 이미지 2/2
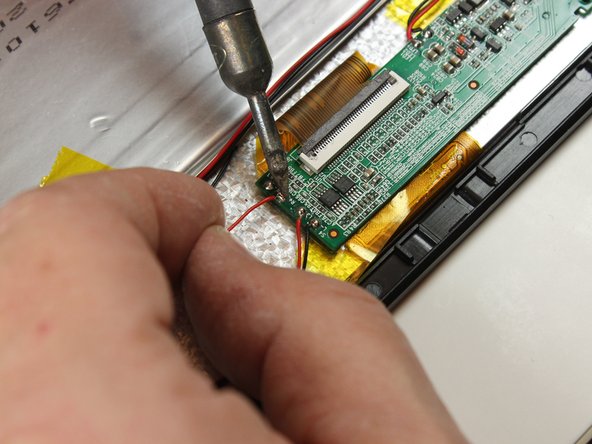
    • Desolder the two speaker wires with the soldering iron by melting the solder so the wires can be removed.

    • Remove the wires from the soldering points once they have loosened.

    • Use a soldering vacuum to remove the excess solder from the board.

  4. Xelio P1001A-BK Speakers Replacement: 4 단계, 이미지 1/1
    • Inspect your wires. You should see 2 mm of exposed wire before you move to the next step.

    • If necessary, use your wire-stripping tool to strip 2 mm of insulation from each wire.

  5. Xelio P1001A-BK Speakers Replacement: 5 단계, 이미지 1/1
    • Place the exposed wire in the soldering point.

    • Apply the soldering iron to the point just until the wire is secured.

    • Repeat these two steps for the second wire.

결론

To reassemble your device, follow these instructions in reverse order.

Josh Saenz

회원 가입일: 03/11/15

316 평판

안내서 3개 작성하였습니다

Colorado Springs, Team 4-2, Panko Spring 2015 Colorado Springs, Team 4-2, Panko Spring 2015 회원

UCCS-PANKO-S15S4G2

3 회원들

안내서 12개 작성하였습니다

댓글 0개

댓글 쓰기

조회 통계:

24 시간 전: 1

7일 전: 4

30일 전: 4

전체 시간: 137